Sunday, May 19, 2019

U Rock!

Hi!

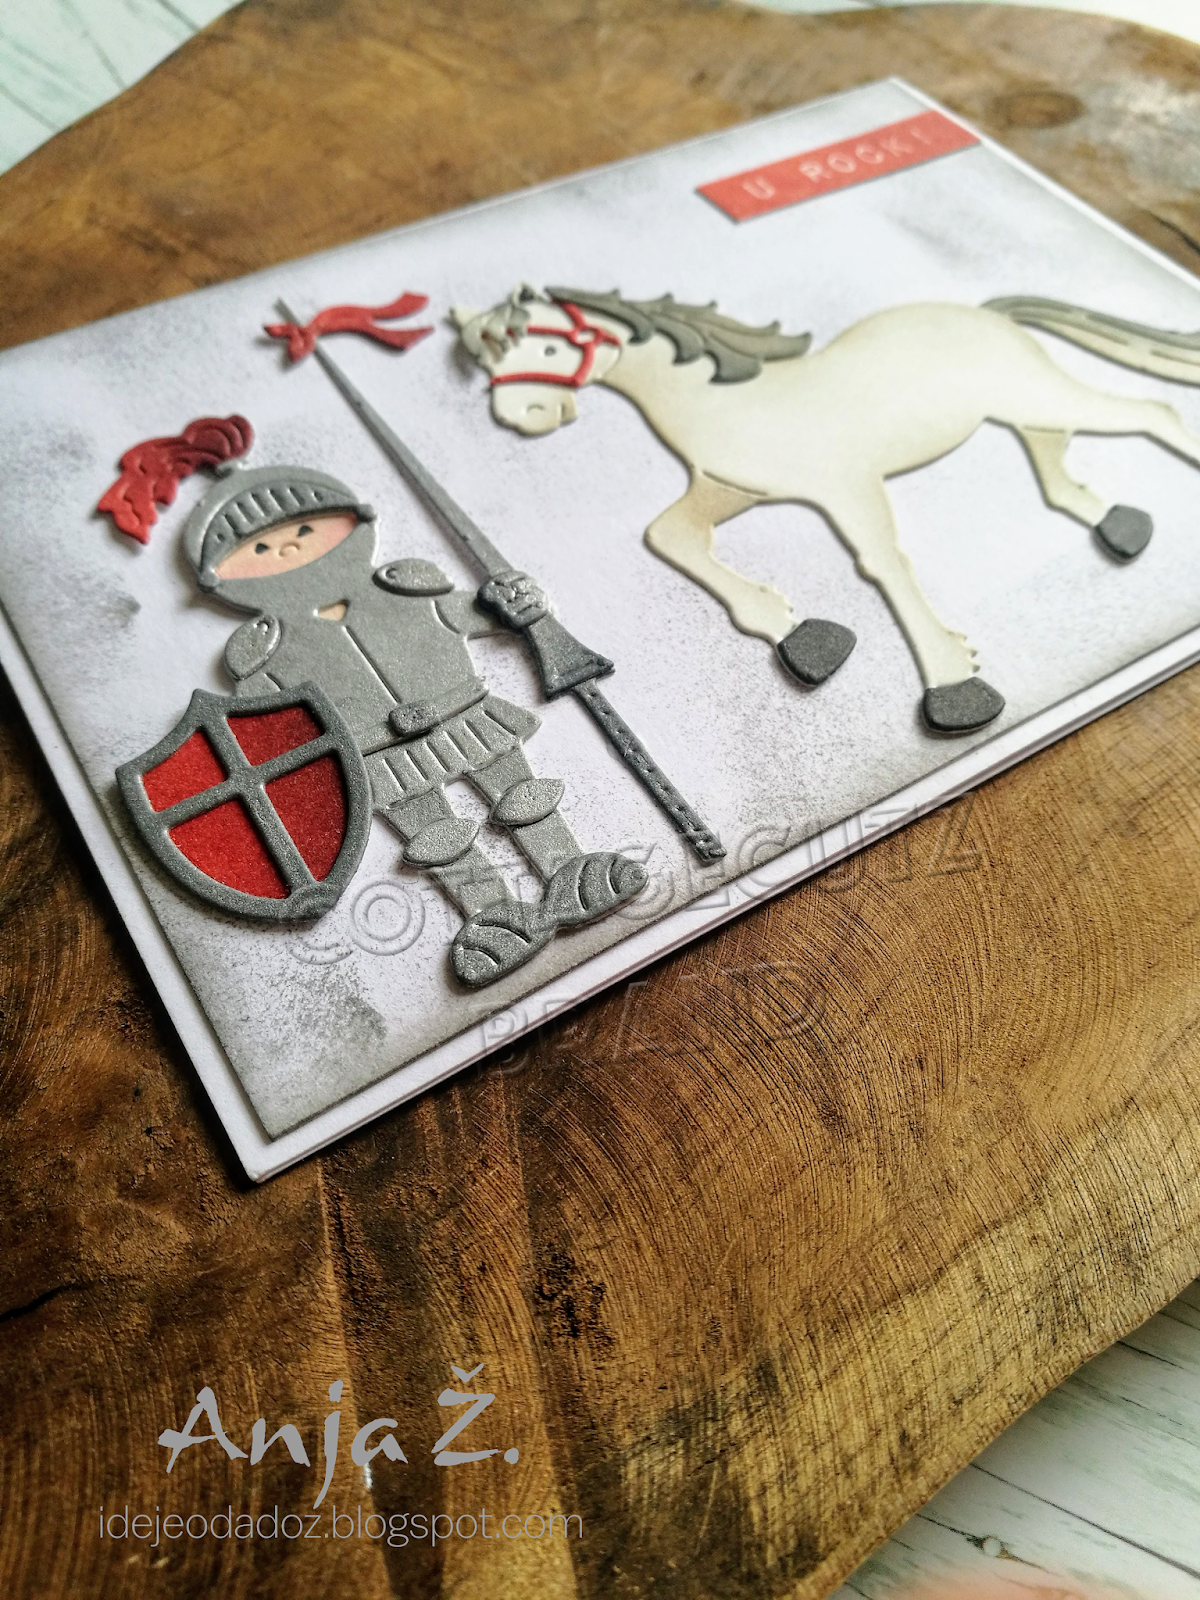
It's Anja here. I have a simple card for you today. I combined two dies from Magical Fantasy release and made a cute card.


For this card I used:
- Cottage Cutz dies (Knight, Royal Horse),
- Distress Inks (Pumice Stone, Black Soot, Fired Brick, Tattered Rose, Worn Lipstick, Hickory Smoke) and Oxides (Fired Brick),
- white card base (10,5x15 cm),
- white card stock for die cuts and background (10x14,5 cm),
- silver pigment ink,
- black pen,
- white pen,
- sentiment stamp,
- acrylic block,
- sponge,
- paper glue.

First I cut and colored the knight.


Then the horse.

Next I stamped the sentiment. I cut around it.


I used white card stock for the background. I used a sponge as a stamp and stamped "bricks" over the paper. I colored also around the edges.


And when I had everything cut and colored, I glued all the pieces onto the card. And my card was done.


That's all from me for today.

Have a nice Sunday.
Anja Z.


Cottage Cutz dies I used:


Saturday, May 18, 2019

Princess Cake


Happy Saturday!

It is Pam sharing with you on the blog today.  Mary and I just switched places for the week.  So her post will be on Thursday.

I have another birthday card for you today.  I am using one of the dies from our new whimsical release called Princess Cake!

Designer Steps:

 1.  Cut out all of the pieces in white card stock using the Princess Cake die
 2.  Use your favorite makers to color the cake pieces.  I used my Copic Markers

 3.  Assemble the card
 4.  Cut out the oval shape using white card stock and the Nested Stitched Eyelet Oval die.  Pop the cake to the oval
 5.  Using silver glitter card stock and the Princess Cake die cut out the crown and the little circle embellishment.  Glue them to the card as shown
6.  Cut out the Happy Birthday using pink and purple DP and the Happy Birthday die
7.  You can cut out the large scallop easel card using your Circuit or a large 5 inch scallop die.  I used 2 different types of coordinating DP for the background both inside and out.


CottageCutz Products


We appreciate you stopping by!  Make sure to take some time out of your day to get crafty!
Blessings
Pam

Friday, May 17, 2019

Poppin Up!

Happy Friday!  It's Jeanne today with an all-occasion card.  This die set just said "FUN!" to me and when I saw this stamp set in my stash I immediately knew what I wanted to do!
I started by cutting the pieces from the Spring Potted Bunnies and Spring Teacup Bouquet in white card stock.  I used a blending tool and Distress Oxide inks to color them.
For the green of the stems I did use a regular dye ink in Garden Green.  I assembled my flower pots using a silicone mat.  I often to this when gluing pieces since I can  let them dry and not worry about them sticking to my table or paper.
For the background I used two stencils.  One is a dot stencil and the other I created using a circle die.  I used the Stitched Circles, but any of the plain circle dies will work.  This allows me to stencil just a portion of the background.  I make sure to use Washi tape to secure everything to my mat so the stencils and background panel don't move.
I then stamped my sentiment, arranged my background pots and added some Washi tape to the side.
I decided to include a few upset flowers from the pot that the bunny decided to invade!
The bunny in his pot is popped up using foam dots and I added a few glitter enamel dots to the flower centers.

Dies used:
http://www.scrappingcottage.com/cottagecutzspringpottedbunnies.aspx
http://www.scrappingcottage.com/cottagecutzspringteacupbouquet.aspx
http://www.scrappingcottage.com/cottagecutzstitchedcirclesetbasics.aspx

Thanks for stopping by today.  I hope you have a fun and creative weekend!


Thursday, May 16, 2019

Rainbow Birthday!

Good Morning Crafty Friends!

I am continuing to work on my summer birthday cards.  Most of the birthdays fall in June and July so I am trying to stay on top of the special occasions! Today I am using the little rainbow in a shaker card.

Designer Steps:

 1.  Using the Rainbow with Clouds die cut it out on white card stock
 2.  Use your favorite markers and color the rainbow.  I used Copic markers
 3.  Use ink to shade the clouds with blue
 4.  Cut 2 Scallop Stitched Squares in white cards stock.  I used the third from the largest square.  After I cut out Scalloped Square I cut the centers square.  I used the 4th from the largest Double Stitched Square to do that
 5.  Glue clear plastic between the two frame and then glue the rainbow and clouds to the frame
 6.  Add the rhinestones behind the clear window and then pop it up to the card
7.  Using the happy phrase die cut 2 of them out of white card stock and glue together before gluing it to the card.  Stamp the word Birthday in black on white card stock. Then cut out and glue to the card as shown

CottageCutz Products


Thanks so much for stopping by I really appreciate it!
Blessings
Pam

Wednesday, May 15, 2019

Birthday Wishes

Hello!  This is Sukie and today I have a happy and bright card to share which is perfect for a Spring or Summer Birthday.
I found the patterned scrap of pink, white and black paper in my stash which coordinated perfectly with the solid colors.
I used each of the solid card stock sheets and cut out all of the Stitched Flowers knowing I would have enough for 2 cards.  I also cut out a couple of leaves from the same set and a banner from the Retro Tag Toppers.
I put 5 of the flowers together layering the different colors.  I added some foam dots to the back of each of the flowers for added dimension.
Once I created my card base, I anchored 3 of the flowers to fill up the center of my card base.
Next, I placed the remaining flowers clustering them together.  The leaves were trimmed and tucked in amongst the flowers.  I also added 3 of the flower centers as extra embellishments.
The finishing touch was a heat embossed sentiment from the Pink & Main Hello Sweet stamp set.  I curved the sentiment along the banner so it fit perfectly.
Here are the dies I used on my card, available in the shop: