Thursday, March 14, 2019

Easter Wishes!

Good Morning Friends!

It is Pam creating with you on the blog today!

The weather here in South Carolina has been just beautiful! Not to hot and not to cold! I love to walk in this kind of weather.  The only bad part is the biting bugs are starting to appear.  And the mosquitoes love me! They even get me through my clothes! Oh well on to the card for today.  I have a bunch more Easter cards to make so let's get started on this one.  I used a couple of dies from the new Spring Release.

Design Steps:
 1.  Use an A2 purple card base, cut a piece of white card stock 3 x 5 1/4, use the Fancy Floral Lace Border die and cut it out of white card stock
 2.  Glue the border to the white piece of card stock as shown above
 3.  Glue the white card stock with the border die to the purple card front
 4.  Use purple card stock and cut out the Easter wishes using the Bunny Kisses & Easter Wishes die
 5.  Use the Peeking Egg Bunny die and cut out all of the pieces several times using green, purple, blue, pink, yellow and gray card stock
 6.  Shade the different pieces and color the nose and eyes black using a maker.  Then start to assemble all the pieces
 7.  Pop dot the bunny to the left side of the card and glue the Easter Wishes to the right side of the card as shown above.  I decided to add some small black rhinestones to the eyes for some dimension

CottageCutz Products


As always I really appreciate you stopping by today to take a peek! Take some time for yourself to play and get crafty!

Blessings
Pam


Wednesday, March 13, 2019

Happy St. Patrick's Day

Hello!  This is Sukie and today I'm sharing a card for my guest designer post.  My card was created with dies from the Valentine's release featuring the darling scottie!
I cut out the oversized sentiment in two different shades of green from the St. Patrick's Day Phrases & More die set.  The sentiments were adhered together and offset slightly.  The two colors give the sentiment some depth and dimension.
I also pieced together the Shamrock & Valentine Scottie and the hat from the St. Patrick's Day Cupcake die.  The hat on the scottie was bit oversized for my card so I cut out a tiny bow from the Lovebug Bee & Ladybug die set instead.
Once I selected the colors for my A2 card base, I used a circle from the Stitched Circle Set to create a window.  A smaller circle was also die cut.
The layers were adhered on my card base.  Next, I  placed the die cut circle inside of the window ensuring it was centered.
The sentiment was added to my card at an angle for a whimsical look and anchored with the hat.
Here are all of the dies I used on my card available in the shop:

Tuesday, March 12, 2019

Sincere thanks

Hi, Janja is here with you.
On the card that I share with you today, I used another die from Valentine's release. I replaced hearts with a bunch of flowers.


- CottageCutz dies: Swinging Monkey, Hedgehogs In Love (flowers), Spring Greenery, Circle Set
- white card base: 4.25" x 5.5" (10,8 x 14 cm), folded
- patterned paper: 3.75" x 5" (9,5 x 12,7 cm)
- brown card stock: 3.95" x 5.2 (10 x 13,2 cm)
- colored card stock
- colored ink pads
- double-sided adhesive tape, self-adhesive foam tape, glue

Cut out monkey and flowers. Emphasize cut outs with colored pads. Glue all the pieces together.


Make a card base from white a card stock. Trim selected patterned papers and cut the frame from the brown card stock.
Cut the round aperture in the middle, which is slightly larger than the inner edge of the frame.
Also cut out branch and greenery.


Stamp a sentiment and trim it with scissors.


First, attach the frame to the back of patterned paper. Attach branch and greenery and all adhere over the smaller patterned paper and brown card stock.


Fasten the monkey and banner on the background with a self-adhesive foam tape.


Have a nice day.
Janja


Sunday, March 10, 2019

Easter Cross


Hi!

It's Anja here. Today I made a card that can be used as an Easter card. I have this cross die for quite some time and I've been waiting to use it. So today I decorated it with spray colors and some spring flowers.


For this card I used:
- Cottage Cutz dies (Ornate Cross, Hedgehogs in Love, Iron Stand w/ Plants, Fresh Spring Floral),
- color sprays (green, pink, gold, orange),
- white card base (15x15 cm),
- watercolor paper for background (14x14 cm),
- white card stock for die cuts,
-  white foam sheet,
- paper embossing tools and surface,
- Nuvo Crystal Drops (pink, yellow),
- paper distresser,
- heat gun,
- paper glue.

First I cut the paper for background and the cross. I colored it all t once by spraying both with gold color.


Next I added green and a few drops of pink. I used heat gun to dry it.


Then I sprayed paper with green and orange. Dried the paper and then cut the flowers and the greenery.
 

I did colored another piece of paper using pink.


I used embossing tools to add some dimension to the flowers and leaves.


Next I cut another cross, this time using foam.


I used paper distresser for the edges of the background and card base.


When I had everything clued on the base I added Crystal Drops to the flowers. And my card was finished.


That's all from me for today. I wish you all a nice Sunday.

Anja Z.


Cottage Cutz dies I used:


Saturday, March 09, 2019

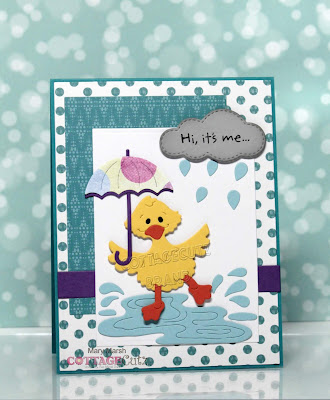
Rainy Day Duck (new die)

Hello Scrapping Cottage friends! Thanks for taking the time to stop and visit with us today. It's Mary Marsh here bringing you the Saturday edition of the Blog.

We have a new release of 36 Spring dies in the online store. There are a variety of designs so perfect for Easter or Spring cardmaking. Take a look in the store you definitely won't be disappointed.

For my card today I am using the new Rainy Day Duck die. This little ducky has such detail right down to the water puddle and splashes of water coming off the puddle. It would be so perfect for a get well card, a thinking of you, a thank you and even a birthday card. So let's get started with some details on how I created my card. 

Step 1: Having a layout in mind at the card start is always a big boost for me. That way I can just choose the card colors and designer paper and I am good to go. I liked this week's sketch #739 on Splitcoaststampers because there are lots of layers and the image panel is big enough to show off the sweet little ducky. 
I looked through my designer papers to get one that would coordinate with the whimsical die cut image I was using. Well that took much longer than I anticipated (lol)!! I selected 4 papers before I settled on the one I am using on this card. Dotted paper always works for me. 
Teal card base: 4 1/4" x 5 1/2"
Teal dotted designer paper: 4 1/8" x 5 3/8"
Teal diamond paper (Layer 3 on the sketch): I used the largest die of the Rectangle set
White image Layer: Again I used the largest die of the Rectangle set
Next I cut the duck image. I used a daffodil cardstock for the body and a tangerine cardstock for the beak and legs. I selected another patterned paper for her umbrella and a coordinating cardstock for the handle. I cut the umbrella twice to give a little contrasting edge.


I love how the water puddle has splashes of water coming out to give the appearance of movement. CottageCutz dies are so detailed. I used the puddle of water as element 6 of the sketch. 

For the rain cloud and raindrops I used the Stitched Sun, Clouds and Umbrella die. I used dimensional adhesive on the rain cloud. The umbrella I used on my card is part of the Rainy Day Duck die. 

After I attached the cloud, I thought of adding a sentiment on the cloud. So I carefully removed it and stamped my sentiment. I decided to make this a thinking of you card. My cards are always a work in progress so sometimes I have to backtrack in the creating process (lol)!!! 
Step 2: Now that all the card elements are cut, I am ready to start assembly. Attached the background designer paper and the designer paper that is element 3 of the sketch with double sided tape. This is my favorite adhesive. 
For Element 4 of this sketch I decided to use purple cardstock. I cut it 1/2" x 4 1/8". 
 To complete my card I added the image panel and it was done. I hope I have given you some inspiration on a way to use this die. I made another card with these same dies and sketch but the card colors and paper are different. You can see that one here
That's it for me for this week see you next Saturday. 
dies I used to create card: