Friday, September 14, 2018

Hello Snowmen!

Happy Friday Cottage Cutz fans!  It's Jeanne today posting a quick, cute card using dies from the new Christmas Part 2 release.  These dies are on sale for a limited time on the website.
These little guys are so cute and are super easy to put together making this a great card for multiples.
I cut everything in white card stock and used Copic markers to color.
Because of the large greeting I opted to not use the birds.  I cut the greeting from gold foil that I had backed with a self adhesive sheet.

Next I took a panel 5 1/2 x 4 1/4 inches and used Distress Oxide inks and a blending tool to create a sky.  After this was finished, I trimmed it to 5 3/8 x 4 1/8 inches.
I used a wood-look background stamp to stamp the fence then I trimmed off the top and used paper snips to cut notches to mimic the planks of a fence.
I trimmed the fence to 5 3/8 x 1 1/2 inches tall and adhered it to the background leaving the top portion unglued so I could slip the snowmen underneath.
When everyone was added, I adhered the greeting and then mounted it all to a red A2 card base.
Very easy and fun to make!

Dies Used:
http://www.scrappingcottage.com/cottagecutzpeekersnowmen.aspx
http://www.scrappingcottage.com/cottagecutzseasonsgreetingphraseelites.aspx
Thanks for stopping by today.  Don't forget to check out the savings on the website!  It's only for a limited time.

I hope you have a fun and creative weekend!


Thursday, September 13, 2018

Santa's Visit!

Hello Scrapping Cottage Fans!

It is Pam from Stamper at Heart Blog sharing with you today!  I am so happy that you have stopped by to visit!  Our Design Team is showing cards from the Christmas part 2 release.  And guess what for a short time they are on sale for 25% off!!  And Christmas part 1 is also still on sale so don't miss out!

Here is my card for today!  I am in love with the Christmas Village 1 and 2!
Designer Steps:

 1.  Cut a piece of white card stock 4 1/2 x 3 3/4 and sponge in the sky using TH distressed inks
 2.  Stamp the Santa Sleigh on to the sky

 3.  Next cut two pieces glitter paper to make the snowbanks. Glue them together and then glue them just below the sky
 3.  Use the Christmas Village 1 and 2 to cut out the buildings making sure you save all the pieces because I left a few in place

 4.  Glue yellow card stock behind the houses to give them a glow
 5.  Mount the scene to a slightly bigger piece of blue card stock

 6.  I decided that I needed a moon so I punched a 1 1/8 inch hole into a post it note and used it as a mask.  Then I sponged it with yellow ink
7.  Mount the panel to the front of the card using dimension tape and add glitter! Your card is complete
CottageCutz Products


I am so excited that you took the time to stop by!  Please make sure you take some time to use your creative juices!!
Blessings
Pam


Wednesday, September 12, 2018

September Group Post (Part 1)

Hello Scrapping Cottage friends! Thanks for taking the time to stop and visit today. We are sampling DT cards from Part 2 of the 2018 Christmas release. There are 29 new designs in this new release.  And, it is currently 25% off for a limited time. Part 1 of Christmas 2018 is also on sale. See those designs here.

Group Posts give you the opportunity to see more card samples from the Design Team. So we are continuing that again for this release. We have 3 samples for your viewing pleasure today.

Card 1: Our first sample is from Lois Bak. She used the Poinsetta w/Flourish die to create this festive card. Poinsettias are such a delight to display at the holidays, and they always look so beautiful on a Christmas card. The background for her bold poinsettia is some Christmas music paper that just adds the perfect touch. If you are looking for a design to do multiples of, this would be a good one.
Card 2: Our next sample is from Pam MacKay. She used the Christmas Village 1 die to create this beautiful woodland scene. A Christmas card with a church in the woods always has such a serene appeal. She sponged her background with distress ink for just a touch of color and also used a stencil and embossing paste for her snow. Notice how she used some pale yellow cardstock to give the look of soft lighting in the church. This is another card that would be easy to recreate for your own Christmas cards.
Card 3: The 3rd and final sample for today is another card from Lois Bak. On this card, she created such a cute indoor scene using the new Cozy Fireplace Pets die.  How comfy the dog and cats look sleeping in front of the fire, waiting for Santa's arrival. Designer paper was used to create the look of a wood floor and wallpaper. She stamped her merry Christmas sentiment. This would be a great card for the dog and cat owners on your Christmas card list.
Well that's it for our cards for today. I hope the samples have sparked some ideas for ways to use these new dies. And, remember they are currently 25% off in the online store. 
 
dies used to create cards:
http://www.scrappingcottage.com/cottagecutzpoinsettiawflourish.aspx
 
http://www.scrappingcottage.com/cottagecutzchristmasvillage1elites.aspx
http://www.scrappingcottage.com/cottagecutzcozyfireplacepets.aspx


Monday, September 10, 2018

We Three Kings

Hi, Lois here for my Monday post.   I like to make Christmas cards all year long -- even when it's 90 degrees + outside.  And CottageCutz has made it very convenient.  Their Christmas release (parts 1 and 2) are both currently on sale in the store at 25% off.

One of my favorite Christmas carols is We Three Kings.  That's what inspired my card for today.


I found a website that provided free printable Christmas carol lyrics.   I printed the song sheet for We Three Kings that I wanted to use for the background of my card.


It printed out at 3 1/4" x 5 1/8"; so when I cut my cardstock, I cut the black piece 3 1/2" x 5 3/8" to give just a little frame around the song sheet.  The white base is 5 1/2" x 8 1/2", scored at 4 1/4".


After cutting the song sheet down, I mounted it on the black piece of cardstock and set it aside.


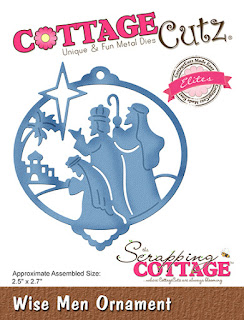
I wanted to try the technique Inlaid Die-cuts for my ornament, so I cut the various sections of the ornament die in black, tan, blue, gray, and yellow.


I laid the black ornament piece onto some white scrap paper and drew around the edge.


After cutting out the shape just inside the line, I ran the paper through my Xyron sticker maker so that the adhesive would be on the front side.


After carefully placing the black ornament on the paper, I started to fill in the spaces with the colored pieces . . .


. . . until it was completely filled.


To attach the ornament to my card, I threaded a piece of black twine through the hole at the top and taped it at the top to the back of the sheet music panel, placing some foam pop dots behind the ornament -- and gluing the music panel to the white card base.


I then pulled the twine tight and adhered the ornament to the front of the card.  And my card was completed.


The CottageCutz die used on this card is:

http://www.scrappingcottage.com/cottagecutzwisemenornamentelites.aspx

Sunday, September 09, 2018

Fawns Card

Hi!

This is Anja. Today I have another Christmas card for you. I decided to make a more monochromatic card, using the new Christmas Fawns die.


For this project I used:
- Cottage Cutz dies (Christmas Fawns, Pierced Circle Set),
- Distress Oxides (Black Soot) and Inks (Brushed Corduoy, Vintage Photo, Walnut Stain, Fired Brick),
- white card stock for die cuts,
- watercolor paper for background (12x12 cm),
- patterned paper (14,3x14,3 cm),
- water spritzer
- heat gun,
- brush,
- Gansai Tambi watercolors (number 906).
- paper glue,
- adhesive foam pads.

First I cut and colored the fawns.


Then I started on the background. First I colored the paper with black ink.


Then spritzed it with water and dried it.


Then I sprinkled it with pearl white color.


Then I cut the background paper and made a circle out of it. I used the biggest circle from the set.


I used adhesive foam pads to adhere first the fawns and then the patterned paper. I used one layer of pads for the fawns and two layers for the paper.


And this is my finished card.


Don't forget to check the new release in the store. Can't wait to get my dies.

Have a great Sunday and see you again next week.

Anja Z.


The Cottage Cutz dies I used: