Thursday, December 20, 2018

Christmas Tree

Good Morning Scrapping Cottage Friends!

It is Pam on the blog with you today!

I have one more Christmas card for you!  I used two of our new dies to create this fun card.
Designer Steps:


1.  Use an A2 card base and cut the front flap in half
2.  Cut a piece of red checked DP 4 x 5 1/4, piece of tree DP 3 3/4 x 5, green card stock 5 1/4 x 2, red checked DP 5 x 1 3/4, cut 2 white oval using the Stitched Scalloped Oval die
3.  Glue the green card stock and the red checked DP to the front flap as shown
4.  Glue the red checked DP to the inside and then glue the tree DP to the red checked DP
5.  Using the Handmade Tree and Presents die cut out the tree in green and the trunk in brown shade with TH inks.  Assemble the tree and glue to the white oval.  Cut out the packages in the DP, assemble and pop to the oval
6.  Glue the oval to the front flap only putting glue on the left side of the oval
7.  Add the star and rhinestones to the tree.  Use the Joy of Giving die to cut out the sentiment and package and then glue to the oval on the inside of the card
CottageCutz Products


Thanks so much for stopping by and I would like to take the opportunity to wish you a very Merry Christmas and Happy New Year!
Blessings
Pam


Wednesday, December 19, 2018

Warm Wishes Layout

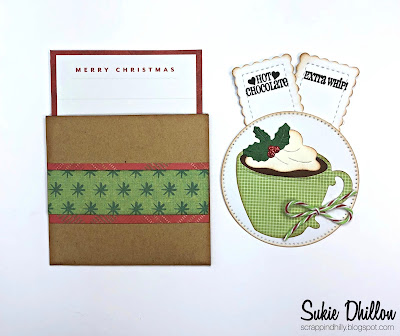
Hello! This is Sukie with my guest designer post.  Today I'm sharing a single page 12x12 layout.  I used several Cottage Cutz dies on this page.
The patterned paper was the inspiration for the die cut cuts on my layout page.  I cut all of the drinks from the Cottage Cutz Coffee & Cocoa Warm Wishes and Sweet Christmas die sets.  Everything was inked on the edges for added dimension.  The mug from the Sweet Christmas set was layered on top of a circle cut from the Pierced Circle set.
I created a pocket and tucked in an ephemera die cut card.  A couple of tags cut from the Cottage Cutz Nested Stitched Scallop Rectangle set were stamped with sentiments from the My Creative Time "Do the Cocoa Motion" stamp set.  A small bow in Christmas Mint Trendy Twine was adhered to the mug.
The title and drinks were layered on a piece of paper to act as a shelf. I added a second layer of paper underneath for a pop of color.
Some Stickles were used to accent the holly berries and the candy cane for a sparkly finish.  The Stickles coordinate perfectly with the strip of red glitter paper on the base of my layout page.
To fill up some of the space at the top of my page, I layered the title at an angle above the 4x4 photo mat.
The journaling pocket was layered with the mug and the sentiment tags were tucked insides.  A few adhesive gems were sprinkled amongst the drinks.
Here are the dies used on my layout page available in the shop:

Tuesday, December 18, 2018

Cards with pets

Hi, Janja is here.
Christmas is almost here and we all probably ended up with our Christmas cards.
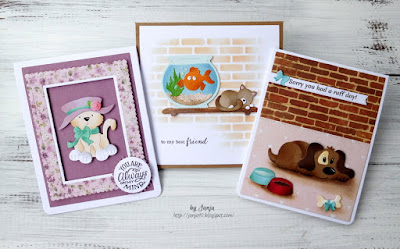
Today, I prepared three cards with some new dies from Pets release.


- white card base: 4.25 x 5.35" (10,7 x 13,9 cm), folded
- kraft card base: 5.3 x 5.3" (13,5 x 13,5 cm), folded
- colored card stock
- different ink pads
- plastic stencil: brick wall
- double-sided sticky tape, double-sided foam tape, foam pads, glue
- glossy accents


Start this card by cutting a fish, bowl and cat. 
I used colored card stock. For greater depth, I used different ink pads. On the picture is missing a shelf that I cut out later.


Use a plastic stencil brick wall for the background.
Cut the background to size 5 x 5" (12,7 x 12,7 cm). Paste it with a double-sided sticky tape to the card base. Stamp a sentiment. 
Attach the fish bowl and cat to the shelf with foam pads. 
Use glossy accents for air bubbles.


-------------------

Cut out all the pieces with the die - Rufus The Hound. I used the die - Fireplace with Accessories for small bows.


Cut two patterned papers of this size: 4 x 5.2" (10 x 13,2 cm) and 4 x 2.9" (10 x 7,3 cm). I printed the sentiment in Word. 


For the final touch, draw a shadow around the dog with a brush. Apply a glossy accents to the water in a bowl.


------------------------

Cut out and assemble Miss Kitty. 


Prepare background and two frames. Cut out two circles and stamp a sentiment. Attach frame and Miss Kitty to card base as shown using double-sided foam tape. 
Finally, add a little pearl to the flower.


Have a nice day.


Monday, December 17, 2018

Ruff Day?

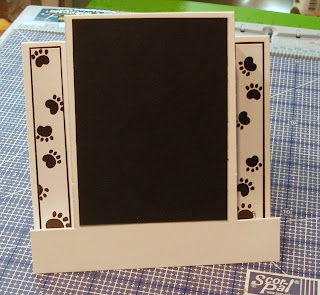
Hi, Lois here with a non-holiday card today.  Christmas time is very hectic, and people can get overwhelmed with all the preparations -- shopping, wrapping, food preparation, etc., etc., etc.  My card today is one you could give to a friend who needs a little smile to help with all the madness of the season.  There's plenty of room on the inside of this center-step card to write some encouraging words.


I started my card by constructing the card base, cutting the papers as follows:

White - 5 1/2" x 11"
Black - (2) pieces 3/4" x 4 1/4", (1) piece 3 1/4" x 4 3/8"
Patterned paper - (2) pieces 5/8" x 4 1/8"


I cut a slit at the 1" mark on either side of the card from the 1" mark to the 6 1/2" mark.  Scored from the side of the card in to the slit line at the 1" mark, the 2" mark, and the 6 1/2" mark.  Scored between the slits at the 5 1/2" mark.  To see more detailed instructions for this type of card, see the tutorial on Splitcoaststampers here.

I layered the patterned paper strips onto the black strips and applied to each side, and then adhered the larger black panel to the center section.


Next I cut the die pieces from white, black and green scraps.  Notice that the Spring Grass die was not fully cut out.  By placing the cutting plate above the lower cut line on the die I was able to enlarge the grass section, rather than cutting it out totally.


Using the packaging as a guide, I then colored and constructed that cute dachshund.


I cut another piece of white cardstock 3 1/8" x 4 1/4".  The background sky was created by sponging Ranger Tumbled Glass ink against a cloud stencil.  I went all the way to the bottom because I would be covering the lower section of the panel with the die-cut grass and wanted to make sure the sky was colored low enough on the background.


I then stamped the sentiment at the top and added the die-cut pieces to the panel, popping up the dog with foam pop-dots and adding the pet border across the bottom.


I hope the holidays haven't worn you down; but, if they have, perhaps this card will lift your spirits.

CottageCutz dies used on my card are:

http://www.scrappingcottage.com/cottagecutzdapperdachshund.aspx

http://www.scrappingcottage.com/cottagecutzcatanddogborderelites.aspx

http://www.scrappingcottage.com/cottagecutzspringgrasselites.aspx