Monday, April 09, 2018

Llama Birthday (new die)

Hello Scrapping Cottage friends! Thanks for taking the time to stop and visit with us today. It's Mary Marsh here bringing you the Monday edition of the Blog. Before I start with today's card, I wanted to give you a heads up on a few sales going on over in the online store. You can save up to 70% on some overstocked designs and also some great savings on retired designs.

And, the BIG NEWS is that we have a new release of dies and they are 25% off for a limited time. The new dies are the Llamas & Botanicals. There are 13 new designs in this release. Lois featured a card on Saturday using one of the new dies. See that here.

For my card today, I am featuring the Llamas and Potted Cactus dies. So let's get started on how I created this card.

Step 1: I wanted some festive patterned paper for this card that would compliment the llama images. I found this paper in my stash and thought it would work for the look I was after. 

Turquoise Card base: 4 1/4" x 5 1/2"
Patterned Paper: 3 7/8" x 5 1/8"
White Circle Die: 2nd largest in set
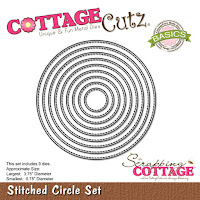
Stitched Circle Die: 2nd largest in set
Step 2: I cut the llama images and also the cactus. I used colors that coordinated with the patterned paper. The llamas are just to cute. I like how you can add color to them with the flowers and the saddle.
Step 3: I stamped my sentiment before I started assembly of the llama scene. It's a one line sentiment but it was too long for my circle. So I used my MISTI and stamped it on 2 lines.


Once this was finished I started the assembly of the scene.
Step 3: I attached the turquoise circle to the image panel. And then assembled the card base and patterned paper layer.

I used mounting tape to lift the image panel off the background. I always like the bit of dimension it gives the card.
I thought I was finished with my card but I felt it needed something else. So I scattered a few black enamel dots on the patterned paper and I thought it completed the card quite nicely. 
 

Well that's it for me for this post. I hope I have given you some inspiration on a way to use these new dies. I will be back on Saturday with another card sample.
 
Dies I used to create card: 
http://www.scrappingcottage.com/cottagecutzllamas.aspx
 
http://www.scrappingcottage.com/cottagecutzpottedcactus.aspx
 
http://www.scrappingcottage.com/cottagecutzcirclesetbasics.aspx

http://www.scrappingcottage.com/cottagecutzstitchedcirclesetbasics.aspx


Sunday, April 08, 2018

Flowers for Mom

Hi!

It's Anja here. My mom is celebrating her birthday this week and I was looking for ideas for her birthday card. I tried out foam flowers and I love the effect. I think I will make some more in different colors.


For this card I used:
- Cottage Cutz dies (3D Flower #1, 3D Flower #2, 3D Flower #7, Leafy Foliage, Oval Set, Nested Stitched Scallop Oval set, Sugar & Cream Alphabet),
- Distress Inks (Aged Mahogany, Forest Moss, Worn Lipstick, Fired Brick),
- foam in different colors,
- craft card base (15x15 cm),
- patterned paper (14,5x14,5 cm),
- white and craft card stock for die cuts,
- flower stamen,
- green tape for flowers,
- iron,
- silicone glue,
- paper glue,
- wire,
- embossing tools.

First I die cut the flowers and leaves, using foam. I colored the foam with Distress Inks.


Then I used the iron and heat all the pieces.


You don't have to heat it for a long time. The foam shrinks and it peels of the surface. Then I used embossing tools to add some more shape to the flowers and leaves.


I used flowers stamens for the middle of the flower. I used a bit of wire to pull it trough the flower.


Then I taped t with this green adhesive tape that's used for making paper flowers.


I made all the flowers in the same way. When I had the finished I cut patterned paper for the background.


Then I die cut oval shapes for the front and inside of the card. I also cut letters from craft card stock.


When I had everything cut I started with adhering. I used silicone glue for adhering flowers to the front of the card.

And this is the finished product.


Have a nice Sunday!
Anja Z. 


Cottage Cuts products I used:


Saturday, April 07, 2018

Thinking of Plants

Hi, Lois here today, filling in for Mary, who will post on Monday.  I am so happy to show off part of a brand-new release from CottageCutz -- Botanical 2018.  There are 12 dies in this release, chock full of succulents, flowers, and llamas!  They should be in the CottageCutz store shortly.  The die I am featuring today is called Shelf w/Plants.


To start my card, I cut the pieces from a small scrap of white cardstock.


I colored the die-cut pieces while they were sitting on my sticky board.  This made it much easier because the pieces didn't move -- too much!  After I colored them (using the packaging for inspiration), I assembled the various images.  I used three different green markers for each set of leaves, which gave them a bit of dimension when they were assembled.


I then cut the cardstock for my base:

Cream cardstock - 8 1/2" x 5 1/2", scored at 4 1/4"
Patterned paper - 4" x 5 1/4"

I cut the oval using the largest of the Nested Wacky Stitched Ovals . . .


. . . and assembled my card base, adhering the patterned paper -- but not the oval..


I applied foam pop dots behind each of the assembled die-cut images and adhered them to the oval. 


I stamped the sentiment below the shelf, adhered foam pop dots behind the oval, and added the oval to the card base; and my card was finished.


CottageCutz dies used on my card are:


http://www.scrappingcottage.com/cottagecutznestedwackystitchedovalset.aspx


Friday, April 06, 2018

Sending Smiles Across the Miles

Good morning Cottage Cutz fans!  It's Jeanne today with a card that will surely brighten the day of someone far away.  This card features the Spring Hot Air Balloon and the Stitched Sun, Clouds and Umbrella dies.
I started with an A2 red card base and a blue panel cut to 4 x 5 1/4 inches.  I used a paper printed to look like watercolor.  Normally I like to watercolor my own backgrounds but this is nice if you're pressed for time.
Next I cut all the pieces - some from colored card stock and others from white.  I used the background of the balloon but not the front piece to keep it from looking Easter-ish.  The rectangle for the sentiment is cut from the second smallest Nested Wacky Stitched Rectangle set.
I colored the rabbit, basket fringe and tassel pieces with Copic markers and used a sponge dauber with Crumb Cake ink to add some shadow to the basket.  I then assembled the pieces.
I glued the sun in the upper right corner, letting some of the rays hang off.  I used paper snips to clip off the over hang.
I glued the sky panel to the front of the card and arranged the clouds and sentiment panel.
Finally I used foam tape to pop the rabbit and basket off the card front.
I hope you enjoyed today's card.  It would surely bring a smile to a loved one's face!

Dies used:
http://www.scrappingcottage.com/cottagecutzspringhotairballoon.aspx
http://www.scrappingcottage.com/cottagecutzstitchedsuncloudsandumbrella.aspx
http://www.scrappingcottage.com/cottagecutznestedwackystitchedrectangleset.aspx


Thanks for stopping by today!  I hope you have a fun weekend and have time do some crafty things!