Monday, March 26, 2018

Spring Basket with Bunnies

Hi, Lois here with my last Easter card of the season.  I used one of the dies from the Spring/Easter release (Spring Basket), as well as a basic shape die I recently acquired -- the Nested Wacky Stitched Rectangles.


To start my card I cut the Spring Basket images from a piece of white cardstock and placed them on my sticky board.  For some reason they look blue on this photo; but, please believe me, they are white.


Using some Copic markers, I colored each one of the pieces.  The packaging shows the basket all in one color, but I wanted to make it look a bit more realistic.


I then cut the pieces for my card base:

White cardstock - 8 1/2" x 5 1/2"
Purple cardstock - 4" x 5 1/4" and 3" x 4"
Patterned paper - 3 7/8" x 5 1/8"
The pale purple cardstock was cut using the second largest Nested Wacky Stitched Rectangle die.


I layered the patterned paper on the larger purple rectangle and adhered them to the white card base.  Then I assembled the die-cut pieces onto the pale purple die-cut piece and adhered it to the smaller purple piece.


This was then attached to the card base using large foam pop dots, and a small Easter greeting was stamped in the corner.  You can see how these foam dots, as well as the ones behind the chick and tan bunny, give the card some dimension.


Here again is my finished card.


CottageCutz dies used on my card are:

http://www.scrappingcottage.com/cottagecutzspringbasket.aspx

http://www.scrappingcottage.com/cottagecutznestedwackystitchedrectangleset.aspx


Sunday, March 25, 2018

Easter Egg With Flowers

Hi!

This is Anja. It's just one week away from Easter and that's why Easter and Spring themed dies are on my table.


For this card I used:

- Cottage Cutz dies (Floral Eggs & Butterflies, Spring Watering Can, Spring Greenery),
- Zig markers (numbers 043, 046, 052, 202, 260),
- Craft card base (15x10,5 cm),
- dark red card stock for background (10x14,5 cm),
- patterned paper - wood (9,6x14,1 cm),
- watercolor paper for die cuts,
- embossing ink,
- rose gold embossing powder,
- heat gun,
- Nuvo drops (Dandelion Yellow),
- paper glue,
- adhesive foam pads
- watercolor brush,
- scissors.

First I cut all the background paper.


Then I die cut the flowers and the greenery from watercolor paper and colored it with Zig markers. I used Nuvo drops for the middle of the flowers.


I die cut the beautiful egg from white paper and tapped it with embossing ink. I used rose gold powder and heat it with the heat gun.


I wanted the inside of the egg to be white, so I drew around the egg and cut it out from white paper. Then I glued the two pieces together.


I put adhesive foam pads on the backside of the egg and glued it on the "wooden" background. I glued the flowers around it. And card was finished.


I hope you have all your Easter cards ready to go. I have to make a few Easter treats and then I'm ready to go.

Btw Rise&Shine dies are still available for 25 % lower price.

Have a nice Sunday.
Anja Z.


Cottage Cutz dies I used:


Saturday, March 24, 2018

Easter Sunrise

Hello Scrapping Cottage friends! Thanks for taking the time to stop and visit with us today. It's Mary Marsh here bringing you the Saturday edition of the Blog. Before I start with today's card, I wanted to let you know we have a new release of dies. It's our Rise & Shine collection and they are currently on a 25% sale. To see some card samples from the team - click here and here

Today, I am showing a card from our Spring die collection. I still need a few more Easter cards and I wanted to create one using the Happy Easter Phrase die. So lets get started with the details on how I created my card.

Step 1: I had this idea brewing in my head for awhile about sponging a sunrise with hills, the cross and the Easter Phrase. I wasn't real sure of how I was going to accomplish all of this but I think it worked out well the way I created my card.

I started by sponging my white cardstock with distress inks. I used hello honey, abandoned coral oxide and wilted violet oxide. I just purchased a few of these oxide inks and they sponge on so smoothly. I really like them. Now I can see why the team loves them so.
Card Panel: 3 7/8" x 5 1/8"
Step 2: I was going to create a slope for my hill and then I decided to use the rock die from the "under the sea" collection. I cut two of them with some soft suede patterned paper. I re-sized them by cutting off of the bottom to create my hills. Just another way to get more mileage out of the dies that you already own.
Step 3: Now for the cross, I just used a stamp I had in my collection and stamped with the help of my MISTI in soft suede ink. I centered the cross in between the slops of the hills. Attached the hills to the sponged sunrise panel. Sponged a bit more of the coral and violet inks to get the color a bit more vibrant.
Step 4: The Happy Easter phrase was just a bit to big to fit this panel so I snipped off the Happy part. Just the word Easter seemed to fit the sunrise background I created.
Step 5: I wanted to layer this image panel on a violet background but I had no cardstock that color. So I took a piece of white cardstock and sponged the outer edges with the wilted violet oxide ink. Now I had the perfect color panel. Attached to the image panel and then attached to my coral card base.
Violet Layering Panel: 5 1/8" x 3 7/8"
Coral Card Base: 5 1/2" x 4 1/4"
Step 6: I decided to do a little finish work on the inside of this card. I added several eggs and some of the flowers that are part of the Happy Easter Phrase die.
Well, that's it for me for this week. I hope I have given you an idea on another way to use the Happy Easter Phrase die on a card. See you next Saturday!

Dies I used to create card:
http://www.scrappingcottage.com/cottagecutzhappyeasterphrase-2.aspx

http://www.scrappingcottage.com/cottagecutzunderthesea-2.aspx


Friday, March 23, 2018

With "Mush" Love

Happy Friday!  It's Jeanne today with a card for spring.  I love the new stitched dies.  And I fell deeply in love with the Stitched Mushrooms and the snail from the Stitched Garden Friends set as soon as I saw them.
I started by choosing the patterned paper so I could get my colors - Smoky Slate, Pool Party and Calypso Coral.  I cut the side fold A2 card base from the grey, a Pool Party Panel 4 1/8 x 5 3/8 inches and a panel from the pattern 4 x 5 1/4 inches.  I glued the patterned paper to the blue panel but did not glue them to the card base yet.
Next I die cut all the pieces from white, Smoky Slate, Pool Party and Calypso Coral. I used two mushrooms from Stitched Mushrooms, the snail from Stitched Garden Friends and the second largest circle from Nested Scalloped Circles. You may notice that a couple of pieces are missing from this photo.  That's because I sometimes "design-on-the-fly"; that is, I make decisions and change the design as I work.
I used a stamping platform to stamp my sentiment.  (I purchased a set of mushroom themed sentiments because a very good friend is a morel mushroom hunter - who knew such people existed?)  I placed everything in the platform, arranged my elements with sentiment on the circle, then carefully moved the elements and set a magnet in place.  I knew that the sentiment would now be in the correct place.
When the sentiment had been stamped I glued the mushrooms in place and added the snail with foam dots.  I then started to arrange it on the card with a piece of ribbon cut slightly longer than 5 1/2 inches.
However, I felt the main image didn't "pop" enough.  Here is my "design-on-the-fly"; I decided to add another element under the white scalloped circle.  I found the next size up scallop circle was too large but the second largest circle from the Double Stitched Circles worked perfectly!  Since my ribbon is coral, I made the circle blue.  I folded the ribbon behind my panel and glued it, then adhered the panel to the card front using foam tape to add dimension.
I glued the scalloped circle to the blue circle and adhered it with foam dots to the front of the card.  My second "design-on-the-fly" element is this cute button.  I was going to use a real button even though the color wasn't a perfect match, when I noticed that I had also cut a button (normally for the flower center) from the Stitched Garden Friends set when I cut my snail shell.  It worked perfectly!  Just the right color and size!

Dies used:
http://www.scrappingcottage.com/cottagecutzstitchedmushrooms.aspx
http://www.scrappingcottage.com/cottagecutzstitchedgardenfriends.aspx
http://www.scrappingcottage.com/cottagecutznestedscallopcircleset.aspx
http://www.scrappingcottage.com/cottagecutzdouble-stitchedcirclesetbasics.aspx
Thanks for stopping by today!  I hope you enjoyed my card.  Have a creative weekend!

Thursday, March 22, 2018

Easter Bunny

Hello Scrapping Cottage Buddies!

It is Pam from Stamper at Heart Blog Spot creating with you today! And before I get started I wanted to give you a heads up about the sales we are have at our store.  We have a Collection of new release dies called Rise and Shine that are currently 25% off and they are just so much fun!  To see some card samples from the design team click here and here!

Now on with today's card!  I am on my last Easter card for my friends and family in fact most of the cards are just about to go in the mail at the end of the week.  This is my last one and I just love how this little guy turned out in his overalls with the little buttons!


Designer Steps:
 1.  Start with an A2 white card base and cut a 4 x 5 1/4 piece of blue card stock.  Run the blue card stock through a cloud embossing folder
 2. Cut out the greeting using the Happy Easter Phrase die and white card stock.  Glue the phrase to the upper part of the blue embossed panel
 3. Cut out the white fence using the Victorian Fence die.  Then glue it just below the greeting
 4.  Next cut out a strip of green card stock 4 x 1 1/4 and 3 grass strips using the Spring Grass die
 5.  Layer the grass onto the bottom part of the card as shown
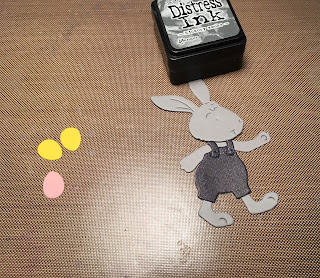
 6.  Using gray card stock and the Mr. Peter Rabbit die cut out the body.  Next use the same die and cut out the overalls in a denim DP.  Also using the same die and cut out the Easter eggs using yellow, orange, and pink card stock
7.  Shade the bunny with a gray ink then glue on the overalls add the black pearl eye and tiny buttons.  Glue the eggs into the grass and one in the bunny's hand and your card is complete.

Cottage Cutz Products


I hope that you are finishing your Easter cards too and that this little card has given you some inspiration!  As always thanks for stopping by!
Blessings
Pam