Wednesday, November 29, 2017

Oh No Kitty Double-Window Card

Hello everyone! It's Janet and it's my turn to share a project video with you. I hope all our U.S. fans enjoyed a few days off and lots of time with family and friends! Likely among all that you visited with there were people recovering from a cold or some other ailment. It seems so many people are suffering with something or other right now.

There's no better way to make someone feel better than to receive a cheery get well card from someone. Well, we have that covered! You've been seeing lots of the new get well projects from our talented design team lately and I'm showing another twist on the Oh No Kitty die. This kitty is so darn cute with all of his little owies bandaged up! I couldn't help but use it on a project.


Click on the thumbnail link to learn how this double-window card was made. It's a little tricky to cut the windows so they are centered over each other but pretty easy once you learn a few tips.


If you'd like to see all twelve of the Get Well themed dies in the new release, click on the thumbnail link below. These dies and many others found in the Scrapping Cottage site are on sale through December 1st. Don't miss it!


Dies used in this project:


Monday, November 27, 2017

Chicken Noodle Soup

Hi, Lois here today with another card made with one of the Black Friday release Get Well dies. There are 12 dies in the release, and all of them are really cute and sure to cheer up anyone who is under the weather!  The entire bundle can be purchased at a special price, plus you can buy individual dies at a discount also.  Some up to 80% off!  That is a great deal!!!   My card today uses two of the new Get Well sets, Chicken Noodle Soup and Get Well Phrase.


To begin my card I cut cardstock for the base:

Red - 5 1/2" x 8 1/2", scored at 4 1/4"
Black - 4" x 5 1/4"
White - 3 7/8" x 5 1/8"
Gingham patterned paper - 3 7/8" x 1 1/2"

I have found that sometimes it is much easier to cut all the various pieces of a die from white cardstock and then color them.  That is what I did with the Chicken Noodle Soup die.  The sentiment die was cut from black cardstock, which I had backed with a double-sided adhesive sheet.


Using the illustration on the packaging, I colored the various die-cut pieces with Copic markers -- with the exception of the soup can and the spoon.  These I colored with a silver Wink of Stella brush.  I didn't think it was necessary to color the entire soup can because only the top and bottom would eventually show.


Then I constructed the chicken, soup bowl, and soup can.


After I put my card together, I decided that the "CHICKEN NOODLE SOUP" didn't show up very well; so I used an XS Faber-Castell black pen to go over the words.  I was much happier with this.  I then added the three enamel dots.


I was  really impressed with all the parts of this die -- down to the steam and the noodles!  Be sure to check out these very cute Get Well dies, as well as all the others that are on sale.

CottageCutz dies used on my card are:

http://www.scrappingcottage.com/cottagecutzchickennoodlesoup.aspx

http://www.scrappingcottage.com/cottagecutzgetwellexpression.aspx


Sunday, November 26, 2017

Deer Family

Hi!

This is Anja again. I hope you all had a great holiday weekend. We got a little bit of snow today, but not enough to make it look like a winter wonderland. That's why I decided to make it my own.


For this project I used:
- Cottage Cutz dies (Winter Deer Family, Woodland Cabin),
- Distress Oxides (Antique Linen, Vintage Photo, Walnut Stain, Peeled Paint, Lucky Clover, Cracked Pistachio, Peacock Feathers, Broken China, Faded Jeans),
- white card base (10,5x21 cm),
- white card stock for die cuts,
- old toothbrush,
- paper scissors,
- paper glue.

First I colored the background. I colored directly on the card base. I started with the lighter tones and then went toward darker ones. I blended the colors together with lighter tones.


When I was happy with the sky color I used an old toothbrush ant spritzed a bit of water all over it. I let the small water drops to dry. In the meanwhile I cut a longer strip of paper with my scissors o use it as the snowy background for the deer.


Then I die cut the deer family and the trees. I colored the die cuts with Distress Oxides.


When I had everything colored and ready I just glued it together into a winter scene.


Don't forget to check the sale in The Scrapping Cottage shop. You can find some awesome discounts til December 1st. 
 
 May you Sunday be relaxed. See you in a week.
Anja Z.

Cottage Cutz products I used:


Saturday, November 25, 2017

Sending Hugs (Black Friday Release Die)

Hello Scrapping Cottage friends! Thanks for taking the time to stop and visit today. It's Mary Marsh here bringing you the Saturday edition of the Blog.

Some exciting news! There is a new bundle of "Get Well" dies that are part of the CottageCutz Black Friday release. And, along with this new release is some special pricing on all the dies. You can save up to 60% on these new dies. So check out the online store for a huge sale on ALL CottageCutz dies.

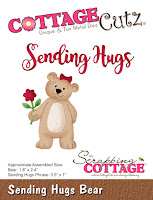
Today, I am featuring the new Sending Hugs Bear die. This die is so versatile. It can be used to send a get well card, a card of encouragement or even a Valentine card to someone. So without further delay, let's get started on the details of my card for today.

Step 1:  I started my card this week, as in some other weeks, with a sketch I found over on Splitcoaststampers. I thought it was a good one to showcase this sweet little bear. And, also to use some patterned paper that wouldn't get completely covered up.
Step 2: Once the layout was decided, I looked through my paper stash. I wanted to see what I could use that would coordinate with the theme of the bear die.
I found this heart paper that I thought would work perfectly for any of the card ideas I gave above. I also liked the red & white colors as I usually gravitate towards the bright shades.
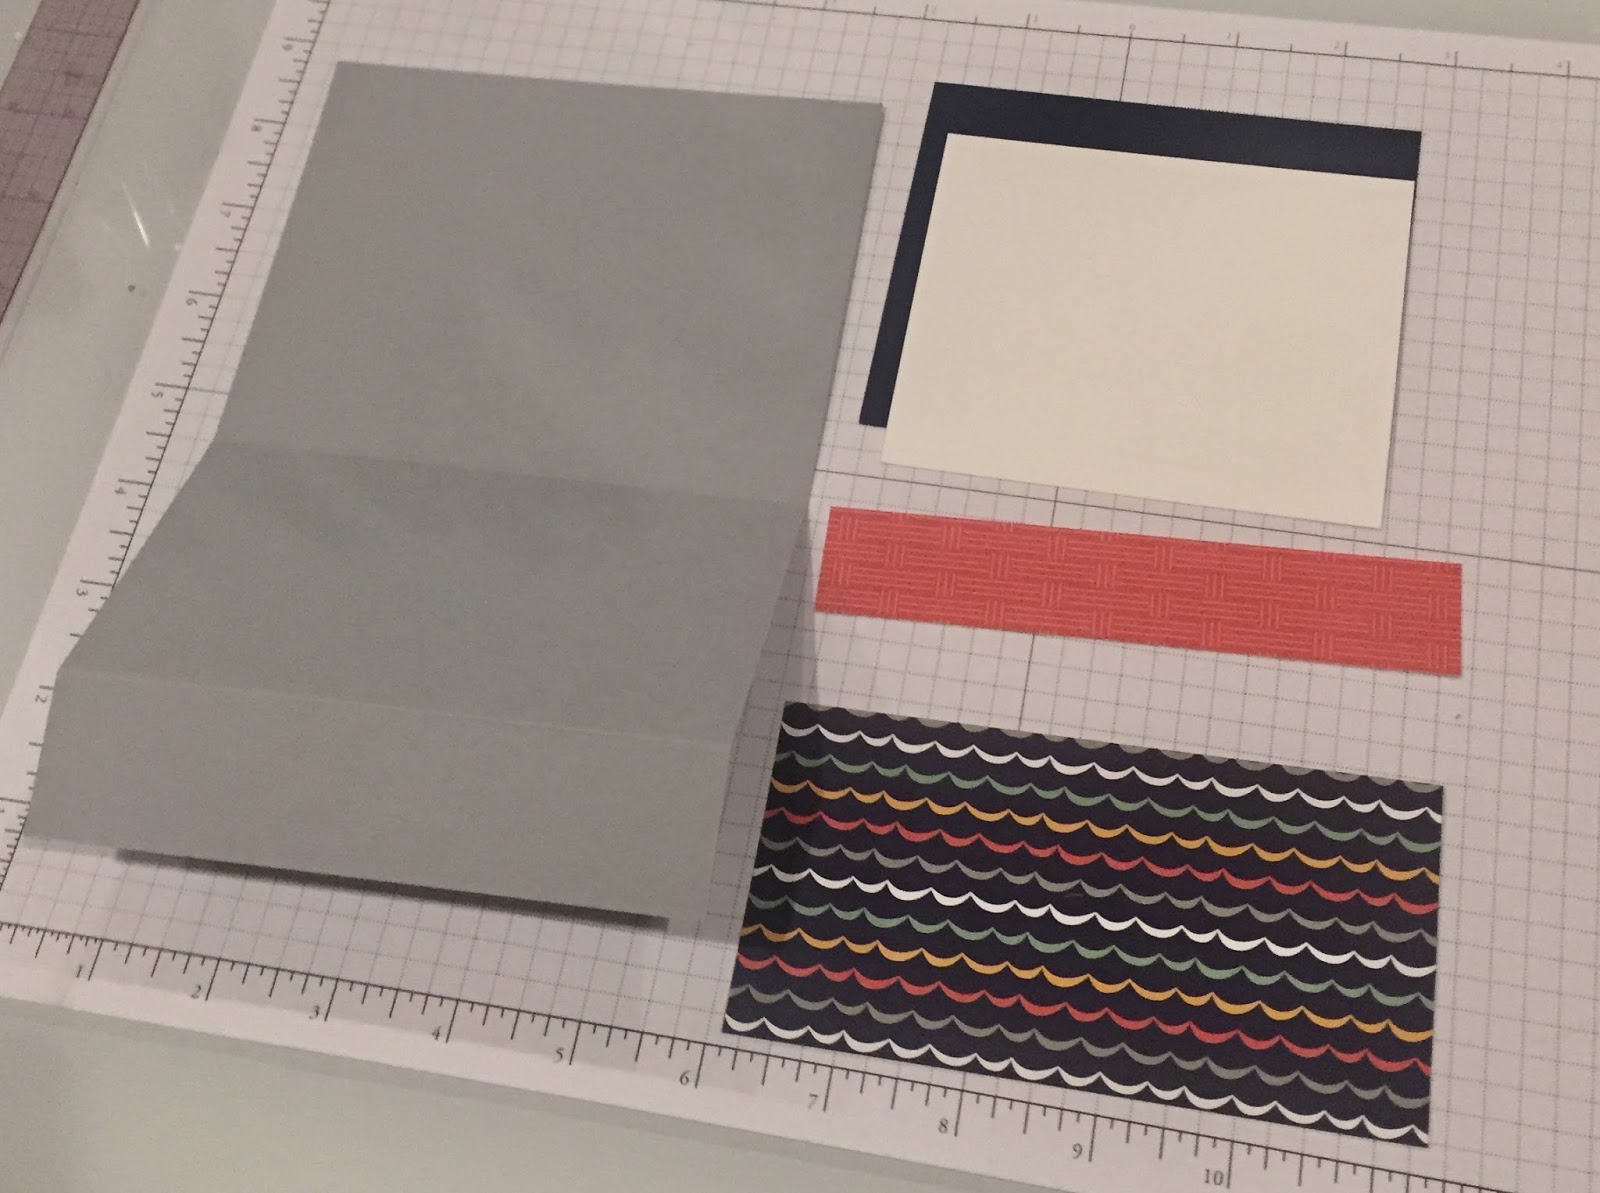
Red card base: 4 1/4" x 5 1/2"
Heart Patterned Paper: 4 1/8" x 5 3/8"
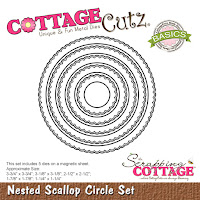
Red scalloped circle: I used the largest of the Nested Scallop Circles
White Circle Image Panel: I used the larges of the Circle dies
Step 3: I cut my bear image, the flower and the sending word from this die set. I decided to stamp the word "Hugs" just for added interest.
I cut the flower in yellow cardstock to break up all the red I was using. Did you notice the cute little embossed belly button this bear has? I used a blush marker to make it stand out a bit. CottageCutz dies all have such incredible detail.
Step 4: I am now ready to start the card assembly.
The circle in the layout has a flat bottom. I first assembled both circles and then cut off approximately 3/8" from the bottom. Before I adhered to the card base, I stamped my "handmade hugs" sentiment.
After it was stamped, I thought it was slightly off-center. So I cut 2 red hearts from an older CottageCutz die and added to the left side. It draws your eye away from it not being centered. I attached my bear to this panel with dimensional adhesive. Gives it more depth.

To complete my card, I added the sending phrase on a slight angle to the patterned paper. Again it just adds some interest to the card.

Well, that's it for me for this post. I hope I have given you an idea for a way to use this new Sending Hugs Bear die. Remember, there is a big Black Friday sale going on until Tuesday, December 1. It's a chance to pick up some new dies at bargain prices.

I will be back next week with a Christmas card idea.

Dies I used to create card:
http://www.scrappingcottage.com/cottagecutzsendinghugsbear.aspx
http://www.scrappingcottage.com/cottagecutznestedscallopcircleset.aspx

http://www.scrappingcottage.com/cottagecutzcirclesetbasics.aspx


Friday, November 24, 2017

Feel Better Bear

It's here!  Black Friday and the release of the new Get Well dies is here!!  Be sure to check out the website and the full release that is available today with special pricing.

Jeanne is posting today with a card that features two of the new dies.  Of course I love bears and this one is extra cute.  As an added bonus you can accessorize him to be "injured", or "sick" or just "under the weather" depending on the recipient's ailment.
This is a pocket card with the sentiment on a separate card that lifts out of the pocket.
Start with a piece of card stock 8 1/2 x 5 1/2 inches folded to A2 size.  Score one side with the folded edge at the 3" mark on your score board.  Fold the small panel that is created opposite the fold in the card, so it creates a flap.  Cut two pieces of patterned paper for the front and flap, one - 2 1/2 x 5 1/4 inches and the other 1 x 5 1/4 inches.  For the sentiment card cut one piece of card stock 4 1/2 x 3 3/4 and another 4 1/4 x 3 1/2.   Using strong adhesive or scor-tape, glue the sides of the card together with the front flap down.  Adhere the smaller panel to the larger panel for the inside card.
Next, place a sheet of double sided adhesive on the card stock that the sentiment will be cut from and die cut the sentiment.
Since this sentiment is very casual, I set it at angles to enhance that feel.
The bear is die cut from two shades of brown; the rest of the items are cut from white card stock and colored with Copic markers. 
I love the detail in this set.  The tissue even slips inside a slit in the box!
When the card is inserted in the pocket, you can't see the sentiment until it's pulled out.

Check out all the new release Get Well dies - they are super cute and very versatile!  The dies Iused today:


http://www.scrappingcottage.com/cottagecutzouchwithtooth.aspx

Thanks for stopping by and have a great weekend!!!