Sunday, October 01, 2017

Haunted House Card

Hi!

This is Anja again. Today I played with new Halloween dies and made my first Halloween card ever :) Given the fact I only have two Halloween dies I tried to do the most of it. And I had to use my favourite inks again. I made a haunted house scene and a big moon in the background.


For the card I used:
- Distress Oxides (Black Soot, Wild Honey, Fossilized Amber, Faded Jeans, Wilted Violet, Seedless Preserves),
- black card base (13,5x13,5 cm),
- watercolor paper (12,8x12,8 cm),
- black and white card stock for die cuts,
- white pigment ink pad,
- water mister,
- paper glue. 

First I die cut the house, phrase and ghost from black and white card stock.


Then I made the background. I colored the night sky with four different shades. I started with the violets on top and then went to black on the bottom.


I cut a circle out of it. 


I colored the moon then. I used a little bit of black on top of the yellow.


Then I spritzed both papers with water. I splashed bigger drops of water on top of the moon background. 


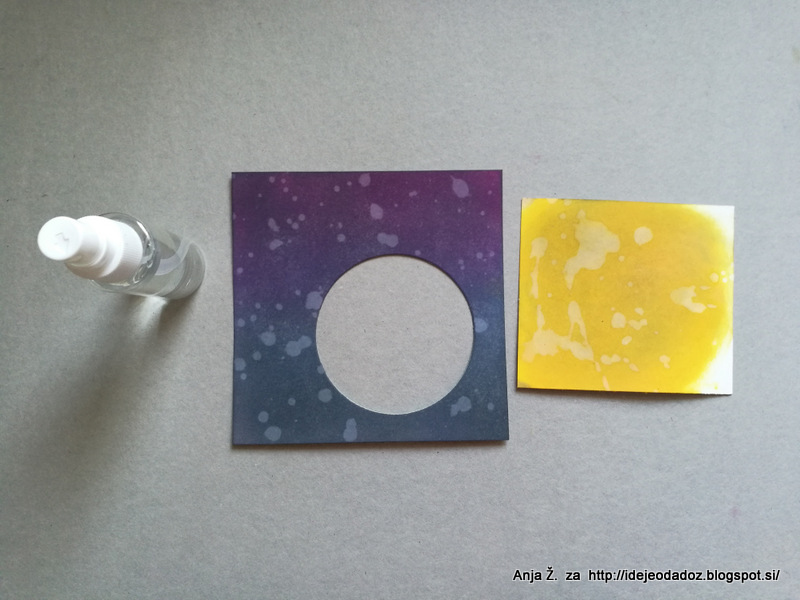
Then I used a bit of yellow around the circle to make it look like the moon is shining. The Oxides are perfect for that. 

And then I just glued all the pieces together and made a little shine to the ghost inside the card. 


And this is my first and simple Halloween card.


Do not forget to check all the new dies. You can still get them with a 25 % discount. 

Enjoy your Sunday and see you again next week. 
Anja Z. 


Saturday, September 30, 2017

Christmas Joy Nativity

Hello Scrapping Cottage friends! Thanks for taking the time to stop and visit today. It's Mary Marsh here bringing you the Saturday edition of the Blog.

CottageCutz has a new release of Halloween & Christmas dies that are now available in the online store for ordering.  So if you have made a wish list, now is the time to get it fulfilled.

The DT has been showing lots of great samples and will continue to show them over the next couple of months to get your creativity flowing. There are plenty of beautiful new Christmas dies. Something for everyone's tastes.

I love Christmas time and making Christmas cards. Today, I am using one of our new dies Joy Nativity. To me this die represents the essence of Christmas. I love the bold Joy word as well as how the Holy Family is nested in the letter "O".  So let's get started with some details on how I created my card.

Step 1:   This week I started off with a sketch. I found this perfect one on Splitcoaststampers. It wasn't too fussy and it allowed the Joy word to be the center focus.
Step 2: I looked through my paper stash for patterned paper that wouldn't take the focus away from the Joy word and at the same time have a touch of elegance to it. I found this red and gold paper that I thought would work for the elegant look I was after. I paired it up with a red card base that was almost a perfect match.
Maraschino Red Card Base: 5 1/2" x 4 1/4"
Patterned Paper Layer: 5 3/8" x 4 1/8"
Step 3:  For the oval elements #3 & #4) of the sketch I used the largest nested stitched eyelet die and the 2nd largest oval die. It nested quite nicely in the eyelet die and the eyelet die kept with the elegant look I wanted for this card.
 
Step 4: I cut my Joy word in a gold cardstock. There is such detail in this die. If you click on this photo or any of them really, it will allow you to see the detail I am talking about. Attached to the oval shapes with dimensional adhesive. Being raised a bit from the ovals will give it nice depth.  
 
Step 5: Attached the oval panel to the striped patterned paper layer. For the #2 layer of this sketch I decided to use ribbon. Looked through my ribbon stash and found this pleated ribbon that is a good match for the card base.  I really like adding ribbon on Christmas cards. I think it dresses them up nicely. 

Attached my image panel to the card base and scattered a few sequins to complete this card. I hope I have given you an idea for using this new Joy Nativity die. By keeping your card simple, you could easily mass produce this one for Christmas. See you next Saturday!!!

Dies I used to create card:
http://www.scrappingcottage.com/cottagecutzjoynativityelites.aspx
 
http://www.scrappingcottage.com/cottagecutznestedstitchedeyeletovalset.aspx

http://www.scrappingcottage.com/cottagecutzovalsetbasics.aspx


Friday, September 29, 2017

Warm Wishes

It must be snowman week at Cottage Cutz!  We've had so many adorable snowmen this week and here is one more.  It's Jeanne posting today and although the weather is still warm, I couldn't resist using this cutie in cocoa.  Makes me want a mug of cocoa by the fireplace.
I cut all the pieces using a combination of white and colored card stock.  I used colored stock for the red and green and white for the rest.  I colored those pieces with Copic markers.
Next I cut three pieces of background paper - red pattern is 4 1/8 x 5 3/8, white 1 3/4 x 5 3/8, kraft pattern 1 1/2 x 5 3/8.  They will all be mounted to an A2 base - 4 1/4 x 5/1/2.
To add some depth to the red cup I used Real Red ink and a sponge dauber to add shadows.
In the top of the photo you will see a piece I cut from white card stock to use to mask off the rim of the cup as I sponged it.
One thing I love about this set - that funky looking scarf piece on the left becomes....
a polka dot scarf when put together!  How great is that!?

When it came time to put this together I played with several options.  One was to use snowflakes as a background element.  I really liked that, but I also liked the peppermints.  A family poll was divided - they both looked good.
Ultimately I chose the peppermints because I liked the way they picked up the stripe in the paper I used as a frame.  Had I used different paper I would have gone with the snowflakes.


http://www.scrappingcottage.com/cottagecutzsnowmanincocoa.aspx

http://www.scrappingcottage.com/cottagecutzcirclesetbasics.aspx
http://www.scrappingcottage.com/cottagecutzsnowflakesset.aspx

I hope this inspires you to create this weekend!

Thursday, September 28, 2017

Sweet Snowman

Hello to our Scrapping Cottage Friends,

It is Pam creating with you today!  I am using one of our cutest new release dies.  It is only a few months away before we have to send out our Christmas cards.  So I really had to get started!


Using the Sweet Snowman die cut out all of the pieces using, pink, red, brown, black, blue and white card stock

 Before completing the assembly of the snowman use ink and copics to shade the pieces
 Glue all of the pieces together
 Cut a white card base and then a piece of blue card stock 4 1/8 x 5 1/4.  Glue the blue to the white card base.  Cut a piece of DP 4 x 5 1/8 and glue to the blue
Cut out 2 of the the Merry Christmas dies on blue card stock and glue them together
 Pop up the snowman onto the card front and glue the Merry Christmas flat to the card

Add some snowflake shaped sequins to the front and your card is finished

Cottage Cutz Dies


Please stop by our store! We are open and waiting for you!!


Blessings


Pam

Wednesday, September 27, 2017

Santa & Snowman Window Cards

Hey everyone! It's Janet dropping by to show you two cards I made using two new holiday release dies. The first is called Window With Shutters and it has a great window, complete with a header, flower box and shutters. This die could be used year round to create a cute window scene by itself or filled with characters of your choosing that fit in the window space.
.

Today, I chose to use the companion die set made just for this window called Window Christmas Friends. It includes adorable Christmas figures including a pine tree, Santa, Snowman and Poinsettias with greens for the flower box.


Since the Santa and Snowman are both cut when you use the set, I decided to use both in each card. Nothing should go to waste right?! For Santa, the snowman is saying hi when you open the card. The opposite is true if the snowman adorns the front. I also used the Nested Stitched Scallop Rectangles inside for the stamped sentiment and die cuts. These are such cheerful little figures!


To learn how I made this card including how I created the acetate window effect, click on the video below. I hope you enjoy this one because I had a lot of fun creating them!

Have a great week and thanks for spending some time with us here at CottageCutz.

Hugs,
Janet
SugarShine Designs


Dies used for this project: