Wednesday, December 20, 2017

Art Journal - Home for the Holidays

Art journaling is quickly becoming one of my favorite places to create smaller works of art.  Die cuts can add interest and whimsy to these small creations.
I used the Cottage Cutz Vintage Holiday Car and colored in the image with watercolors.
By adding layers of watercolor, I added shading to the car.  For small die cuts, it is easier to leave them in the die cut scrap when coloring them in.
Next, I added glitter glue to the die cut to give a little shimmer.
Then I used Tattered Angels Glimmer Mist in assorted colors to create the background.
Wishing you a creative day, dear friends.

Sheila


Tuesday, December 19, 2017

Santa and Rudolph

Hi, Janja here!

Although Christmas is getting closer and closer, there's still time to create some cards.
Today I share with you two cards with a similar layout.


Supplies:
- CottageCutz dies: Woodland Santa, Reindeer Barn, Moose & Trees, Santa Napping
- white card base: 4.25 x 5.5" (10,7 x 13,9 cm), folded
- patterned paper: 4 x 5.2" (10 x 13,2 cm)
- white and colored cardstock
- Distress ink pads: Aged Mahogany, Vintage Photo, Mowed Lawn
- Wink of Stella brush glitter pen maker - clear
- paper crimper
- Flower Soft - polar white

Create a card base from a white cardstock. Cut the smaller layer from patterned paper, and place it on to the card base.


Stamp Merry Christmas on a piece of white cardstock. Cut the upper edge with scissors. Put it through a paper crimper.


Cut out individual pieces from colored cardstock for both main motive. 


Prepare some white cutouts of spruces, and add glitter.


Assemble the cards. 


Since this is my last post this year, I prepared another card with Santa. 


Merry Christmas and a Happy New Year!


Monday, December 18, 2017

Feel Better Bear

Hi, Lois here today with another card using dies from the Get Well release from CottageCutz.   The cute dies were released for Black Friday.  Again, I've made something other than an A2 card -- it's a Z Box Fold card, using both Bear Patient die and the Ouch with Tooth die, as well as a Double-Stitched Square die.


As I wasn't sure which of the images from the Bear Patient die I was eventually going to use, I cut all the pieces out of white cardstock so that I could color them.  I knew I was only going to use one sentiment from the Ouch with Tooth die, so I just cut it out of red cardstock.


Using various Copic markers and a couple of Wink of Stella brushes, I colored the bear pieces and constructed the various images.

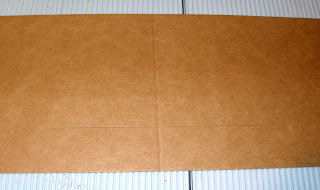
I then cut the cardstock for the base of my card -- a 4 1/4" x 5 1/2" piece of dark brown and a 9 3/4" x 4" piece of kraft.


I scored the long piece at 5 1/4".   With the short edge of this piece at the top of my paper cutter and the long edge at the 1" mark, I cut a slit from the 3" mark to the 7 1/2" mark.   IMPORTANT:  If you decide to make a similar card, be sure that the larger section of the cardstock strip is at the top before you cut the slit.  (Ask me what happens when you don't place it in your paper cutter the correct way!)


I placed  the strip on my Scor-Pal with the long edge across the top and the larger section toward the left.  I then scored at the 3" mark down to the slit.  At the end of the slit (at the 7 1/2" mark), I scored down to the edge.  (I slightly folded on the score lines so that you can see them.)


Fold on the score lines to make the "box."


Apply Scor-Tape to the back of the 4 3/4" x 4" section, as shown.


Now it was time to cut the background panels of the card.  I wanted to use the Double-Stitched Squares and Rectangles on my card, but the rectangles weren't quite the right size.  So I just cut the front panel with the die and the rest of the panels as listed:
Cream cardstock - 2 1/2" Double-Stitched Square, 4" x 2 1/2" rectangle
Dark brown cardstock - 2 3/4" square, 4 1/4" x 2 3/4" rectangle, 3/4" x 5" strip, and (2) 3/4" x 2" strips
Patterned paper - 1/2" x 4 3/4" strip and (2) 1/2" x 1 3/4" strips


I layered the panels and adhered them to the front of the card.


I then glued the die cuts to the front and inside panels . . .


. . . removed the protective covering from the Scor-Tape and glued the back panel to the dark brown card base, carefully centering it.


And my card was complete.


CottageCutz dies used on my card are:

http://www.scrappingcottage.com/cottagecutzbearpatient.aspx

http://www.scrappingcottage.com/cottagecutzouchwithtooth.aspx


http://www.scrappingcottage.com/cottagecutzdouble-stitchedsquaresetbasics.aspx


Sunday, December 17, 2017

Festive Penguins

Hi!

Anja here. I can't believe how quickly this week went by. I'm still waiting for my new Cottage Cutz dies to come, so I used a few holiday dies and combined different pieces together to make a cute penguin card. It's so cool how different Cottage Cutz dies go so well together.


For this card I used:
- Cottage Cutz dies (Penguin With Present, Snowglobe Friends, Vintage Holiday Car, Sweet Baby Lamb),
- Distress Oxides (Black Soot, Faded Jeans, Broken China) and Inks (Black Soot, Wild Honey, Fired Brick, Peeled Paint, Forest Moss),
- smooth watercolor paper for background (13x13 cm),
- white card base (14x14 cm),
- white card stock for die cuts,
- black pen,
- Zig watercolor brush (pink shade),
- watercolor brush,
- adhesive foam pads,
- paper glue.

First I colored the background. I used smooth watercolor paper which is great for coloring with Oxides. It allows you to blend the colors really well. I started with black and then went to light blue. I just circled around the paper with round blending tools. I prefer the round ones over the rectangular ones. When I had the color I wanted, I spritzed it with a few drops of water and dried it.


Then I die cut the  penguins from two different dies. I colored them with Distress Inks. I added eyes and cheeks with black and pink pen.


Instead of the skates I used another die to make penguin feet.


I die cut the wreath from Vintage Holiday Card die.


I used adhesive foam pads to add a bit of dimension.


And this is the finished card.


Have a peaceful Sunday.

Anja Z. 


Cottage Cutz dies I used: