Tuesday, June 13, 2017

Let's celebrate

Hi, Janja here!

Today, I share with you an invitation to celebrate a child's birthday.


Supplies:
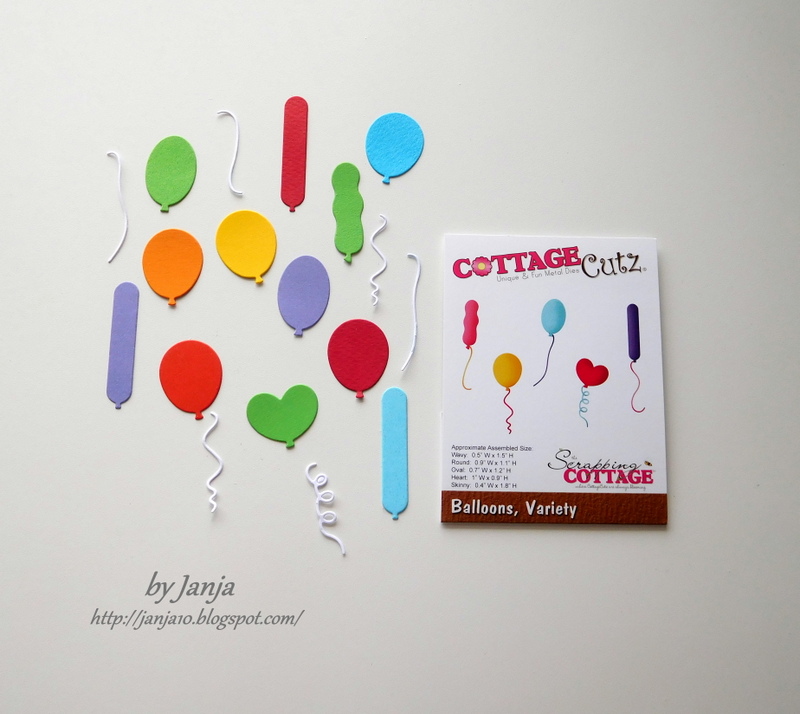
- CottageCutz dies: Celebrate Phrase, Balloons variety, Birthday Party BearSpring Grass, Stitched Wide Square Frame Set
- white card base: 5.3 x 5.3" (13,5 x 13,5 cm), folded
- patterned paper: 5 x 5" (12,6 x 12,6 cm)
- white and colored cardstock
- Distress inks: Antuque Linen, Mustard Seed, Wild Honey, Tumbled Glass, Broken China, Festive Berries, Mowed Lawn, Vintage Photo

As usual, first cut out all the pieces to compose a motive. In our case, this is a bear. Also prepare a few balloons, celebrate phrase, grass and a white frame. For the frame, use the largest die of the set.


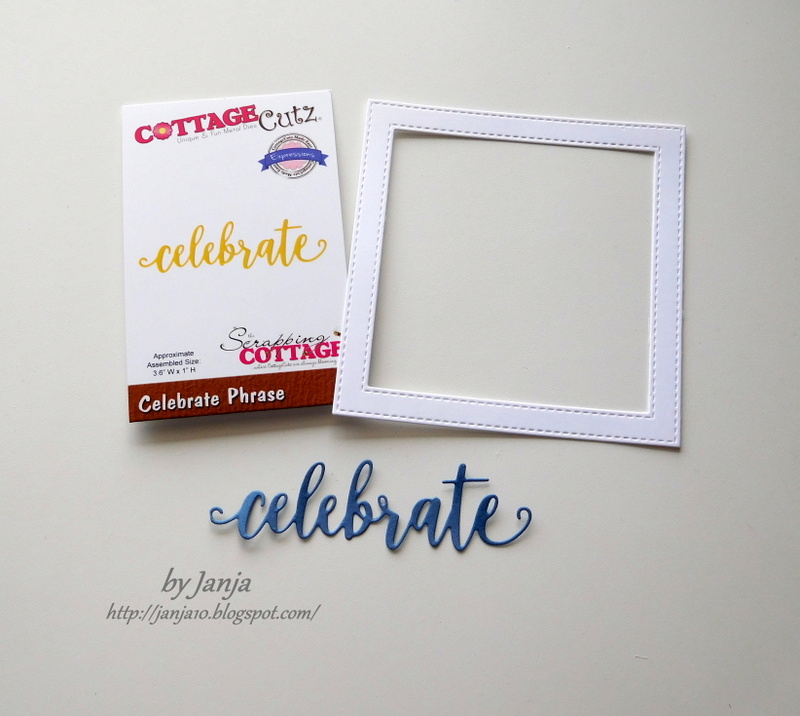
On a light blue cardstock print "Let's", which will be supplemented with cutout "celebrate".
Trim patterned paper, and white card base for an invitation.


Create clouds on a light blue cardstock with cloud stencil and Distress ink pad - Tumbled Glass.


Begin by assembling the invitation.
With a large number of invitations, pay attention that the layout is not too demanding.
First paste background with clouds and white frame in the middle of patterned paper. Use double-sided adhesive tape.


To catch the middle of card base, paste double-sided adhesive tape on the back side of our background. Fix a tape on the edges along the entire length.


Remove only a part of the protective strip. Place all together on a white card base. Since the protective strip is not removed completely, we can easy move the cardstock on the base. When we are sure it is in the middle, place a finger on the base, and pull the protective strips.


Thank you for coming over and have a nice day. 


Monday, June 12, 2017

Nativity Silhouette


Hi, Lois here today with a Christmas card.  I realize this is June, but I saw a tutorial for a very cool technique a couple of weeks ago and wanted to give it a try on a Christmas card.  I used a very nice CottageCutz Nativity Silhouette die and Faith Phrase, one of the new Expressions Plus dies on my card.


To begin my card, I cut a piece of navy cardstock 8 1/2" x 5 1/2" and scored it at 4 1/4".  In addition I cut a piece of silver cardstock 4" x 5 1/4" and a piece of watercolor paper 4 1/2" x 5 3/4".


The dies I used were CottageCutz Nativity Silhouette and Faith Phrase, both of which were cut from silver cardstock.  I cut a second Faith Phrase from gray cardstock.


I ran the silver Faith Phrase through my Xyron X sticker maker and glued it to the gray die-cut.  This gave a little more dimension to the phrase.


At this point, I watched the tutorial again for a very cool technique -- Galaxy Background.  There are several U-Tube videos explaining this technique.  The one I used was by Christine Riley.  Here is a link to her video.  This is the result of my attempt. 


Then I constructed my card.  After I had it completed, I decided that I wanted a bit more contrast between the ground and the sky; so I die cut a portion of the Nativity Silhouette from a piece of white cardstock and inset the pieces at the bottom of the card.  I liked that so much better.


Here again  is my completed card.


Dies used on this card are:


http://www.scrappingcottage.com/cottagecutznativitysilhouette4x4.aspx


http://www.scrappingcottage.com/cottagecutzexpressionsplusfaithphrase.aspx

Sunday, June 11, 2017

Friends

Hi!

It's Anja here. My inspiration for today
's card were little kittens that we currently have at home. They are so cute and like to cuddle a lot. So I made a card with cats on it. They are chatting like friends always do.


I used:
- Cottage Cutz Dies (Friends Phrase, Kitty with Spring Chicks, Sweet Spring Kitty, Flowerpot Mini, Springtime Window, Grass Trees & Vines, Spring Bunny w/Flowers),
- Distress Inks (Vintage Photo, Peeled Paint, Walnut Stain, Wild Honey, Black Soot, Pumice Stone, Scattered Straw),
- Distress Oxides (Fossilized Amber, Vintage Photo, Fired Brick, Walnut Stain, Worn Lipstick),
- white card base (20 x 16 cm),
- white paper (19,8 x 15,8 cm and 19,5 x 15,5 cm),
- white card stock for die cuts,
- Nuvo Crystal Drops (Dandelion Yellow),

- adhesive foam pads,
- embossing folder,
- glue,

- black and white pen.

First I die cut all the pieces. Both cats and the window are rather big, that's why I needed to cut them first and then adjust the size of the card base. I colored the pieces with Distress Inks and Oxides. I used blending foams for adding color. I also used little make up sponge applicator to add stripes on both cats.


I finished the flowers with some Nuvo Crystal Drops.

Then I cut the card base which is larger than usual (21 x 16 cm). I also cut two larger white rectangles. I cut a hole in the smaller one (for the window) and embossed it with an embossing folder to make it look like the outside of the house. I lightly used Scattered Straw Distress Ink on top to add some color. I also added red Oxide ink around the edges of the middle sized rectangle.


When I had all the pieces finished I started to glue them together. I started with the cat behind the window. I glued the embossed paper with adhesive foam pads. And then added all the other elements on top.


And for the end, one of my cute inspirations. The other two were to fast for me and my camera :)


Have a nice and sunny Sunday.

Anja Z.


Saturday, June 10, 2017

Hugs from the Herd


Hello Scrapping Cottage friends! Thanks for taking the time to stop and visit today. It's Mary Marsh here bringing you the Saturday edition of the Blog.

Hope you have been enjoying all the different cards from the DT using the new Expressions Plus word dies. The team has shown some really creative ways to use these dies with your existing collection. With 35 word phrases in these dies, there is so much you can do with them in your own card making.

Combining the word die phrases with a stamped sentiment is just one idea. That's the direction I am going with my card today.  I did this technique with this card and another idea popped into my head using the Baby Clothesline and Hugs Phrase dies.

I need a card of encouragement for a friend of mine who is battling cancer. And, the sweet baby animals are just too cute. And, they worked perfectly with the Hugs Phrase and sentiment I used.

So let's get started with some details on how I created my card.

Mint Card Base: 5 1/2" x 4 1/4"
Patterned Paper: 5 3/8" x 4 1/8"

Step 1: As I was looking through my cardstock and patterned papers, I found some card bases that have the look of water coloring. This is so popular in card making right now but I never like how mine turn out. That was the reason I bought the card bases. They are 4 different color schemes in the pack and I chose the mint.  With the coral hugs word and all my animal colors, I thought this would be a good base color.
Step2: I used the Baby Clothesline die and cut all the animals. Instead of cutting in white and coloring them, I used different colored cardstock for each animal. Either way works just fine. Just depends on what you want to do. Ranger multi-matte medium is my adhesive for securing the pieces together. 
Step 3: I cut the Hugs Phrase in coral cardstock. I only show one cut in this photo but on assembly I decided to cut another one. It just gives it a bit of dimension.

Step 4: Now that everything is cut, it's time for card assembly. First, I stamped my sentiment. Although I forgot to take a photo after this step. I used a combination of glue dots and the multi-matte medium to secure the animals to the patterned paper.
Attached my hugs phrase and then used some coral twine because I wanted it to look like the animals are holding the word.
Step 5: I die cut a few hearts to add to the top of the card. This helped to balance it out for me. The stitched hearts are part of the Stitched Cupcakes dies set. They were the perfect size to fill in the open area. I cut the hearts in the coral cardstock. This color works nicely with the mint. 
Well, that completes my card for this week.  Hope I have given you another idea for a way to use the Expression Phrase dies. See you next Saturday. We are on Instagram now. Check us out here.
 
Dies I used to create card:
 
http://www.scrappingcottage.com/cottagecutzexpressionsplushugsphrase.aspx

http://www.scrappingcottage.com/cottagecutzbabyclothesline.aspx

http://www.scrappingcottage.com/cottagecutzstitchedcupcakes.aspx