Tuesday, March 07, 2017

Happy day

Hi, Janja here!

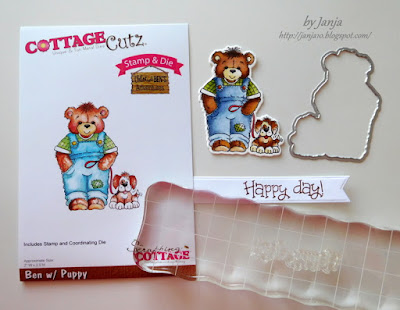
For today's card, I have chosen the bear Ben. It is from the new CottageCutz release - Chloe and Ben's  Adventures.
You will surely love these cute bears.


Supplies:
- CottageCutz stamp & die sets: Ben with Puppy, Garden Gnomes 2, Fancy Pocket Plus (button), Rounded Rectangle Set, Stitched Rounded Rectangle Set
- white card base: A2 - 4.25" x 5.5" (10,8 x 14 cm) 
- patterned paper: 4 x 5" (10,2 x 13,2 cm)
- patterned paper: 2.1 x 5" (5,3 x 13,2 cm)
- watercolor paper
- white and colored cardstock
- Distress ink: Antique Linen, Faded Jeans, Tea Dye, Vintage Photo, Mowed Lawn, Twisted Citron, Festive Berries

Stamp the bear on a watercolor paper, color it and cut it out with the die.
On strip from white cardstock stamp Happy day with coffee Archival ink. You will find it in stamp & die set - Garden Gnomes 2.


Trim patterned papers, glue them with double-sided adhesive tape and attach to the card base.
Cut out two rounded rectangles with dies (the 5th and largest die in a row from the middle of the set) from white cardstock and patterned paper.


Attach the bear with puppy, with self-adhesive foam pads on the background. Also, add a white strip with red heart.


I would like to show you another two cards with Bumblebee Chloe and Bumblebee Ben. I created them for friends with Slovenian sentiment - plenty of happiness.


Thank you for coming over. Have a nice day.


Monday, March 06, 2017

Woodland Scene

Hi, Lois here, with a fun card today.  I have used quite a few CottageCutz dies and stamp/die sets on my card.  If you know me at all, you probably know that I love making fun-fold cards -- so it will be no surprise to see that my card is a Side-Step Card.


Supplies used on this card are:

Green cardstock - 5 1/2" x 8 1/2"
Pale blue cardstock 1 3/4" x 3 7/8" and 1 3/4" x 3 1/4"
White cardstock for stamp/die sets
Scraps of brown and two shades of green for shrubbery
Copic markers
Liquid glue and tape runner
Fiskars paper trimmer
Scoring board
CottageCutz stamp/die sets - Woodland Animals, Woodlands, Garden Gnomes 1

To make the card base, I placed the 5 1/2" x 8 1/2" piece of green cardstock into the paper trimmer with the long edge at the 3 1/2" mark.  With the cutting blade at the 1" mark, I cut a line down to the 6 3/8" mark.  Placing the long edge of the card base at the top of the scoring board, I scored the wide section at 1", 2", 3 1/8", 4 1/4" (all the way across the center of the card), and 6 3/8" and folded on the score lines so that my card looked like this:


Using my Copic markers, I colored and cut the various stamps from both the Woodlands and Woodland Animals sets.


Then I cut the shrubbery from the scraps of green and brown, using the Spring Grass, Spring Greenery, and Campfire Clothesline dies.


I stamped the sentiment at the top of the tall pale blue panel and assembled my card.  The Campfire Clothesline tree had only a few leaves, so I made branches out of some of the Spring Greenery die cuts.  Here is a close-up of the steps of the card.


And again . . . the finished card.


CottageCutz sets used on this card are:


Saturday, March 04, 2017

Easter Basket + Tutorial


Hello Scrapping Cottage friends! Thanks for taking the time to stop and visit today. It's Mary Marsh here bringing you the Saturday edition of the Blog.

We have some fabulous new Spring dies in the store. Today for your viewing pleasure, I am featuring the Build an Easter Egg and Spring Bunnies dies. I made an Easter Basket with them.

I have seen quite a few baskets made using the Envelope Punch Board and I may try one of those soon. But, I realize that not all of you may have that tool. So my basket is made with dies and a scoring tool. I have loads of pictures for the process but here is a link to a video.

So let's get started on what I did for my project.

Step 1: The basket uses one sheet of 8 1/2" x 11" cut as shown in the following template.

 My first cut was at 4 1/2" x 11". Then cut this piece in half to measure 5 1/2" x 4 1/2". Used these pieces for my basket sides. The next piece used for the basket itself was cut at 4" x 6 1/2".  My last cut was 4" x 4 1/2". I used this piece to cut the basket handle.

Step 2: I used the largest Stitched Oval die for my basket sides. I cut 2 ovals using the 4 1/2" x 5 1.2" cardstock piece.  For the handle, I used the Oval die set -  Choosing the 1st and 3rd largest dies in the set. The cardstock piece is the 4" x 4 1/2" panel.


Step 3: I was now ready to complete the scoring on the 4 x 6 1/2" panel.  First score was at 1/2" on both sides of panel in portrait mode. The 2nd score is at 2". This was done on both sides of cardstock. Used a bone folder to crease all score lines. Also make cuts as shown in photo.


Scor-Tape added to top and bottom of panel
Step 4: I also scored the stitched ovals. This just made it easier to fold it under the basket base. Scored this at 1/2".  Used an embossing folder for added texture on the basket sides. I didn't emboss the 1/2" that was scored.

 
Scor-Tape added to oval panels
 
Step 5: Basket Assembly begins. The basket sides get secured to the base.
 
Both sides secured


Step 6: Die cut the elements for decorating the basket. Used lots of bright spring colors. Elements adhered with Ranger Multi-Matte medium and glue dots. Added the handles to basket with glue dots. I simply cut the oval that I made in  Step 2 in half.


Step 7:  Basket completed and time to fill with some goodies for gift giving.
That's it for me for this week. I hope I have inspired you to make a basket of your own for Easter or as a Spring gift. See you next Saturday!


 Dies I used to create card: 
 
http://www.scrappingcottage.com/cottagecutzbuildaneasteregg.aspx
 
http://www.scrappingcottage.com/cottagecutzspringbunnies.aspx
http://www.scrappingcottage.com/cottagecutzovalsetbasics.aspx
 
http://www.scrappingcottage.com/cottagecutzstitchedovalsetbasics.aspx