Monday, January 30, 2017

Baked with love

Hi, Janja here!

They say that love goes through the stomach. When you want for someone to embellish his day, or show your love for him, cook something good. Or send to the best friend as a little attention a card and home baked cookies.
So today something from our kitchen.


Supplies:
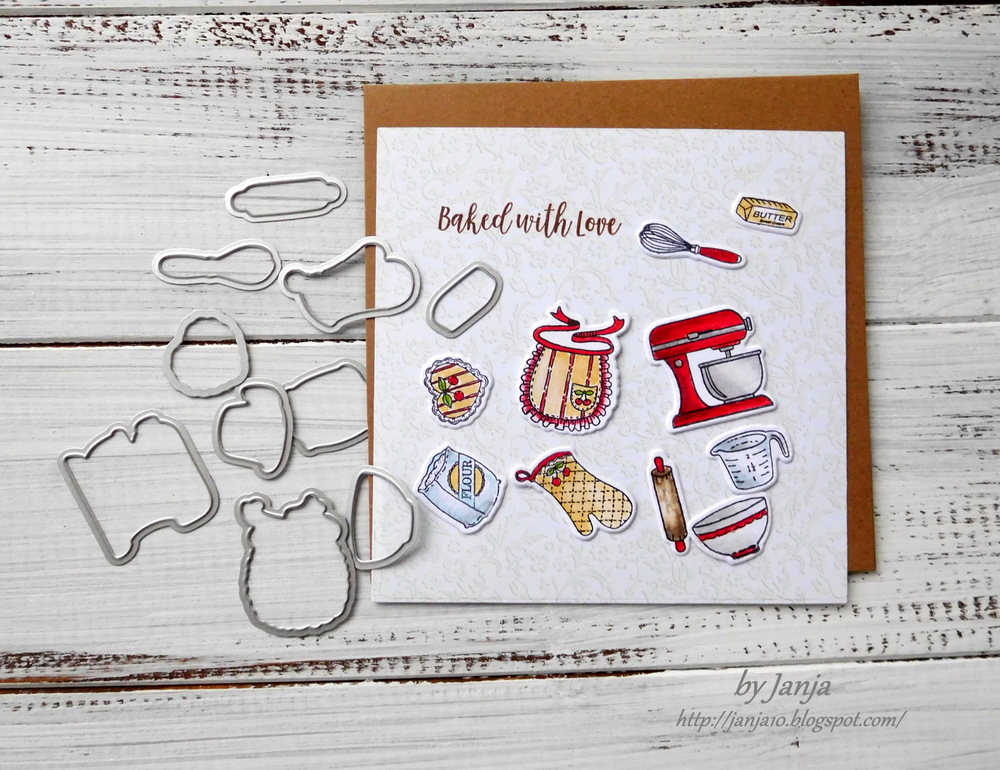
- CottageCutz stamp & die: baking in the kitchen
- kraft card base: 5.3 x 5.3" (13,5 x 13,5 cm), folded
- patterned paper: 5 x 5" (12,7 x 12,7 cm)
- watercolor paper
- colored cardstock
- Distress ink: Festive Berries, Aged Mahogany, Scattered Straw, Tumbled Glass, Broken China, Hickory Smoke, Antique Linen, Ground Espresso

Stamp motives, paint and cut them out.


For layout I chose an older die - parlor table & chairs. I placed all tools on them. Under the table I added a rug - floor lamps, rugs & plant die.


When we are satisfied with the layout, attach the cutouts to background.


Thank you for coming over and have a nice day.


Sunday, January 29, 2017

Cup of Love

Hello everyone!

It's Donna with another Valentine card. I hope you have stopped over at the Scrapping Cottage store to see all the new releases!  If you have not, here is the link most of the newly released dies and stamps are on sale.

I am using the new CottageCutz Cup of Love on my card. I love this die set, there are three cups in the set and you can make them a coffee, tea or hot chocolate cup.....the possibilities are endless and this is a must have in your stash of coffee related dies.  To see all the newly released Valentine dies, click here.


closer look of the card

Here is how I put it together:

1.  Card is an A2 card (4 1/4 x 5 1/2),

2.  All cut all the pieces with the colors I wanted to use on my card,


3.  I inked all the edges,

4.  I used liquid glue to put my pieces together,

5.  I embossed the base of my card,

6.  I then die cut the second to the largest die from the Cottagecutz Stitched Rounded Rectangle set,

7.  I put foam dots on the back of the heart piece,

8.  I added the coffee mugs and all the elements,

9.  I cut two stripes of paper and stamped my image on one piece,

10.  I finished my card off by adding some foam heart dots.

Thank you so much for stopping by, please come back again soon!

Dies Used:


Saturday, January 28, 2017

Love Postage + Sketch

Hello Scrapping Cottage friends! Thanks for taking the time to stop and visit today. It's Mary Marsh here bringing you the Saturday edition of the Blog.

We have some fabulous new stamp & die combo sets released and they are available at 25% off in the online store. The new sets include Chloe & Ben Adventures, Birthday Flowers (A flower for each month of the year) and Spring 2017 that not only includes spring dies but Easter themed as well. The Design team will be showing projects with these stamps and dies soon.

For today though, I have a Valentine card for your viewing pleasure. This one is made with the Sweet Valentine stamp and die set and the Love Postage dies. So let's get started with some details on how I created my card.
I started my card by using this weeks sketch #629 from Splitcoaststampers. Using a sketch most always is a good starting point for me. When I saw the square blocks in this one I thought the love postage dies would work perfectly.

Black Card Base: 4 1/4" x 5 1/2"
Red CardstockLayer: 4 1/8" x 5 3/8"
Patterned Paper Layer: 3 7/8" x 5 1/8"

Once I chose my card colors, I decided to use this red patterned paper because it has the same dotted lines and hearts as on the bear in the envelope. And for the wavy border on the sketch I am using red ribbon. After the picture was taken, I added the licorice twine.
 
My next step was to stamp my bear image. I stamped multiples just in case I wasn't happy with how  I colored him. I used both Prismacolor pencils and Copic markers for my coloring. This "Sweet Valentine" stamp set also has matching dies. I also cut the Love Postage images.
 
 
Finished the assembly of my card. Once it was done, I thought the ribbon and twine needed something so I added a bow. I used my bow-easy tool. The name does just what it says- makes bow tying really easy. 
Here is a close -up photos of the dies and bear image.
 
Well, that's my card for this post. I hope I have given you some additional ideas for these new Valentine dies. See you next week!


http://www.scrappingcottage.com/cottagecutzlovepostage.aspx
 
http://www.scrappingcottage.com/cottagecutzsweetvalentinesstampanddie.aspx


Tuesday, January 24, 2017

On the farm

Hi, Janja here!

Another new CottageCutz products line I share with you today. This are stamp & die combo sets. You can choose from eight sets for different occasions.
I have chosen the set - On the farm and supplemented it with two stamps and dies from the set - Farm animals.


Supplies:
- white card base: 5.3 x 5.3" (13,5 x 13,5 cm), folded
- white cardstock: 4.6 x 4.6" (11,7 x 11,7 cm)
- watercolor paper
- Distress ink: Dried Marigold, Worn Lipstick, Festive Berries, Aged Mahogany, Spiced Marmalade, Scattered Straw, Twisted Citron, Mowed Lawn, Tumbled Glass, Broken China, Hickory Smoke, Antique Linen, Ground Espresso

Since I use Distress inks for coloring, I stamped selected motives with black Archival ink on watercolor paper.


Once we have all the motives that we want to put on card painted, cut them out with matching dies that are attached to the set.


For background trim a white cardstock, shadow it with Distress inks, and stamp "Hay friend".


When the background is dry, begin by placing the elements on the card. Some of them are fastened with glue and some with self-adhesive foam pads to create depth.
The sun is from the Campsite die set.


Thank you for coming over and have a nice day. 


Monday, January 23, 2017

Hi, Chick!

Hi, Lois here today,  using one of the new stamp/die sets from CottageCutz -- Farm Animals.  I think the red gingham patterned paper gives a warm, country feel to my card.


Supplies used on my card:

Card base - 8 1/2" x 5 1/2", folded in half
Cream layers - 4" x 5 1/4", 3 1/4" x 4 1/2"
DP layer 3 7/8" x 5 1/8"
Ink - black, red
Other - Copic markers, Foam pop dots

I stamped, colored, and cut out my three Farm Animals images.


Then, using two pale shades of blue and tan, I "painted" the background to my focal panel.


I stamped my sentiment on a scrap of cream cardstock and then cut out two ovals using the Double Stitched Ovals dies.


When I layered the two ovals, I thought the difference in size was too wide; so I trimmed the gold oval at the inner stitch line, sanded it smooth, and then mounted the cream oval onto the gold one.  I liked the size contrast much better.   Then I constructed my card.  All the die-cut elements are popped up on foam pop dots.


Dies used on this set are:


Sunday, January 22, 2017

Happy Valentine's Day

Hello everyone!

It's Donna here, can you believe we are almost at the end of January......here in Virginia, we have not gotten any snow and it has been relatively warm for this area.  I am enjoying it while it last, because we still have February to go.

I am here sharing another Valentine card.  I know I have told you before, but I love the colors of Valentine's, I love red and pink with black.  Today, I am sharing with you a red and black card.  There are several newly released Valentine dies that you just have to see. Go over to the CottageCutz store and check them out.  Right now the Valentine release is 25% off!

I am using the new CottageCutz Fancy Heart and the Valentine's Day Phase on my card. These sets are adorable and so easy to assemble. See below on how I put my card together.


Closer look:

inside of the card:

Here is how I put my card together:

1.  My card is an A2 card (4 1/4 x 5 1/2).  I cut a layer (red), which measures 4 x 5 1/4.  I die cut all the pieces I need for my card. 


2.  I wanted to create a frame in the front of my card, so I took the fourth circle to the largest from the CottageCutz Circle Set, found the center of the card.  I used some re-positional tape to keep the circle from slipping.  

3.  After I die cut the circle, I took the red layer from my card and die cut another circle using the third to the largest circle.  I die cut the circle, embossed it and adhered the layer onto the black card.


4.  I cut out two of the "Fancy Hearts", I used some foam tap and put the two hearts together.  This would give the heart more dimension.

5.  I have a little trick for all those intricate dies.  The "Valentine Phrase" die is some intricate and dainty, I took some double stick tape and put it on the back of the black piece that I was cutting the sentiment out of.  I laid my die on the top of the black piece and ran it through my die cutting machine.


6.  When I took the paper away from the die, this is what it looks like, the adhesive is already onto the words.  I added this onto my card and finished it off by adding some sequins.


 Dies Used: