Sunday, October 02, 2016

FIRE PLACE CARD WITH DETAILED DIE CUTTING

Hello friends !!

Happy Sunday !!!
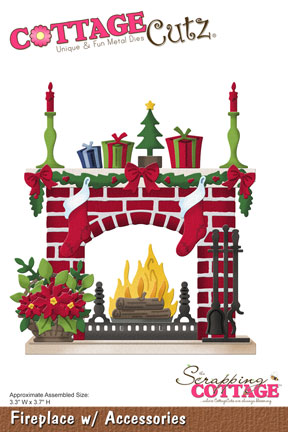
It's Anita here with a very pretty card for you. CottageCutz store has such a wonderful collection of Christmas and Autumn dies. Some of them are so intricate that you can build some amazing festive themed scenes with them.
You might some of these dies very detailed and intricate , but as you build them up by colouring these or cutting them in coloured card stock.
So here is my card  followed by step by step detailed pictures as I build the layers.
Do try these dies and I'm sure you will love them.


The die cuts beautifully in one go!!!All the elements are grouped together. Example-All the elements of poinsettia flower basket are grouped in one left top corner. So you need not hunt for tiny die cuts. Try to keep all the die cuts attached to the paper and use them step by step as you proceed.


  I have started building the fireplace. Colour them with Zig Brush pens.


All the elements and layers of fire place coming together.


Cut a stitched wide rectangle frame and emboss it in basket weave embossing folder.


Cut the best wishes expression . Keep it attached to the card stock. Colour with Zig Brush pen. Adhere to the base.
The finished card measures 5 inches by 7 inches.


Saturday, October 01, 2016

Wisdom Tree Christmas


Hello Scrapping Cottage friends! Thanks for taking the time to stop and visit today. It's Mary Marsh here bringing you the Saturday edition of the Blog.

It's a rainy day here in the Eastern U.S. and a slight chill is in the air. One of those perfect days for staying indoors and doing some crafting. And, it's also World Card Making Day. So there is a 2nd reason to get crafty on this first Saturday in October
.
Today for your viewing pleasure I am featuring another of the new Christmas 2016 dies. This one is the Wisdom Tree. The words are a wonderful description of what Christmas represents.

So let's get started with some details on how I created my card. I wanted the words to be the focal point so I kept the embellishments minimal and dressed the card up with some patterned paper, ribbon and a few sequins.

Teal Card Base: 4 1/4" x 5 1/2"
White Layering Panel: 4 1/8" x 5 3/8"
Patterned Paper Panels: 1 1/4" x 5 1/4", 1 1/2" x 5 1/4", 1" x 5 1/4"

I found some odd sized pieces of this patterned paper in my stash but nothing big enough to cover the size panel I was using. So  I decided to cut 3 different size panels for my background. That solved my problem. You know how it is when you want to use something on a card. Nothing else you look at works (lol)!!

My next step was to cut the words from the Wisdom Tree die. I cut it twice just for some added dimension.  I decided to stay with the teal color theme. I used the rectangle and stitched rectangle dies to cut the panels for the words.
I started the assembly process with the background designer paper.  I decided to add some white satin ribbon on this panel. Again just for added interest. I used some Ranger multi-matte medium and attached the words to the white panel.
Secured the image panel to my card with some dimensional adhesive. I wanted this panel raised up from the striped background just a bit. I finished it off with a few teal sequins.
 
Here is a close-up photo of the image panel. I love the beautiful font and die shape and of course the bottom layer with the flourish and "25" finishes the tree perfectly.
I hope my card has given you an idea for using this new die. Well, that's it for me for this post. So until next time.......inky hugs!


http://www.scrappingcottage.com/cottagecutzwisdomtreeelites.aspx
http://www.scrappingcottage.com/cottagecutzrectanglesetbasics.aspx
http://www.scrappingcottage.com/cottagecutzpiercedrectanglesetbasics.aspx


Friday, September 30, 2016

Hello

Hello everyone,

It's Donna here sharing one of the newest CottageCutz dies that was just released. If you missed it the release, you can find the collection here. I am using the adorable coffee die called "Mug with Heart". Here is my card:


closer look at the cups.

How I created my card:

1.  A2 size card 4 1/4 x 5 1/2, 

2.  I cut all my pieces out, 

3.  I inked up all my cups with the colors I wanted to use,

4.   Then I dipped them in matching embossing powder,  and finished with the heat gun. 

5.  After I finished all my cups with the ink and embossing powders, I took the white pigment ink with the splattered ink pad and dotted the cuts.  Do you remember years ago there were dishes called pfaltzgraff?  Well this is the look I was trying to get.  Here are the finishes cups

Dies used:


Thursday, September 29, 2016

Wheat Stalks in Frames


Hi, Vladka here!

Today I'm using some dies from Autumn release. I love this time of the year, when nature is so generous with colors. This is my card:


Basics:

White card base: 4 1/4 x 6 inches (cut 4 1/4 x 12 inches, fold in half)
Additional piece of white cardstock and some red and kraft cardstock to cut out the die cuts 

Other Supplies:

CottageCutz Dies: Listed Below
Distress Ink:  Tea dye, Brushed Corduroy, Fossilized Amber
Other: acrylic block, Scissors, Paper trimmer, Sizzix machine, piece of acetate 

1. First let's do some smooshing on additional piece of paper to prepare the background.  Add some Tea Dye Ink on acrylic block and spritzed some water on it. Then take a piece of plastic acetate and gentle pressed it against the block to pick up some of the ink. Now, press the plastic on the paper to transfer the ink. This will give you a splotchy look. Put paper aside to dry or use heat gun to dry it:


2. Prepare all die cuts: Wheat Stalks cut out of white cardstock and bow cut out of the red cardstock, "Give thanks" cut out of the kraft cardstock and two second biggest Pierced Wide Rectangle Frames (one white and one cut out of the kraft cardstock):


3. Color wheat stalks gentle with Fossilized Amber distress ink first and then distress the edges with Tea dye and Brushed Corduroy distress inks:


4. Now glue piece of paper with smooshing on card base, then glue both rectangles and also all die cuts as shown on the photo.


5. To finish the card, flick some droplets of gold shimmer spray and let it dry. Card is now finished.


I hope you like it. Have fun creating. And don't forget, sixth CottageCutz challenge is waiting for you. You still have two days to participate. This time theme is HOLIDAY. You can linked your project here. And please, use only Scrapping Cottage dies.

Tuesday, September 27, 2016

Christmas ornaments and card

Hi, Janja here!

Decorating the Christmas tree is for me one of the most beautiful parts of Christmas. Creating homemade ornaments is nice socializing for the whole family.


For the card and ornaments we need:
- white scalloped card base: 5.3 x 5.3" (13,5 x 13,5 cm), folded
- brown cardstock: 4.8 x 4.8" (12,2 x 12,2 cm)
- patterned paper: 4.5 x 4.5" (11,5 x 11,5 cm)
- gold and green cardstock
- tape with cork
- ivory embossing powder and embossing pad
- golden string

First paste the tape with cork on a cardstock. Such fortified tape is very easy to cut with dies. Use the smallest dies from the nested ornaments: ball and star. From the golden cardstock cut the tops for hanging ornaments.


Stamp chosen pattern on the ornaments and treat it with hot embossing technique. First I used golden embossing powder, but I was not pleased with the color contrast, so I used an ivory powder.


Cut a few spruce stems from green cardstock.


Use the tape with cork also for branches, that are cut out with the die holiday mason jar. With this die also cut out a bow in gold.


Now we have everything ready and we can start assembling the card.


Attach both ornaments on the patterned paper, and on the upper part start adding spruce stems and branches. Pay attention to cover the both ends of the golden string.


Fasten patterned paper on to a brown cardstock and mat them together on front of the card. Add the golden bow and some golden dots, which remain us in cutting tops for hanging ornaments.


Use the same technique for Christmas ornaments.
We need two cutouts for each ornament, which are glued together. Add the golden tops of Christmas ornaments (2 on each ornament) and insert a golden string.


Ornaments are light, pleasant to the touch and really easy to make. 


I would like to remind you on our challenge #6 - holiday
You still have time to share your projects with us. 

Enjoy and have fun while creating.