Wednesday, April 20, 2016

Love You, Mom


Hello Scrapping Cottage Fans! Thanks for taking the time to stop and visit with us. It's Mary Marsh here bringing you the Wednesday edition of the Blog. Today for your viewing pleasure, I have created a little garden scene as a Mother's Day card. We will be celebrating Mother's Day here in the US on Sunday, May 8. It's just under 3 weeks away so time to get busy creating a card for Mom, Grandma, Daughter or someone special.
 
Here are some details on how I created this card:
 
The main die is the spring tree frame and I cut it in white card stock.  Using sponge daubers and distress inks I colored the tree, leaves, birdhouse, bird and tulips. The die cut measures 3 3/4" x 5". I set that aside to work on the background.
 
 
Background: I cut white card stock 3 7/8" x 5 1/8" and used a stencil to sponge in the sun rays.
 
Then I lightly sponged in a soft blue background and adhered this to my spring tree frame. 
 
I then applied versamark ink and clear embossing powder and heat set. It gives a nice shine to the trees and leaves.


To highlight the scene I added a frame around cut in the deep purple shade and attached it to the spring tree frame with glue dots. The outside measurements are 3 7/8" x 5 1/8". The inside measurements are 3 3/8" x 4 5/8".
 
 
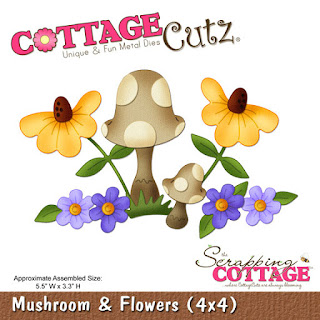
I used the parlor set and cut in a deep purple shade to set in the middle of my garden scene. The vase on the table is from the Mushroom & Flowers dies. It's the base for the smaller mushroom. Just another way to get more mileage out of your dies. I cut it in a chocolate card stock.
 
The flower in the vase is cut from the butterfly with flowers die. I cut it once in green cardstock then again in pink. I paper pieced the pink flower over the green and placed it in my vase.
 
Once the scene was created I attached it to a white card base measuring 4 1/4" x 5 1/2". I used mounting tape to pop it up on the white base.
 
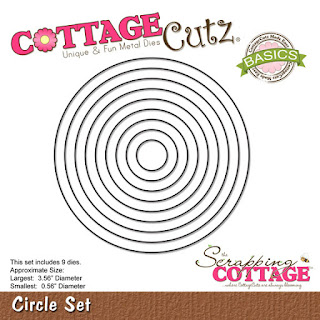
To complete my card I stamped my sentiment and cut it out using the circle set and the stitched circle set. Attached to the side of my frame for a little interest.
  
 
Also, did you know that we are having a challenge for our fans and followers to display the cards you have made with CottageCutz dies? There are prizes to be won as well. Click here for all the details and the linky to submit your entry.
 
Well, my friends that's it for me for today. So until time....... inky hugs.
 
http://www.scrappingcottage.com/cottagecutzbutterflywithflowerspetites.aspx
http://www.scrappingcottage.com/cottagecutzcirclesetbasics.aspx
http://www.scrappingcottage.com/cottagecutzstitchedcirclesetbasics.aspx
 
http://www.scrappingcottage.com/cottagecutzmushroomandflowers4x4pre-order.aspx
http://www.scrappingcottage.com/search.aspx?find=spring+tree+frame

http://www.scrappingcottage.com/search.aspx?find=parlor+set


Tuesday, April 19, 2016

A beautiful underwater world

Hi, Janja here!

The new CottageCutz flourish & flowers dies are already on my desk. But before I start with them, I want to lead you in a beautiful underwater world. Let's see what is hiding in the coral reef.


For the card we need:
  • white card base: 10.6 x 5.3", folded
  • blue or patterned paper: 5 x 5"
  • patterned paper in the sand color: 5 x 1"
  • white and color cardstock
  • distress inks: peeled paint, mowed lawn, worn lipstick, dusty concord, festive berries, aged mahogany, mustard seed, rusty hinge, pumice stone and black soot

First, we prepare cutouts shaded with distress inks. We prepare a larger number of cutouts, because the card is made inside and outside.
 

For corals, underwater plants and coral reef, I used the die - under the sea. The die offers a lot of elements that you can optionally attach to the background. Some of cutouts are fixed directly to the background and for the remaining we use adhesive pads. 
In this beautiful environment, I added a crab, a starfish and a fish.
 

In the interior of the card, the background is prepared the same way as the front side of the card. 
From the white cardstock we cut out a circle (the largest die of a set) for text. The edges are covered with the stitched circle frame (the largest die of a set). With the remaining cutouts we create a beautiful underwater world.


And don't forget on our April challenge - anything goes. You still have time to share your projects with us till the end of the month. Two lucky winners will get the nice award.
Dies, which I used at work:


Have a nice day. 

Janja

Monday, April 18, 2016

Magic-box for the Newborn Girl

Hello friends!
Yuliya here and today I share with you another project made with the CottageCutz dies. I make  magic-box for the Newborn Girl
The size of my box is 4' 'х 4'' х4''
Let's see how it is made.
Supplies:
Cardstock for base box - 2 pc 12'' х 12''
White cardstock for cut - 1 pc A4
Patterned Paper: 4 pc 12'' х 12''
1.  Prepare cardstock for base box - 12'' х 12''. Fold it at 4'' and 8" on both sides. Cut the folded lines as it is shown on the picture.
2. I make the cover for box. Prepare scrapbookpaper for cover 5,59'' х 5,59''
Fold it at 0,78'' on all sides. Cut the folded lines as it is shown on the picture.
3. I glued the cover
4. Let's decorate with papers!
Prepare the details for our Box - cut out 8 details from paper sheets:
10 pc - 3,75''
4 pc - 3,4''
5. I glue the paper
6. Inside too
8. Glued the die-cuts as it is shown on the picture with help glue tape


9. Here is how I put the flower together. The flower has 3 pieces. I die cut them out with paper. 
10. After the flowers are die cut and inked
11. I used my  special tool to curl the edges to get the fibers lose.
12.  Here is the finished flowers.
13. Our Box is ready 


So cute, isn't it?)
Finally adding some crystals!))

I hope you enjoy the tutorial and will be happy to inspire you!
Also, did you know that we are having a challenge for our fans and followers to display the cards you have made with CottageCutz dies? There are prizes to be won as well.Click here for all the details. I hope you will join in on the fun!