Wednesday, April 13, 2016

Happy Mother's Day


Hello Scrapping Cottage Fans! Thanks for taking the time to stop and visit with us. It's Mary Marsh here bringing you the Wednesday edition of the Blog.  Today, I am giving you a sneak peak of some new brand new dies that will be coming to the shop later this week.

I have been asked how I start my cards or where I get the ideas for my layout. It's always a bit different for me. Sometimes I have the card layout in mind and I just start creating. And, then sometimes I have a particular theme in mind.

Today, my card started with my layout. There are many places on the web that provide card sketches. I used a sketch from Splitcoaststampers. So let's get started with the card details.

Card Base:  8 1/2" x 5 1/2" and scored at 4 1/4" to make an A2 card (4 1/4" x 5 1/2")
Patterned Paper:  4 1/8" x 5 3/8"
Large Rectangle Layer:  5" x 2" and white layer is 4 7/8" x 1 7/8"
Small Rectangle Layer:  3 3/4" x 2 1/4" and white layer is 3 5/8" x 2 1/8"
Green Background Panels: 1" x 4 1/8" and embossed with a flower pattern.
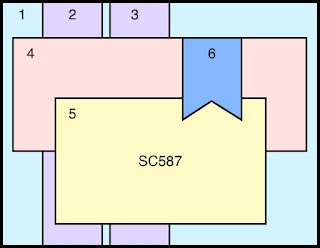
My Card Layout

After I decided on this sketch, I chose my patterned paper and that helped me decide on my card colors. Since the paper colors are a deep raspberry and olive green color, I stayed with that palette for my die cut flowers and leaves.

The flowers and leaves are the sneak peek I mentioned to you at the beginning of the post. The flowers are the "doodle flower set 1". They come with a background die and also the doodle flower die. Aren't they just the cutest little things?

I cut the background in the deep raspberry shade and decided to use some patterned paper to create a bit of contrast. I used dimensional adhesive and attached them to my card. To attach the doodle part of the flower I used multi-matte medium. It's a strong adhesive like glossy accents but it dries clear.


The leaves are also a new set of dies and come with a background and pattern die. They are the new leaves & stems dies.  I cut them in olive green and then a celery green shade. If you look close, you will see that on one set of the leaves I used light and then dark for the top layer. I just switched it around on the other set of leaves for interest.

I used the Mushrooms & Flowers die for the 2 small flowers on the card. I cut those in the deep raspberry shade and used the same patterned paper for the flower centers.

Since I used flowers, I decided to make it a Mother's Day card. We will be celebrating on Sunday, May 8 here in the U.S. I stamped my sentiment, added a couple of enamel dots in the raspberry color and I added a flag cut in the deep raspberry shade to complete my card.


Well friends, that's it for me for today. Hope you enjoyed the little peek I gave of the upcoming release. Also, did you know that we are having a challenge for our fans and followers to display the cards you have made with CottageCutz dies? There are prizes to be won as well. Click here for all the details and the linky to submit your entry.   So until next time......inky hugs!
 
http://www.scrappingcottage.com/cottagecutzdoodleflowersset1.aspx

http://www.scrappingcottage.com/cottagecutzleavesandstems.aspx
 
 
http://www.scrappingcottage.com/search.aspx?find=mushrooms+%26+flowers


Tuesday, April 12, 2016

Ship's porthole

Hi, Janja here!

Today I share with you another card made with the CottageCutz nautical dies.
Let's see how it is made.


For the card you need:
  • card base in brown color: 11.4 x 5.7" (29 x 14,5 cm), folded in half
  • white cardstock: 5.3 x 5.3" (13,5 x 13,5 cm)
  • wooden sheet
  • scraps of white and colored cardstock
  • transparent PVC foil
  • embossing folder
  • Distress inks: Antique Linen, Vintage Photo and Wild Honey
  • white pigment ink pad
  • white chalk paint, brush
  • gold and copper metallic paste
  • paper cutter
From wooden sheet we cut out 10 strips. They should be 5.1" (13 cm) long and 0.5" (1,2 cm) wide.
Paste them on a sheet of paper and cut it to size 4.9 x 4.9" (12,5 x 12,5 cm). I advise you to use glue and not double-sided tape. 
The whole area is shaded with the Distress ink Vintage Photo and a white pigment ink pad.
Finally it's painted with a white chalky paint.
When the color is still wet, pull with the finger on some places. This will remove color. Little smearing, but at the end, you will be satisfied with the shabby appearance of the wood. 


Now let's start with porthole.


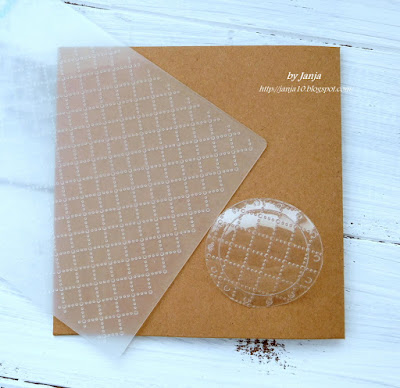
Prepare the cardstock cutouts. For the glass piece use PVC foil. I can't advise you which one is preferred. I always use the thicker one. 


Use embossing folder for pattern on the foil. 


Coat other cutouts with gold and copper metallic paste and glue them together with the foil.
 

The fence consists of two CottageCutz dies. Pillars and the rope around them are from the pelican die. Pillars are also cut out of a wooden sheet. 
For the rope between the pillars, use the rope corner die.
 
Seagull flew to the one of the pillars, while we stuck an anchor to another one. The inscription Happy Birthday is glued to the wooden background.
And don't forget on our April challenge - anything goes. You have time to share your projects with us till the end of the month. 
Two lucky winners will get the nice awards.
 
List of dies used:


I hope that you enjoy my company.

Janja

Monday, April 11, 2016

The rustic-card "Best Wishes"

Hello friends!
I am Yuliya here with a beautiful new card for you!
 And I want to show step by step pictures to show you how to make this rustic style card with very pretty 3D flowers! 


For the card we need:
- white cardstock for the base card
- scrapbook-paper
CottageCutz 3D Flower 5
- CottageCutz Cross-Stitched Circle Set (Basics)
CottageCutz Leafy Foliage (4x6)
CottageCutz Tea Time Doily (4x4)
- CottageCutz Expressions Best Wishes
- ribbon or lase
- glue and glossy accents

1. I prepared the details of my future card:
 - white cardstock for the base card: 11 x 5,5" (28 x 14 cm), folded in half -1 pc
- white cardstock 4,3 х 4,3'' (11*11 сm) - 1 pc
- scrapbook-paper 5,3 х 5,3'' (13,5 х 13,5 cm) - 2 pc and 4,1 х 4,1'' (10,5 х 10,5 cm) - 1 pc

2.Glue the details of scrapbook paper to the cardstock. Glue the lace
3. Add some volume with the help of chipboard.
4. Our card is ready for the next step

5. Cut out flowers and leaves from the CottageCutz 3D Flower 5, CottageCutz Leafy Foliage (4x6)
So cute, isn't it?) I use also CottageCutz Tea Time Doily (4x4)
 6.
7.


8. Arrange our details on to the card as shown in the picture below.
9. I glue inscription Best Wishes on the circle. I make the very nice circle with help
CottageCutz Cross-Stitched Circle Set (Basics)
Cut out frames in many sizes in scrapbookpaper and arrange on to the card as shown in the picture below.

10. Arrange the flowers and leaves on the card as shown.


The card is ready.

CottageCutz is having a new challenge - Anything Goes, for the very first time and giving away two prizes to the winners. So do follow this link Challenge #1 and play with us.
Here are the dies that I used for my card


Have a great day. See you next week.

Saturday, April 09, 2016

PLUMERIA BLOOMS


Hello friends,

It's Anita Kejriwal here, bringing for you a very pretty spring card made with CottageCutz dies.

It's Saturday today and everyone is ready to have super weekend. I ,too am going to have a fun filled weekend with lot of craft activities. So why don't you join me to create this card adorned with very pretty flowers!
I have used stitched Circle dies to create a pattern on the card base on which I have laid down the flowers.

So have a look at the card followed by some step by step pictures to show you how to make this card.


Instructions and pictures for making the card.

The completed card measures 7 inches by 5 inches.

1. Cut a card base the measures 10 inches by 7 inches. Score at the 5 inch mark on the 10 inches side and fold.

2. To make the first mat layer, Cut a card stock measuring 4.75 inches by 6.75 inches. Cut another pink pattern paper measuring 4.5 inches by 6.5inches .
Apply Aged Mahogany Distress Ink on the pattern paper and mark score lines at an interval of 1/8th inch. Adhere this to the mat layer. Adhere the mat layer to the card base with 3D foam tape.


3. Using the CottageCutz Stitched Circle set, cut out frames in many sizes in white card stock and arrange on to the card as shown in the picture below.


4. Cut out flowers and leaves from the CottageCutz Plumeria and Leaves set and make do some deep cutting between the petals by removing the notch between the petals.


5. Colour the flowers with Color Box inks and the leaves with Distress inks. Add a few black dots on the petals.


6. Arrange the flowers and leaves on the card as shown.


7. Add the sentiment from the CottageCutz Expressions Best Wishes on a vellum paper and adhere to the card.

The card is ready.

CottageCutz is having a new challenge - Anything Goes, for the very first time  and giving away two prizes to the winners. So do follow this link Challenge #1 and play with us. 


Here are the dies that I used for my project


Do share your work with us and please leave your comments. It really helps us to serve you better.
Have a great weekend. See you next week.