Thursday, October 17, 2013

Midnight Witches Brew decorated lunch/gift bag

 It's that time of year!  What am I talking about?  Well, Halloween, of course.  It's Carol here today with a CottageCutz Creation!  Don't you love the bright colors of the season.  On this project for CottageCutz, the papers are just "screaming" color and fun "spooky" images.  Sure to "thrill" even the most "squeamish"  Trick or Treater!
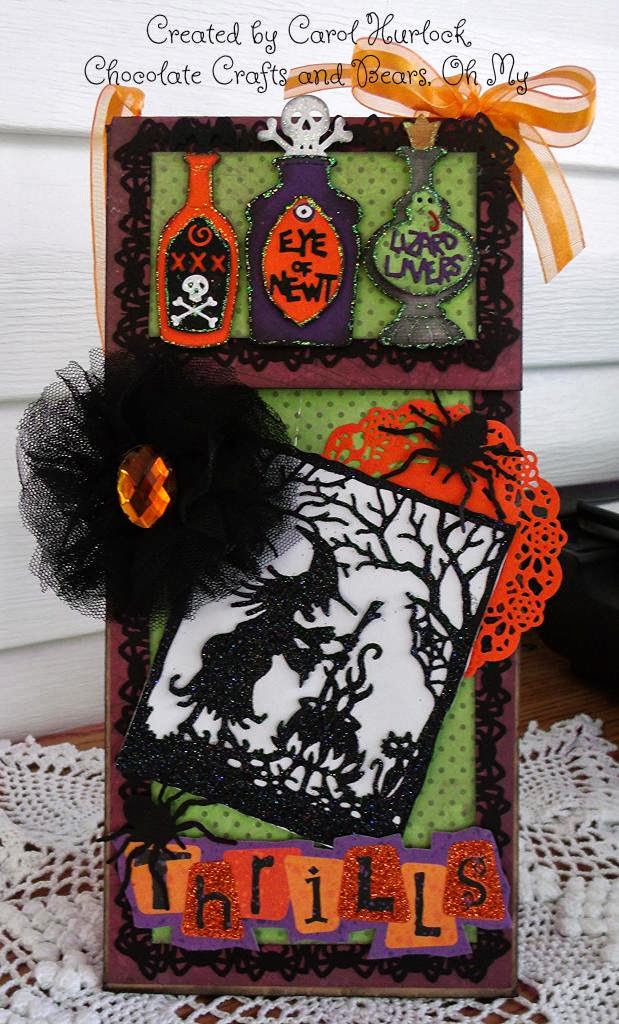
 This is a decorated lunch bag with a little bow handle at the top.  Now I never had girls, but if I did, I would have used something like this for her to carry her lunch to school in on Halloween!!! lol  Better yet, I was thinking about how someday I might have a grandchild and this would be the perfect little gift bag to place some treats in to give as a gift.
 Isn't this a darling die?  It's called Potion Bottles and they were so fun to put together.  They are popped onto a panel that was created with a Martha Stewart Spider Punch around the Page.  This is actually a flap that comes over the top of the bag and has a Velcro closure.
This image is Midnight Witches Brew.  It was cut on black cardstock and black glitter is what is making it sparkle.  The little Tea Time Doily is the backdrop for that creepy spider.  And yes, I did scare myself with that spider!!!!  I don't care for spiders AT ALL.  I punched that baby out and was really intrigued by how it pops up at the legs-not so intrigued when it got tangled up with the paper and flew up when I moved.  I jumped a half mile then laughed at scaring myself with the darn thing.  We have spiders this big and bigger in the south.  I will be sure not to leave any punched ones hanging around!!!!lol
The flower was created with some black lace netting that was on hand and a recollection orange bling piece was added to the center.  The sentiment is a K&Company from my stash.  Quick and easy if you need a gift bag for someone special or want to surprise a loved one with a great lunch bag!  Thanks for visiting today.  I really appreciate it.  Here are the dies I used:


Wednesday, October 16, 2013

Winterland Village


Hello everyone!

 Simona here with a new post for 

Today's card is showcasing beautiful


was cut out of silver glitter paper.


For the background I used pergamano paper and 
dry embossed it with the Xcut embossing folder (Holly). 
I used pine needle distress ink and applied the color
with the  brayer onto the embossing folder.
Then I glued the embossed pergamano paper
to the white liner. For the base of my card I chose
some green cardstock. 


As a final touch I added some Holly leaves
and drew some dots with a white gel pen.

Thank you for looking!

Hugs,
Simona

The dies used:


Tuesday, October 15, 2013

Christmas Cheer Gift Bag

Hello Friends! Happy Tuesday, today I have a new post
for you, this time I created a gift bag. 
Take a look:


I used a paper bag and covered the front and back with
kraft cardstock, then on top my designer paper
and some rhinestones swirls.


These are the dies I used for this bag:


Hugs, 

Monday, October 14, 2013

Christmas Cheer Candles

Hi all! Vladka here again with another Christmas Card!
This time I used  Christmas Cheer Candlesand Spice Rack&Jars dies to create peaceful Christmas atmosphere. 
As usually, I used different Distress Inks to colored all die cuts. Then I use a sentiment and a little heart and card was finished. I just love to create Christmas theme cards. It fills me with warmth and excitement.
Have a great week!


Sunday, October 13, 2013

Happy Halloween card


Today, I am sharing a NEW Halloween card  I created with 
Beautiful NEW Halloween Collections 2013.


For this card I used NEW "Midnight Witches Brew" die. I cut image out 2 times. First image I glued to orange card panel. From second image I cut out witch and cat. Glued parts on first image using foam tape. Added glitter on images and sentiment "Happy Halloween". 
Very easy to make.


For this project I used: 

Have a Wonderful Day! Olena


Saturday, October 12, 2013

BOO! Card


Happy Saturday everyone!  Kathy with you and today I have a cute Halloween card using 3 new Fall CottageCutz Dies.  From the Halloween Release I use Scarecrow Pumpkin and Spooky Ironwork Sign, and from the Harvest Release I used Harvest Fall Corner Dies! 


Aren't these too cute? 

I used a bunch of different colored cardstock (mostly scraps) and ink for this.  I shaped some of the pieces and inked in some shading and shadows.  The background is a piece of Iced Cocoa Coredinations Cardstock that is embossed with Triad Leaves Embossing Folder.  It's hard to tell in the picture, but the card base is black.   Here's a close-up of the Scarecrow Pumpkin with Harvest Fall Corner.


Here's a close-up of the Spooky Ironwork Sign.  I used a black marker to write "BOO!" on it.


These are the dies I used on this.


Friday, October 11, 2013

Happy Halloween Bendy Card


Hello everyone, Cheryl here with a Bendy card. I was so inspired to created one of these due to Carol and her post with her beautiful Bendy card. I just LOVE the fold for this. Thank you Carol for the inspiration to create one of these.


For my card I used TONS of CottageCutz Dies. The dp is Graphic45, and I thought the print was fitting for the occasion :) hehehehehee

Next I used the spooky Iron fence along the bottom of the inside and outside of my card. I placed the Lantern Tree on the front and the backside, to make it more sturdy, and so you could see the entire tree when opened. I used the tombstones along the inside like a cemetery. I figured the cute Jack o Lanterns would be darling on the front, but again I wanted you to see them on the inside too. 

I absolutely LOVE all the NEW Halloween CottageCutz dies, as they worked PERFECT for my card today :)

Here is a list of CottageCutz used:
CottageCutz Haunted House


In this photo you can see the tree, with the ghost, and the Iron sign. I added Welcome to it :)


Original Photo tutorial by Emma can be found here
Thank you for looking and have a lovely day!!
Hugs to all,
Cheryl