Saturday, September 25, 2010

Beachy Fun!!

Since it is still so incredibly hot down here in Alabama (we are still hitting high 90's everyday), I figured I might as well work on some fun summer layouts! The beach dies from the Aug under the Sun Release are so much fun and are such must haves for all of your summertime activities.

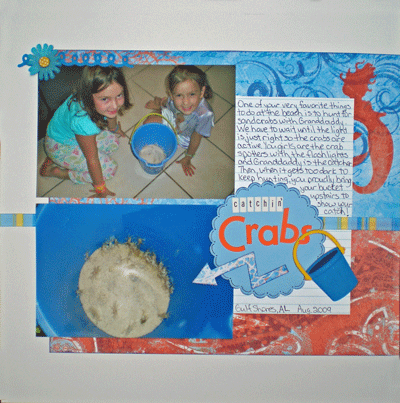
For my layout today, I am featuring the Cottage Cutz Pail and Shovel die. This die is another one of those great dies that comes with several different shapes any of which could stand alone. In my pictures, my girls were carrying their sand bucket to use to hold their crab catch. Therefore, I just used the bucket to accent my title. I "hung" the bucket from the curve in the letter "s" from my title to emphasize the bucket.


I also used the Cottage Cutz Loops Edger to add some accents around the layout. I LOVE theses edgers because I did not have any ric rac the right color and I was getting irritating and then I remembered my edgers! Of course once I started looking through my edgers, I found my Loops one and decided to use that one instead of ric rac. I hope you have a great weekend and get a chance to do a little scrapping, too!!


Friday, September 24, 2010

Life's A Beach

Good morning!  For my post today, I'm sharing a layout I did using my Cottage Cutz Sandcastle and Seagull dies from The Scrapping Cottage.  I used colored card stock instead of white this time, because the kraft card stock just worked the best for trying to achieve that sandy look, so as they say, "If it ain't broke...  and, I'm sure you know the rest.  I did do a little shading here and there with Copic markers, but not too much.
 I did lots of tearing and sponging on this page, and I used some twine to wrap around the posts for a more authentic look.  The Life's A Beach title is computer generated, and I thought it would be cute to add that to the sand castle.  I know I have pictures of my kids when they were little that will work just great with this page.  Thanks so much for stopping by today.  Have a wonderful day and I hope you get to enjoy some happy crafting!


Thursday, September 23, 2010

PLAY

We had such fun with the girls this summer and I'm not quite ready to let go of summer just yet, so I'm still scrapping photos from their visit. Here is Mila playing in the backyard with one of the kids' fishing poles. Grace was giving her pointers on how to fish. At 9, Grace is an expert now, you know. LOL

Papers for this project are from the Thrift Shop Collection by October Afternoon.


For the 3D flower embellishments, I used the sunflower die, minus the stem, pot, and faces, from the Peachy Keen collaboration release. Instead, I used buttons with ribbon for the centers, and popped the layers with foam tape for a more dimensional look. In keeping with the play theme, I threaded ribbon through and around the title letters and cut two of each letter overlapping light over dark to give a shadow affect.


Thanks for visiting the blog today, and I hope you'll leave a comment. I always appreciate the feedback. :)

Wednesday, September 22, 2010

I went to pull out a card for my cousin Jack who just had surgery and I didn't have any cards that I could send to him already made up. I had guys birthday cards and tons of women cards but none that I could send a guy. I looked in my stack of dies and there was this
CottageCutz Seagull that I thought would be perfect for this type of card.
This Seagull die would be great for those beach or boating layouts as well.
You can also you the seagull and the wood separate too.
I have to tell you though, when I think of seagulls I can't help but think of lunch at the junior high I went too. We lived near the coast in California and the seagulls would always fly over head waiting for whatever the students left from their lunches. We'd always take cover because you never knew when it would be your turn to get pooped on. It never did happen to me, but I had a couple of friends that got it and it wasn't pretty.....
Hopefully my cousin will enjoy receiving this card and my speedy recovery wishes inside.
Happy Wednesday to you!
Kay

Tuesday, September 21, 2010

Dance for Treats

Dancing for a Treat!, This week I made a Card and matching Halloween Pin. I used the Cottage Cutz Ghost with Legs Die. The ghost legs dangle and dance.

As you can see I decided I wanted the legs to dangle, I cut the normal leg s out of the die (in this case green) and cut the legs off at the top to create separate legs (rounded the edges). I used a pin to create holes in the base of the ghost and at the tops of the legs.

Remember when you tie the legs, add a skewer or cut a q-tip and use the stick to tie the thread/knot on so there is a space in the loop of thread (than slide out after the knot has been double knotted). This is to make sure the legs hang even and loose. On the card I tied the knot in the back, on the pin I tied the knot on the front (I do like the knot w/tails showing on the front better). Also the triple paper on the shoes adds weight to the legs . . so they swing easier .


This is the matching pin, I used a Spellbinder Label #11 Die for the base of the pin, cut the base white three times and glued the layers (this makes a nice stiff base) without cutting chipboard which can be a bit heavy on a small pin. What I forgot above is to use foam tape to put the ghost on, this adds dimension and also allows the legs to dangle freely without being pressed against the base.

Sunday, September 19, 2010

Happy Monday Morning Friends


Good morning! I hope you all had a fabulous weekend. I participated in a couple of card workshops this weekend, so that is always a good time. I will post those cards later, on my blog. For today I would like to share this fun fall card with you. I am loving these cute crows! I used the Farmer Crow with Haystack and the corn stalk die for the corn field. I used parts of the farmer crow to have him hiding behind the haystack. I used the marker sign die for the Happy Fall. I started with a 5x5 white base. To make the clouds, I cut a cloud template from a piece of cardstock. I used a sponge and blue pigment ink. I would start at the cloud outline and push the ink away from me. Turn the stencil slightly and move down about an inch or so and repeat. They sell plastic cloud templates but cardstock works just as well, I think. The grass was cut with a Martha Stewart border punch. Have a great day and I will be back next Monday. If there are any dies or techniques you would like to see just leave a comment or send me an email. Thanks so much! I appreciate your visits and suggestions.
Hugs, Janice

Eek!...SPIDERPIG

Hello! Ok, I know this is WEIRD! Have you seen the Simpson's Movie? If not, this makes absolutely NO sense to you! LOL. In the movie Homer makes a little piglet walk on the ceiling and sings a song called Spiderpig. ♫ Spiderpig...Spiderpig...does whatever a Spiderpig does...Can he swing from a web...no he can't, he's a pig...LOOK OUT...he is a Spiderpig♫ So, basically if you're a fan of the Simpson's, you probably think this is as funny as I do! HAHA I AM A NUT! ☺ Anyhoo, I used the Pig Peeker die to make my hybrid Spiderpig. The spider came from one of my cricut cartridges.

Happy "weird" crafting to you!

♥ Nikki ♥

p.s. I have Homer singing Spiderpig on My Blog. ☺


Saturday, September 18, 2010

Fall Fun!

Happy Saturday!!  It is still really hot down here in Alabama, so I thought maybe if I started working on some Fall layouts, I could bring a little cool breeze my way!

I have combined several Cottage Cutz dies together to embellish my layout today. The Cottage Cutz Mini Acorn and Mini Maple Leaf are perfect together! They also go great with the newest Fall dies from the Sept 2010 Release. I combined these shapes with the Cottage Cutz Stylized Tree and by changing the leaves to a golden yellow, it becomes a Fall tree! I also used one of my embossing folders on the top of the Stylized Tree in order to give it some texture. A lot of inking went into this layout as well to carry on the Fall feeling I wanted.


Never forget to pull out older dies! Cottage Cutz shapes are specially designed for versatility and fun and will be useful accents on your projects for years to come! Have a great weekend and happy scrapping!

Friday, September 17, 2010

What's Kickin', Chicken?

Hello, happy Friday, and welcome to The Scrapping Cottage Blog.  Here's what's kickin', and it's some fun with my  Cottage Cutz dies from The Scrapping Cottage.  Technically, we're talking about the country rooster die, here, but for all intensive purposes today, I needed a chicken, so a chicken it shall be.  LOL!!  You see, today I noticed on Splitcoaststampers that their challenge is to get punny with our cards, so this one I'm entering in the Free For All Friday Challenge at SCS. 

I've done this little fella in both patterned paper and white card stock, but for this card, I used the white card stock and colored with Copics, adding lots of texture with my markers.  I really like using white, because I only have to cut once in my die cutting machine, then I can assemble and be ready to color.  

I'm so glad you could stop by today.  Have you checked out all the wonderful creations our DT has submitted this week?  If not, then please scroll down and check out all the paper crafting goodness!  It's absolutely inspirational, I tell ya!  Have a beautiful day, and fabulous weekend, and enjoy some happy crafting!!


Thursday, September 16, 2010

Let's go to the pumpkin patch!

Nothing says fall like rows and rows and pumpkins, ready to be chosen by precious little hands that can barely pick them up. Joe and Regan had a blast with Aunt Cyndi at the pumpkin patch last fall. I couldn't resist doing another layout with the adorable Cottage Cutz pumpkin patch and crows dies. Below the large scallop border, I also used the scallop three edger.


Love the Eerie Halloween paper collection by Basic Grey. My favorite Halloween color combination is purple and green.


Once again, I've used the letters that come on the die (pumpkin patch) to spell different words for my sign. Amazing how many words you can get from those few letters. This time, I cut the sign from cork paper which makes very realistic looking wood planks.


Layered pumpkins and sunflower vines make a fun pumpkin patch growing below and around the sign.


Thanks for looking. And if you haven't picked up this die yet, get on it. It's so versatile and just plain fun!!


Wednesday, September 15, 2010

Maybe Someday....

Today I'm working with the CottageCutz Convertible and boy what a fun die this is. I'm amazed at the realistic detail on this die. The one thing I love even more is this die can be used for lots of different occasions for male or female projects. We saw a couple of weeks ago how hot this car looks in pink for a girls card, now I want to show you a guy card.
My husband absolutely loves cars, sports cars to be exact. But with raising a family and all the expenses that come with it (college, weddings, just plain life) it's really not a smart time for us to make this purchase. Maybe someday I can make him a card like this...I'll keep hoping.
In the meantime it's Motor Trend magazine.

This would make a cute 16th birthday card or any age birthday card, retirement card, drivers ed or new driver scrapbook page. Let us know in the comment section what you've used this Convertible die for on your projects.
Happy Wednesday everyone!

Tuesday, September 14, 2010

Little Gifts for Cool Giftgiving

Time to start on those little gifts for the season, I just whipped 24 of these up over the last two days. They are great gifts for the office. Mini Clipboard with Post-It notes for the Office, or Teachers.
I used the Cottage Cutz Snowman Doll Die, dressed him in the sweater outfit. The hat came from the Cottage Cutz Accessories Set #3 Die. You start with a panel of card stock 2 1/2" x 3", in this case I tore the bottom at a slat to give the image of a snow drift in the background. Build your design, and add items around your design. Be sure to overlap the additional items (Snowflakes).

I start with a piece of crescent Mounting Board (like chip board, but thinner and much stronger). I start with a board at 3 1/2" x 6", cover the board with pattern card stock (4 1/2" x 6 1/2") overlapping and gluing on the back. The Post-It note pad (3" sqr" fits perfect on the left) . Do not depend on the stick of the last page of the pad, glue the pad down. You now have that 2 3/4" x 3 1/2" area to mount your design (snowman panel). I inked/sponged the edges a bit with the turq and pine green to match the papers in the snowman and tree. Added Stickles in those areas for an icy glow.

Now add the clip to your clipboard, I am not sure how they denote these clips, but the one I used was about an inch wide. I covered the clip with a bit of blue cards stock. Tied a scrap of white eyelash yard, and polka dot ribbon. The dangle is 1 3/4" and 1 3/8" layered circle with the same silver snowflakes used on the snowman area. Punched a 1/16" hole and added silver thread with beads. Loosely tie onto the clip with the ribbon. You want it to dangle freely. The mini pen is than added, the clip of the pen slides onto the top flat area of the clip. (these mini pens are sometimes hard to find, and if you need a lot!. . look at the $1.00 area of Target seasonally @ $1.00 for 5 pens . . . otherwise you will pay about a $5.00 for 5 on bubble card in the pen sections of various stores). Hot glue button magnets on the back (four corners) so it can be used on a file cabinet or frig.

Monday, September 13, 2010

I Scream You Scream....


We all scream, for ICE CREAM!

Hello everyone! I thought I would squeeze in one more summer themed card. I think The Ice Cream Truck die is so cute! I wanted to use it before parking it in the garage for winter. I am sure you all have memories of hearing the familiar sound of the ice cream truck as it perused the neighborhood. While living in Tucson in the early 90's, I remember my young boys chasing the truck to buy a cool, sweet treat. Believe me, Tucson is the place to buy something cool during the heat of summer. Have a great week! I will be back next Monday.

Sunday, September 12, 2010

I'll bee here for you!

Hello and happy Sunday to you all! For my card today I used the Bee Shape die. I just think he's adorable! I hope you're having a relaxing day! See you back here next Sunday. Have a wonderful week!

♥ Nikki ♥


Saturday, September 11, 2010

Christmas Countdown

These are the dies I am showcasing today:


Christmas is closer than you think and it is time to start working on your Christmas lists. If you have not already added these adorable little Gingerbread men to your Cottage Cutz collection, you are definitely missing out. The Gingerbread shape is quick and simple to put together and so much fun to accessorize with the different Accessories Dies available.


On my layout, I chose to make my little Gingerbread a girl by adding the pigtails to her hair. I also used Stickles to add additional accents.