Monday, September 10, 2018

We Three Kings

Hi, Lois here for my Monday post.   I like to make Christmas cards all year long -- even when it's 90 degrees + outside.  And CottageCutz has made it very convenient.  Their Christmas release (parts 1 and 2) are both currently on sale in the store at 25% off.

One of my favorite Christmas carols is We Three Kings.  That's what inspired my card for today.


I found a website that provided free printable Christmas carol lyrics.   I printed the song sheet for We Three Kings that I wanted to use for the background of my card.


It printed out at 3 1/4" x 5 1/8"; so when I cut my cardstock, I cut the black piece 3 1/2" x 5 3/8" to give just a little frame around the song sheet.  The white base is 5 1/2" x 8 1/2", scored at 4 1/4".


After cutting the song sheet down, I mounted it on the black piece of cardstock and set it aside.


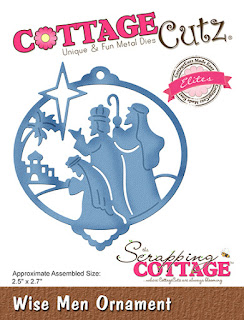
I wanted to try the technique Inlaid Die-cuts for my ornament, so I cut the various sections of the ornament die in black, tan, blue, gray, and yellow.


I laid the black ornament piece onto some white scrap paper and drew around the edge.


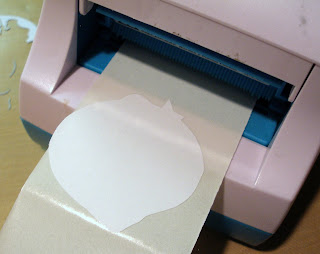
After cutting out the shape just inside the line, I ran the paper through my Xyron sticker maker so that the adhesive would be on the front side.


After carefully placing the black ornament on the paper, I started to fill in the spaces with the colored pieces . . .


. . . until it was completely filled.


To attach the ornament to my card, I threaded a piece of black twine through the hole at the top and taped it at the top to the back of the sheet music panel, placing some foam pop dots behind the ornament -- and gluing the music panel to the white card base.


I then pulled the twine tight and adhered the ornament to the front of the card.  And my card was completed.


The CottageCutz die used on this card is:

http://www.scrappingcottage.com/cottagecutzwisemenornamentelites.aspx

Sunday, September 09, 2018

Fawns Card

Hi!

This is Anja. Today I have another Christmas card for you. I decided to make a more monochromatic card, using the new Christmas Fawns die.


For this project I used:
- Cottage Cutz dies (Christmas Fawns, Pierced Circle Set),
- Distress Oxides (Black Soot) and Inks (Brushed Corduoy, Vintage Photo, Walnut Stain, Fired Brick),
- white card stock for die cuts,
- watercolor paper for background (12x12 cm),
- patterned paper (14,3x14,3 cm),
- water spritzer
- heat gun,
- brush,
- Gansai Tambi watercolors (number 906).
- paper glue,
- adhesive foam pads.

First I cut and colored the fawns.


Then I started on the background. First I colored the paper with black ink.


Then spritzed it with water and dried it.


Then I sprinkled it with pearl white color.


Then I cut the background paper and made a circle out of it. I used the biggest circle from the set.


I used adhesive foam pads to adhere first the fawns and then the patterned paper. I used one layer of pads for the fawns and two layers for the paper.


And this is my finished card.


Don't forget to check the new release in the store. Can't wait to get my dies.

Have a great Sunday and see you again next week.

Anja Z.


The Cottage Cutz dies I used:


Saturday, September 08, 2018

Joyful Christmas Mice


Hello Scrapping Cottage friends! Thanks for taking the time to stop and visit with us today. It's Mary Marsh here bringing you the Saturday edition of the Blog. 

Our  Christmas Part 2 dies are available, and on a 25% sale,  in the online store.  There are 29 new designs in this release. The Christmas Part 1 dies are still on sale as well for a limited time. 

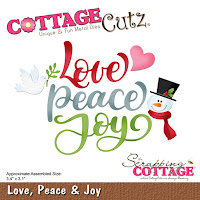
For my card today, I am using two  of the new dies from Christmas Part 2. It's the ever so cute Christmas Mice and the Love, Peace & Joy dies.  So let's get started with some details on how I created my card.

Step 1: I started off by die cutting all the pieces that are part of this die set. I use various colors of cardstock. But you could cut them in white cardstock and then color the pieces with pencils, alcohol markers or water color. 
I simply followed the package coloring and used similar cardstocks. Our artist does such a great job of coloring the images, and I always love the colors she uses.

My Joy word is cut from the new die Love, Peace & Joy. I cut it 2x in red cardstock to give it a bit more dimension on my card.
Wanted just a bit of snow in my outdoor scene so I cut a snowbank in white glitter cardstock from the Snowman Lane die. Click here to see another card I made using this die.

The last item for my card prep is the background clouds. I wanted this to be a daytime scene. Although with the lamp pole you could certainly make a nighttime sky and have a great night scene. 
I used a mini-cloud stencil and distress ink to sponge in some clouds. I stenciled right on the white card base, making this more of a one layer card.
Step 2: Now that all the pieces of the card are ready, it's time for card assembly. I started with the snowbank.

Then I attached the Christmas Mice die cut pieces with a combination of glue dots and double sided adhesive.
The Joy sentiment was attached with Ranger multi matte medium to complete my card. I don't often do one layer cards because I like the addition of designer paper and layers but I like how this one turned out. I plan on making several more of these for Christmas. 
Card Base: 4 1/4" x 5 1/2"

Well, that's it for me for this week. See you next Saturday!

dies I used to create card: 
http://www.scrappingcottage.com/cottagecutzchristmasmice.aspx

http://www.scrappingcottage.com/cottagecutzlovepeaceandjoy.aspx

http://www.scrappingcottage.com/cottagecutzsnowmanlane.aspx


Friday, September 07, 2018

A Country Christmas

Good morning Cottage Cutz fans!  It's Jeanne today with a card featuring dies from the Christmas Part 2 release.  The Christmas dies (Parts 1 and 2) are on sale for a limited time so be sure to stop by the online store!
This card would be perfect for the car enthusiast or anyone who likes a good old-fashioned Christmas.

I started by die cutting all the pieces in colored card stock.  I often use white when I have several small pieces.
In this case it was the tires and the blinkers.  I used Copic markers to color those.
I assembled the car.  To give the tree and wreath a bit of dimension, I sponged the edges in a dark green.  I also has cut several packages in different patterned papers so I could pick the ones I liked best.
Finally the assembled truck.  This die would be so cute at any time of the year.  Just remove the tree, wreath and presents, then fill with something else.  Or add more presents and make it a birthday truck!
Next - the background.  I cut a vanilla piece of card stock 2 3/4 x 5 1/2 inches and antiqued the edges. Then I cut pieces 3 x 5 1/2 inches from green, 4 x 5 1/2 inches from plaid paper and an A2 (4 1/2 x5 1/2 inches) panel in dark red.
The assembled panel.
I cut the sentiment from a piece of green card stock with an adhesive backing.
And the final card.
I hope you enjoyed this card today.  This was a fun and quick card to make.

Dies used:
http://www.scrappingcottage.com/cottagecutzholidaypickuptruck.aspx
http://www.scrappingcottage.com/cottagecutzcountrymerrychristmasphraseelites.aspx
Thanks for stopping by today!  Have a fun and creative weekend!

Thursday, September 06, 2018

Adorable Snowmen!!

Good Morning Scrapping Friends!

It is Pam sharing with you today from Stamper At Heart Blog!

 Make sure your check out the store because part 2 of the Christmas release is in the house! The card I made for you today is from Christmas part 1.   All of these new Christmas dies are so amazing and the detail is unbelievable! The best thing about all these wonderful dies is that right now they are 25% off but just for a limited time! Don't miss out on this fantastic sale!


Design Steps:
 1.  Cut out all of the pieces using white card stock and the Snowman Lane die.  Color all of the pieces with your favorite pencils or markers
 2.  Use an A2 white card base and then cut a slightly smaller piece of snowflake DP.  Using the Wacky Stitched Rectangle second from the largest cut out the center of the DP
 3.  Mount the frame made from the DP to the front of the card using Dimension tape next glue the cut rectangle flat to the center of the frame
 4.  Begin to add the pieces into the frame add the snow, snowman then the fence as shown
 5.  To add dimension place one of the snowmen outside of the frame and continue to all the rest of the pieces: Mailbox, sign and the third snowman
 6.  Add all of the snow to the scene and the small pieces to the mail box.  I added some additional snow to the base of the card
7.  I added some small black pearls for the snowmen's eyes and some Stickles glitter to the piles of snow for some sparkle.  Stamp your sentiment and the street sign and your card is complete!


CottageCutz Products


As always we love it when you come to visit us!  Thanks again and make sure you take some time out for yourself to be crafty!
Blessings
Pam