There isn't a new release of dies for July, but there is a Christmas in July sale going on right now. You can save up to 65% on selected dies in the online store.
This is also a throwback month for designs. The team will be featuring some of our previously released dies to give you fresh ideas for using them.
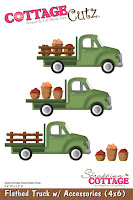
I jumped ahead a few months and thought I would feature a happy harvest card. Not that I am looking for summer to end anytime soon (LOL)!!! My card today is showcasing the flatbed truck w/accessories die. Let's get started with some details on how I created this card.
Step 1: This week I started with my layout. I saw this one on Splitcoaststampers and thought it would work great for the card that I had in mind. I flipped the sketch to accommodate the truck image. It also would allow me to use fall themed patterned paper.
Step 2: I chose my card colors from the patterned paper I found in my stash. The card base is a deep, rich brown shade.
Espresso Brown Card Base (Element 1): 5 1/2" x 4 14"
Patterned Paper (Element 2): 5 1/8" x 3 7/8"
Vanilla Rectangle Panel (Element 3): 3 7/8" x 2 7/8" - 2nd largest stitched rectangle die
Step 3: I cut my truck from colored cardstock- using 2 shades of green for truck body, black and 2 shades of gray for tires, a light gray for door handle and trim around windows, suede for the wood planks, baskets are a brown sugar cardstock.
The October Phrase is cut in a Cajun cardstock (cinnamon). Used the calendar months die. Looks like it's currently out of stock, but you could use one of Expressions Phrases dies such as Blessings, Grateful or Happy.
Step 4: Started the card assembly. Attached the first 3 panels together using double sided tape. Before I attached the image panel I decided to sponge a few clouds and at the bottom I sponged some kraft ink to simulate the dirt in the harvest field.
I attached the truck using dimensional adhesive. I always like the look of an image lifted from the panel a bit. I forgot to stamp the sentiment before I attached the panel so I did it at this point. I used my MISTI because it's a clear stamp and sometimes it needs stamped twice- and it did. I used Cajun ink so it would match my October phrase.
Step 5: I attached the wood truck planks with Ranger multi matte medium. I ended up cutting the October phrase 3x to give it more dimension on the card.Especially since part of it was against the designer paper ,which is a bit busy. This is element 4 of the sketch. I moved it up top. I guess I took a bit of liberty with this sketch.
For the 3 embellishments of the sketch I found some sunflower buttons in the stash. I thought they worked great.
Well that's it for me for this post. I hope I gave given you some inspiration if you have this truck die. If you don't, it's still available in the online store. See you next Saturday.
dies I used to create card:


