We are still showcasing samples from the Just For Guys release. This latest release has 14 different designs and they are ideal for masculine cards. They all have a great retro as well as a classic look. The design team has been showing samples all month. So if you haven't seen them, take a look back on the Blog for some creative ideas for your masculine cards.
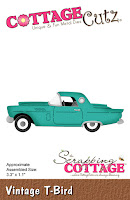
For my card today, I am featuring the new Vintage T-Bird die. I needed a "thinking of you" type card to send to a male friend of my hubby and mine. He is a long time friend, and we just wanted him to know we are thinking of him.
I was focusing on the timeless friendship sentiment, and I thought the vintage T-Bird would carry that theme through. Of course, he was only 3 years old when this T-Bird was cruising the streets, but he will get what I am trying to convey with this card.
So let's get started with some details on how I created my card.
Step 1: Since I had my sentiment and image already chosen, I just needed some masculine looking papers to bring my idea to life. I settled on a soft suede cardstock and a coordinating striped patterned paper.
I had a pre-cut and embossed blue circle card base in my stash, which I cut in half to use on the card. I saw this card on Pinterest that I used for inspiration. I used her layout but changed colors added an additional layer of patterned, sequins and of course my image is a red hot vintage T-Bird not a stamp.
The lighter striped paper was actually a bag that I cut with the stitched circle die and used as more patterned paper. The oval is cut from vanilla cardstock and I used the 4th largest die from the oval set.
Soft Suede Card Base: 4 1/4" x 5 1/2"
Soft Suede Striped Paper: 4 1/8" x 5 3/8"
Blue Embossed Circle: 4"
Light Brown Striped Paper: 3rd largest stitched circle die
Vanilla Oval: 4th largest oval die.
Step 2: I used red, silver, black and dark gray cardstocks to cut the pieces of the Vintage T-Bird. For the windshield I used vellum paper. It's a classy looking car and so perfect for our class-act friend. I remember when I was a youngster a guy on our street had one of these cars. I was in awe of it.
Step 3: Before I started my card assembly, I stamped my sentiment on the image panel. Stamped on an angle just for added interest.
I attached the panels with double sided tape. I added gold twine as another accent to lay under the image panel
. Step 4: Attached the image panel with dimensional adhesive. Then, to finish off this card, I scattered some gold sequins.
Well, that's it for me for this week. I hope I have given you another idea for a way to use these new dies. See you next Saturday!!
dies I used to create card:


