Sunday, March 11, 2018

Rainbow Easter Card

Hi!

It's Anja here. Spring is coming! I can smell it. Finally. I must say I was getting a bit tired of all the snow, waking up early to clean the snow of the car and roads full of snow. We still have some though, but I think the sun will take it away soon.

I still have some Easter dies to show you, so I decided to make another Easter card today. This time I used this cute bunny with the brush. He painted all the letters and eggs in rainbow colors.


For this card I used:
- Cottage Cutz dies (Egg Painting Bunny, Stitched Alphabet, Pierced Circle Set),
- Distress Oxides (Antique Linen, Black Soot, Twisted Citron, Gathered Twigs, Walnut Stain, Spiced Marmalade, Squeezed Lemonade, Peacock Feathers, Worn Lipstick, Abandoned Coral),
- craft card base (15x15 cm),
- craft paper for background (13 x13 cm),
- white card stock for die cuts and background (13,5x13,5 cm on the front, 13x13 cm inside),
- silver pigment ink,
- gold pigment ink,
- paper distresser,
- pink Zig marker,
- black brush pen,
- white pen,
- Wink of Stella glitter brush pen,
- paper glue.

First I colored the white paper with Distress Oxides. I tried to make a rainbow. I started with lighter tones and went to darker ones.


Then I cut out the letters. I used the leftover paper to cut out the eggs later.


Then I die cut and colored all the pieces for the bunny. I used combination of oxides and silver and gold  pigment ink pads to color it. I used Wink of Stella marker for the eggs, brush and can of paint.


When I had everything colored I made the background. I spritzed oxides, mixed with water on the craft background. I heat it with the heat gun.


I cut the other parts from white card stock.


Then I just glued everything together. I used the eggs to decorate the inside of the card.


At the end pf my post I want to remind you to stop by at the store and check out the new Rise&Shine Collection. I just got my new dies yesterday and I can't wait to make projects with it. The new dies are currently 25 % off.

I wish you all a lovely Sunday and see you again next week.
Anja Z.

Cottage Cutzs products I used:


Saturday, March 10, 2018

Easter Egg Plant (new die)

Hello Scrapping Cottage friends! Thanks for taking the time to stop and visit today. It's Mary Marsh here bringing you the Saturday edition of the Blog. Our days are about to get a lot longer starting tomorrow. This weekend is our Spring forward time change. So remember to push your clocks 1 hour ahead tonight when you go to bed.

Before I start with today's card, I wanted to let you know we have a new release of dies. It's our Rise & Shine collection and they are currently on a 25% sale. To see some card samples from the team - click here.

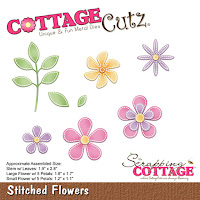
Today, I am showing a card from our Spring die collection. They are on a limited time sale at 25% off. I used the Chickies w/Egg Plant, Spring Meadow, and Stitched Flowers dies. So let's get started with some details on how I created my card.

Step 1:  Since I knew what dies I planned on using, I looked through my cardstock and patterned papers for some spring colors. I have a spring mix stack from DCWV that has some great patterns in it. I just needed to match it to cardstock. Decided that yellow and green would coordinate well with the pattern of paper I chose.
Wild Wasabi (green) card base: 4 1/4" x 5 1/2"
Daffodil Delight (yellow) layering panel : 4 1/8" x 5 3/8"
Patterned Paper layer: 3 7/8" x 5 1/8"
Step 2: cut my "egg plant" from a lilac cardstock and layered yellow underneath.  The plant pot is also cut in lilac with a matching paper for the trim. The stitched flowers are cut in lilac and yellow.
Step 3: Started the assembly of the card base and layering panels. Used double sided tape to secure. 
I decided to cut a white rectangle 1 3/4" x 4 1/2" as a base for the egg plant & pot. Lightly Sponged distress tumbled ink as a background.
Used the Spring Meadow die to add some grass to the bottom of this panel. This die has 2 heights of grass so you can add shading for a slight color variance. I used the wasabi green cardstock and sponged the background. Also cut a butterfly in lilac cardstock for another element for my card.
I cut a stitched cloud from the Stitched Sun, Clouds & Umbrella die. Sponged that in distress ink and stamped my Easter sentiment directly on the cloud. I used my MISTI tool to stamp 2x in order to get a darker shade of purple.
Step 4:  Attached all the elements to the image panel with double sided tape and glue dots.
 Used dimensional foam tape to secure the panel to the patterned paper layer. I wanted it lifted somewhat since the paper has a busy pattern. Attached my 2 stitched flowers and butterfly and this card is completed.

I hope I have given you another idea for an Easter card. The team has been showing lots of samples over the past month. There is a search box on the right side of the Blog if you are looking for a sample for a particular die.
Have a great weekend. Happy St Patrick's Day and I will see you again next Saturday.
 
Dies I used to create card:
http://www.scrappingcottage.com/cottagecutzchickiesweggplant.aspx

http://www.scrappingcottage.com/cottagecutzstitchedflowers.aspx

http://www.scrappingcottage.com/cottagecutzstitchedsuncloudsandumbrella.aspx

http://www.scrappingcottage.com/cottagecutzspringmeadow.aspx
 

Friday, March 09, 2018

Painting Eggs with Mr. Bunny

Hi, Jeanne here today.  The Easter bunny has been busy this week painting eggs!
For this card I started with a white A2 card base (8 1/2 x 5 1/2 scored at 4 1/4 to create a top fold card) then added a panel of plaid paper cut to 4 1/4 x 5 1/2 inches.  I wanted my eggs to be variegated rather than solid so I took out my Distress Oxide inks in colors to coordinate with the paper.
I had fun creating a large panel that I could use to cut the eggs, paintbrush tip and paint can paint.  I die cut Mr. Bunny and everything else from various colors of cardstock.
Before I assembled Mr. Bunny I took a sponge dauber and some Crumb Cake ink to give his edges just a bit of dimension. 
Next I used the largest of the Nested Wacky Stitched Rectangles dies to cut a panel for my scene and sentiment.  I used a stamping platform to stamp the sentiment in two different colors.
Finally, I arranged my eggs under the sentiment.  I really like how cutting the eggs from the blended panel gives variation to them.
This card goes together quickly but is a little messy - brings back memories of coloring real Easter Eggs with my kids!

Dies used:
http://www.scrappingcottage.com/cottagecutzeggpaintingbunny.aspx
http://www.scrappingcottage.com/cottagecutznestedwackystitchedrectangleset.aspx

Thanks for stopping by today - I hope you have a wonderful weekend!


Thursday, March 08, 2018

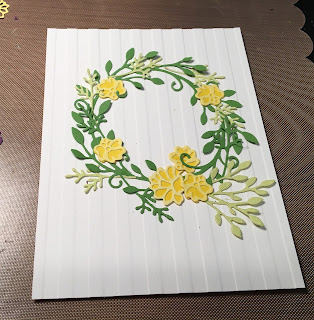
Spring Wreath

Hello Scrapping Cottage Friends!

It is Pam sharing with you today from Stamper at Heart Blog.  I just wanted to remind you that we are having a hugh sale!!  The two new collections In Stitches and Spring Designs are 25% off! And there are other wonderful sales going on too! So don't miss out!!

Today, I am making an Easter card with the new Fresh Spring Floral die. This die is so awesome that it can be used for just about any occasion!
Design Steps:
 1.  Start with an A2 white card base and a piece of white card stock 4 x 5 1/4.  Emboss that white piece with a stripe.  Using the Fresh Spring Floral die cut out all of the pieces using different color card stock: light yellow, dark yellow, purple, light green and dark green.  Cut out Happy in light yellow using the Expressions Happy die
 2. Arrange the wreath on the embossed white card stock using both the light and dark greenery
 3.  Add the layered yellow flowers
4.  Add the tiny purple flowers and dot the centers with white.  Add the sentiment and ribbon

Cottage Cutz Products


As always thanks for stopping by and please don't forget the fabulous sale we have going on right now!!! Take some time out of your busy schedule and be creative! It is so good for the soul!
Blessings
Pam


Wednesday, March 07, 2018

Happy Easter Bunny

Hey Everyone. Sherry here today with another really fun Easter card. Links for all of the products I used will be listed below and in the description box of this YouTube video. I hope that you enjoy this video as much as I enjoyed making it for you. Click on the photo below to watch the process tutorial.


Remember to practice your CPR - Craft Pray Repeat. Thanks for visiting me today and happy crafting.
God Bless,
Sherry