Thursday, March 21, 2024

Do You Smell Carrots?

Hi Crafty Friends,

It is Pam sharing with you today.

I am still finishing up my Easter/Spring cards.   I learned a fun fold from Stacey.  She is a wonderfully creative fellow paper crafter.  So I decided to use it on this card today.  I am also featuring two different dies Bottoms Up Bunny Baker and Spring Bunny w/Giant Carrot.

Background photo by Freepiks

Design Steps:


1.  Cut 2 pieces of white card stock 8 1/4 x 4 1/4 (Score both pieces at 2 1/4, 4, 6 1/4) Cut one piece of white card stock 4 1/4 x 4 1/4

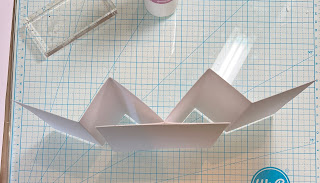
2.  Starting with the widest panel make a mountain fold and then the next 2 valley.  Set the two pieces next to each other as shown above in opposite directions.  Tuck the mountain fold into the valley fold and place close together as shown below

3.  I used a piece of tape to anchor them together then applied glue to the two panels as shown below
4.  After spreading the glue I lined up the 4 1/4 x 4 1/4 square on top of the flaps

5.  This is what it looks like after the panel is glued in place
6.  To open the panel pull on the two side flaps and it will look like this from the top view
7.  This is what the card looks like from the front view 
8.  Cut 2 pieces of plaid DP 2 1/8 x 4 1/8 and 2 piece of Easter Egg DP 1 5/8 x 4 1/8 (I decided to make a spring card rather then an Easter card so I switched out the pattern)
9.  Glue the DP in place as shown above


10.  Use the following dies and card stock colors:  Picket Fence Slimline White - Bottoms Up Bunny Baker pink, white, gray - Spring Bunny w/Giant Carrot orange, green (cut off the little curl at the bottom of the carrots).  Cut a piece of polka dot DP 4 1/8 x 4 1/8
11.  Working on the polka dot square DP glue down the fence (do not put glue on the top of the fence so you can tuck in the carrots), dirt and then the bunny as shown above
12.  Tuck in the 3 carrots behind the fence.  Glue the polka dot panel to the white panel on the card base.  Add your sentiment

13.  This card will fold down to fit inside an A2 envelope 


We have more inspiration on our YouTube Channel check it out HERE

Thanks so much for stopping by!  And I will see you next Thursday.

Blessings and Take Care


Head over to Cottage Cutz and do a little shopping today!

Get Social With Cottage Cutz

Sunday, March 17, 2024

Risen Empty Tomb Home Decor DIY piece

Hey crafty friends,
So glad you stopped in today! Today I am sharing a pretty home decor piece that I created for the passover, resurecction season. Here is what I came up with.
My piece is a little mini sign that sits on a wooden easel that I picked up from Dollar Tree.


I started with a variety of Cottage Cutz dies. I cut them all out from white cardstock. I typically do this so I can use my markers and coloring to match the color scheme of whatever paper I am working with. 
My finished piece is 4.5 x almost 7". I started with a piece of cream cardstock for the base. I then found a piece of pretty paper that I thought would be nice. It is not the traditional type of Easter theme, but I thought it would work. I did have to cut my paper and add some extra to the bottom as it was only a 6" piece of paper from a 6x6 pad.


Here is a closer look at my finished cross. I colored the cross to look like wood coloring. I then cut the draped cloth in that same cream color. I did lightly add some pink shading to it. I then went to work on my flowers and the foliage and picked colors from my marker stash that I thought were close to the colors in the paper. I then took the draped cloth and gave it some slight curve to give it a feeling of movement. You can see in the YouTube video project share the depth it creates!


Next I went to work on my hill and tomb. I had to try and color them to look like stone. So I used my different gray markers and did some stipling, squiggles and shading to try and make it look like stone. I then colored the little hill in a variety of greens to make it look like a combination of grass and dirt. I did have to put a piece between the back of the tomb piece to make it some up to the grass/dirt hill. I then colored in the little grass pieces with some of the same green colors as the grass.


I went to work attaching all of the pieces onto the mat. I used some foam for the cross to give it a little lift. Here is one last look at my finished piece. I think it turned out pretty good. I know it isn't a traditional look, but living here in Florida, the palm fronds in the paper really attracted me.


Dies Used For This Project


I created a quick project share video so you can see if a little better than the pictures.

Head over and check out my quick project share video


Well, that about covers it for today. Be sure to come back real soon. You will want to keep up with all that our wonderful design team is creating!  Dont' forget to head over to the Cottage Cutz YouTube Channel where you will find so many great inspirational projects and pick up some great crafting tips too!

Until the next time, have a wonderfully crafty day!
Melinda


Head over to Cottage Cutz and do a little shopping today!

Get Social With Cottage Cutz

Friday, March 15, 2024

Mr. Snuggles Split Front Card

Happy Friday Friends!

Kris here to share some coffee-themed inspiration with you.  Today kicks off the Spring/Summer Coffee Loving Cardmakers Blog Hop, so I was inspired to make a coffee-themed card using some 'new-to-me' CottageCutz dies that were perfect for this.  I made a fun fold card that is so super simple... let me show you! ☺


To create the split, you start with an A2 landscape card, then make 2 cuts to the front of card, up to the score line.  Adding a supporting cross bar that connects the front 2 side flaps, helps to hold them together as you open the card.  


The middle section inside (which is also the middle of the front of your card) serves to hide your stamped or hand written message.  ☺  It's so simple, but adds a fun unexpected feature.


DIE CUTS:

Kraft cardstock:

White cardstock:
Coffee & Donuts (donuts and steam)
Cookies & Cocoa (just the hearts)
Warm & Cozy Cocoa (just the marshmallows & cocoa oval)

PAPER TRIMMER CUTS:

 Teal Cardstock:
Cut card base at 5-1/2" x 8-1/2" and score at 4-1/4"

Kraft Cardstock:
2-13/16" x 4-1/16" 
(2) 1-1/16" x 4-1/16"
1-1/4" x 5-7/16"

White Cardstock:
2-5/8" x 3-7/8"
1-1/16" x 5-1/4"
(2) 1-1/16" x 4-1/16"

Designer Paper (coffee cups):
2-5/8" x 3-7/8"
(2)  7/8" x 3-7/8"

Designer Paper (Teal Plaid):
(2) 7/8" x 3-7/8"
7/8" x 5-1/16"

DESIGN STEPS:

• With 5-1/2" edge along top of trimmer, cut just down to the score line at 1-1/4" and 4-1/4"


• Attach your coffee print papers to their brown mats.  
• Attach the larger one to the middle section of card front
• Attach the skinny ones to the inside side panels so there's equal border around.


• Attach white message piece to the inside center.


• Attach plaid papers to the white mats, and attach to the front side panels as shown.


• Attach the longer plaid piece to the white mat, then onto the brown kraft piece.  

• Add adhesive ONLY to the side ends that will be overlapping the 2 side columns (don't attach to the center panel that has cups on it. 


• Add color and shading to your die cuts and assemble.

*Tip:  For the croissant, I angled the ends of the "marshmallows" and colored like a croissant.  For the plate, I added some lines to the cocoa oval.

 **Optional:  I added glossy glaze to my bear's eyes and nose, and the donut icings.  The photo below shows before it dried, so it's a li'l opaque here.  When it dries, it is transparent ☺


• I added foam tape to the lower part of bear and cup and attached them to the cross bar on front of card.


Grab some fun COFFEE or COCOA dies and join in the fun!!


Thank you for visiting today! 
I hope you are inspired to get crafty with your favorite CottageCutz dies!

~Kristine


Head over to Cottage Cutz and do a little shopping today!

Get Social With Cottage Cutz