Tuesday, February 20, 2024

I AM Always With You

 Hello Friends

It is Pam creating with you today!      

PRESIDENT SALE IS ENDING February 21 AT 9:00 PM PACIFIC!  DON'T MISS OUT ON THE FANTASTIC SAVINGS!!!

This card is going to someone who needs a little uplifting and encouragement.   I decided to go with a mini slimline design to feature the Garden Butterflies and Bees die and the Morning Glory die.  


Design Steps:

1.  Start with a mini slimline white card base when folded measures 3 1/4 x 6 1/4.  Cut a addition piece of white card stock 3 1/8 x 6 1/8
2.  On the extra piece of white card stock use a stencil and blue ink for the background.  After stenciling use the same color of ink and add some spattering
3.  Glue the stenciled panel to the front of the mini slimline base

4.  To create the butterfly wings I used a piece of Alcohol Ink Yupo paper.  I put several colors of alcohol ink on an applicator and dabbed it onto the Yupo paper

5.  Using the Garden Butterflies and Bees die cut out the back of the butterflies using the Yupo paper and then cut out the outline for the butterflies in black card stock.  Cut out the Morning Glory vine in green and the flowers in white.  I add a touch of yellow ink to the inside of the morning glory flowers
6.  Glue the Morning Glory vine and flowers to the card front as shown above
7.  Next add you butterflies and sentiment and your card is complete


We have more inspiration on our YouTube Channel check it out HERE

Thanks so much for stopping by!  

Blessings and Take Care


Monday, February 19, 2024

Presidents Day Sale


Happy Monday and President's Day Crafty Friends!
Wanted to stop in real quick and let you know about our Sale!

President's Day Sale 

SAVE up to 60%

SALE ENDS WEDNESDAY


Sale prices do not apply to previous orders. Orders can not be changed, combined or canceled once placed via the website. Some items have limited stock on-hand, no backorders will be accepted. Sorry e-mail or phone orders cannot be processed during the sale. Orders will be filled and shipped in the order they are received. $6.95 flat-rate shipping in Continental USA, low international shipping rates available.


SALE ENDS Feb 21, 2024 at 9PM Pacific Time

Head over to Cottage Cutz and do a little shopping today!

Get Social With Cottage Cutz
 

The Scrapping Cottage

 www.scrappingcottage.com | info@scrappingcottage.com


©2024 by The Scrapping Cottage, Inc. All Rights Reserved.The Scrapping Cottage is a trademark of The Scrapping Cottage, Inc. CottageCutz is a registered trademark of The Scrapping Cottage, Inc. Other trademarks and registered trademarks belong to their respective owners. Promotional details and policies are available on the website.

Saturday, February 17, 2024

I Can't Color Like This.... Think Again


Hello, my crafty friends.  It's Marla here today with a new CottageCutz YouTube video tutorial.  I am so excited to be back and to share this beautiful card with you today.  I hear from so many people that they struggle coloring their die cut images.  Today, I am here to show you that anyone can get this beautiful water colored effect with minimal effort.  I hope you'll join me over on our channel.

I have linked the CottageCutz products I used below.  Until next time... Marla


Head over to Cottage Cutz and do a little shopping today!

Get Social With Cottage Cutz


Wednesday, February 14, 2024

Polar Bear Fishing Die Cut Card

Happy Valentine's Day crafty friends! I wanted to share a cute little card I created with one of the cutest cottage cutz dies!
It's the perfect card for my hubby for Valentine's day. He is indeed the perfect catch and he is all mine!


I started by cutting out and assembling all my pieces. For the cutie patootie polar bear, I cut all his pieces out in white cardstock. I then used some markers and chalks to give the pieces some color.

My card base is a standard A4 side fold card from some standard white cardstock. I used some cute patterned papers for the card base as well as for a mat for the scallop stitched rectangle mat as pictured.

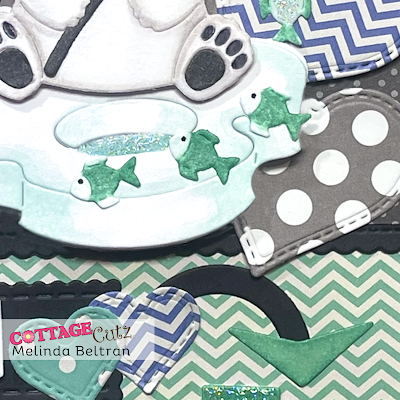
Here is a closer look at the sweet little polar bear. He is holding his little fishing pole and he has one little fish on the hook. That fish I made extra sparkly with a touch of Stickles glitter glue.
I also used some of the glitter to color the water hole. The photo doesn't show the sweet little sparkle.

Here's a closer look at the cute little fish and you can also see a variety of the stitched hearts I cut out in a variety of patterned papers. I also used one of the arrows and one of the pieces from the retro alphabet set to make the arrow head look extra large.

here is a closer look at my layered sign. I layered one of the shapes from the Retro Alphabet die set onto one of the black scallop stitched dies. I then used another one of the arrows in the same retro alphabet set and wrote the words: you're, the and perfect. The perfect arrow points to the letters....

CATCH!  The letters are from the retro alphabet set. I cut them in white like the other pieces and then used the same marker color that I used on my little polar bear to color the letters in. I like doing this so that I can get the same colors on my project without having to try and have that particular color paper on hand. I have so many pieces of patterned paper and they are all from different manufacturers and the colors are so varied. This is the easiest, most economical way I have found to craft with a variety of color palettes.


Dies Used For This Project


Scallop Stitched Rectangle


Be sure to head over to Cottage Cutz and do a little shopping today!


Well, that about covers it for today. Be sure to come back real soon. You will want to keep up all the amazing projects the super talented design team shares! Don't forget to also check out the Cottage Cutz YouTube Channel and all our other social media accounts! Until the next time, have a wonderfully crafty day!
Melinda