Tuesday, January 30, 2024

Warm & Cozy Bears Card

Hey crafty friends,
Melinda here and it's another Terrific Tuesday! Today I am sharing a fun and super cute card featuring some more of the fun dies in the Cottage Cutz collections. Take a look.
My card is a standard A2 side fold card. I started with a white base. To that, I added a black mat and a cute blue polka dot patterned paper.

Here is a closer look at the cute little bears. I colored them with my markers. I also colored the logs, cocoa cups, fire and sign 

I used some clear gloss on my fire die cut pieces. As it dries, it dries clear and gives the die cut some glossy dimension. I did also add some to the inside of the bears' cups. You can't really see it in the photo above but it adds a cute touch.

Here is a closer look at my directional sign. I cut the pieces out in white and then used my markers to color the pieces in. I did print out the letters. I added a small pink heart and added some stickles glitter glue to it for the top of my sign.

Here is a closer look at the warm & cozy title. I also colored the purple and blue mini hearts. The darker pink (small and large one) and the lighter pink hearts were cut from that colored paper.

Here is one last look at my card. As I assembled the card, you can see I used the scallop stitched rectangle mat. To that I added a cute mat from some patterned paper. You can't really see it, but the paper has a heart print and it says.. Love One Another on it. I love this. Makes me think of me and my hubby as we are having a cold snap here in Florida. I have it set by my coffee and cocoa bar.


Dies Used For This Project

Rectangle scallop die (currently out of stock)


Well, that about covers it for today. Be sure to keep coming back to see what the other talented designers are creating! So much inspiration. Until the next time, have a wonderfully crafty day!
Melinda

Thursday, January 25, 2024

Miss You Valentine

Hello Friends 

It is Pam creating with you today! 

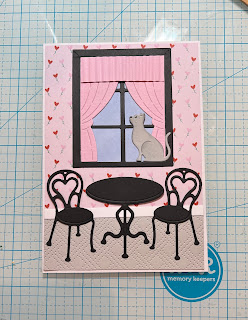
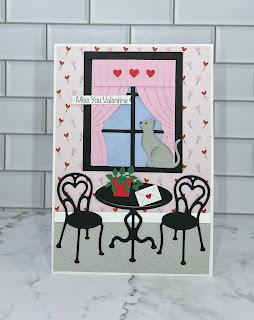
I have another Valentine to share.  I usually send out Valentines to family and a couple of close friends.  So I am just finishing up with a few more.  The one I am showing you today is featuring the Garden Window die from the Black Friday release and an older die Parlor Table & Chairs.  The card is a little larger in size then my typical A2.


Design Steps:

1.  Use a white card base measuring when folded 4 1/2 x 6 1/2, designer paper 4 3/8 x 5 3/8, gray card stock 1 1/2 x 4 3/8 and a white strip 4 3/8 x 1/4
2.  Glue down the designer paper then add gray at the bottom (I ran the gray through a cover plate to get the added texture) last glue down the little white strip
  • Using the Garden Window die and the Parlor Table and Chairs cut them out of black card stock.
  • Using the Garden Window die cut out the cat in gray.  
  • Using the Hanging Pots die cut out the pot in red and the plant in green.  
  • Cut pink card stock for the curtains using the Spring Window with Peekers.  
  • And the last piece is the little envelope which I cut in white with some red hearts the die I used was the Love Letters die.  
  • All the dies I used are still available
4.  Cut a piece of blue card stock for behind the window.  Glue the blue to the back of the window.  Place the curtains in the window.  To make them fit I cut them in the middle and you will also notice they are short so I made a little valence which I ran through my crimping tool
5.  Glue the window to the card front placement as shown above.  Place the cat in the window 
6.  Add the table and chairs as shown above
7.  Add the plant and letter to the table and three little hearts to the valence.  Last place your sentiment and your card is complete


We have more inspiration on our YouTube Channel check it out HERE

Thanks so much for stopping by!  And I will see you next Thursday.

Blessings and Take Care


Wednesday, January 24, 2024

Warm and Cozy Sandwhich Board Sign-Card

Hey crafty friends,
So glad you stopped in today!Today I am sharing here on the Cottage Cutz blog. I created this easy little sandwhich board sign/card and it features some fun dies from Cottage Cutz. Take a look.

Here is my sweet little sandwhich board sign/card.

For the base, I cut a piece of 8.5" x 11" piece of paper to 4x11. I folded it in half as the 5.5" mark. I then measured out a portion of the bottom to cut out the "legs". I marked the folded bottom open edge .75" from either side. I measured it lengthwise a half inch from the bottom.

Here is a photo collage of the measurements and the finished cut out at the bottom of the card.


I cut out a piece of paper at 3.75 x 4 and then scored it at a half inch along the 4" side. I accordion folded the piece and then attached it on the inside of the stand. This will allow the stand to open but not too far.

For my black mat, I did some dry brushing of the white ink to make it look a little like a chalboard.


Here is one final look at my cute little sandwhich board. If you wanted to use it as a card, you can use the back to put your sentiment.


Here is a closeup view of the cocoa cups. I added some stickles to the whipped cream. I also used some dimensional paint on the tops of the cookies. Also for the little faces, instead of making them like Santa and Frosty, I used regular noses instead of carrot noses. I also cut off the beard and used the other face.


Here is one more closeup look at the cute little cocoa cups and the cute little cookies.
I added all the cute embellishments onto the black, brown mats and added those to the scallop stitched mat.


Dies Used For This Project

Warm and Cozy Cocoa

Nested Scallop Rectangle


Well, that about covers it for today. Be sure to come back real soon. You will want to keep up with my crafty adventures!  Don't forget to find me on social media too! Links are below.
Until the next time, have a wonderfully crafty day!
Melinda

Friday, January 19, 2024

Garden Butterflies & Flowers

Hi CottageCutz Friends,

Kris here with you today, sharing a split front card featuring the Garden Butterflies and Garden Flowers from our Black Friday Release.


Here's a side view

CUTTING & SCORING:

Berry Burst cardstock 
Cut a 5-1/2" square 
--from that, cut 1-3/4" from one end (card front)
--then cut 2" from the same end, leaving 1-3/4" attached.

White Cardstock
Cut a 5-1/4" square 

Acetate/Window Sheet 
Cut at 5-7/16" x 5-1/2" 

Fresh Freesia Cardstock
Cut (2) at 1-1/2 x 5-1/4" 

SU! Masterfully Made - Fresh Freesia leafy pattern
Cut (2) strips at 1-1/2" x 5-14"

SU! Masterfully Made - Multi-Floral pattern
Cut (2) strips at 1-5/16" x 5-1/16"


DESIGN STEPS:

1.  Open card so the small flap is at the top.  Apply double sided tape to the flap (not too close to the edge, and attach the acetate so that the 5-1/2" is going side to side (horizontally).

2.  Fold the front closed and attach the 1-3/4" Berry Burst panel to the bottom of card front, aligning with the bottom edge of acetate.


3.  With card open, and working on backside of acetate, apply the leafy patterned Freesia paper to cover up the taped acetate panels as shown.


4.  Attach white square inside bottom of card.


5.  Attach floral patterned paper to the Fresh Freesia strips and then onto the front of card as shown.


6.  Stamp a sentiment onto white inside panel.  I added some post-it notes where the front panels ended so I know where to stamp my sentiment.  


7.  Die cut the top layers of Garden Butterflies and the dragonfly from colored cardstock.  Then for the bottom, more solid layers, watercolor using the same color of ink.


8.  Die cut the Garden Flowers from same colors of cardstock plus Perfect Pear.


9.  I used sticky notes again on inside so I know where the solid card front panel ends then I glued my flowers and cut off the bottoms that overhung. 


10.  I gave the wings more dimension by bending the wings up while rolling the ends of wings around my finger, then I glued just the middle of bodies to the card front.  I then added some matching sequins to their bodies.  


and you have a beautiful acetate thank you card! ☺


Thanks so much for looking today!  I hope I've inspired you to get crafty with your favorite CottageCutz dies! 

~Kristine