Saturday, July 24, 2021

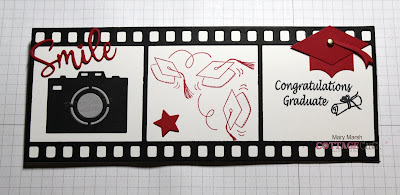
Filmstrip Graduation Card

Hello Scrapping Cottage friends! Thanks for taking the time to stop and visit with us today. It's Mary Marsh here bringing you the Saturday edition of the Blog.

IT'S NEW RELEASE TIME! We have a new collection of Slimline Designs. Your slimline cardmaking is going to get a lot easier. We have 20 new designs and they are on sale. You can get each individual die for a limited time 25% off. The dies have appeal for all styles and occasions of cardmaking. So check them out and make your selections.

Today for your viewing pleasure, I am featuring the new Filmstrip Slimline die. There are lots of cute accessories that come with this die and I am using a few of them on my card. 

I needed a graduation card for my nephew and this die worked out perfectly for my idea. He graduated magna cum laude from high school and plans to go onto to college in an engineering major. So proud of him. Now let's get started with some details on how I created my card.

Design Steps: 

I cut the filmstrip from black cardstock. My white card base is 8 1/4" x 3 1/4". It's the same size as the filmstrip. 
Next, I cut the Smile phrase and the Camera. These images are both part of the Filmstrip die. I used cardstock to cut the images.  
I cut another white panel 3 1/4" x 8 1/4" to stamp my sentiment and grad cap images. I just thought it would be easier this way rather than stamping directly on the card base. I laid the filmstrip down for placement of the stamps. These are wood stamps so I used my Stamp-a-ma-jig for exact placement. 
I am ready to start card assembly. I attached the filmstrip to the white background panel with Ranger multi medium matte. When I use this die again I will definitely use an adhesive sheet. It will be easier that way. 
Next, I placed the camera image and smile phrase in the left opening.  I used double sided tape and liquid adhesive to attach these images. Notice the graduation cap in the corner. It's not a die. I cut it out and in the next photos I will tell you how I did it.
Grad Cap Steps:
I started with a piece of red cardstock 2" x 1". I penciled a line at 1" and then turned it and penciled another line at 1/2". 
Then I started making my cuts. I went from point to point so it would form the top of the graduation cap.  The next photo shows the start of my cutting.
I went around and made 3 additional cuts going from point to point to form the shape. I believe it's called a parallelogram. I flipped it over since my pencil marks were still there. 
Now to make the piece that fits on the grad's head, I used the 2nd largest stitched die heart and placed just a portion of it on red cardstock. 
This is what the cut looks like. I am using the negative part of cut. I just trimmed until I got the size that would work for the cap. 
Here is the finished piece. 
And then I attached it to the head part. I was happy with how it turned out. Then I started thinking about a tassel but I didn't want to fuss with twine. So I looked through my dies and found a ribbon that I thought would work. It's from the Penguins with Presents die. I cut just the ribbon portion and then used the longest loop of the ribbon. I think it works for the tassel.  I punched a 1/8" hole and added a gold brad. 
Before I attached the white card base to the image panel,  I stamped my inside sentiment. I also added a few stars that are part of this Film Strip die. I thought this sentiment is a perfect companion to the front of my non-traditional graduation card. 
To finish off my card I attached the image panel to the card base using double sided adhesive. 
And that's it for me for this week. I hope I have given you an idea for this new Slimline die. Sometimes you just have to do some out of the box thinking! See you on Monday with another sample using these new Slimline dies.


Friday, July 23, 2021

Aloha Friday!

Aloha!  It's Jeanne today with a hello/thinking of you card with a tropical twist.  This card uses one of the new slimline dies.  This release is wonderful with a great selection of dies.  It features awesome background dies which can be on their own or to highlight dies that you already own!  I found this leafy background was the perfect backdrop for one of my favorite dies from last summer.  To make things even better, the new slimline release is on sale right now for a limited time!

I started this card by creating a blended background in several shades of green by using Distress Oxide inks and blending brushes.


Next I cut a panel using the Leafy Background Slimline die.  I edged the outside and several of the leaves with a darker green ink.

My flowers are from Tropical Bouquet and I used various colors of cardstock to cut them.  I inked the edges to get a bit of depth.

I cut the word Aloha from the Aloha & Ukulele die.  I cut one from gold foil and three from a dark brown cardstock.

To complete the background I adhered my leaves to a dark green panel cut from the largest of the Nested Rectangles Slimline from the first slimline release.  I stacked all the "aloha" words placing the gold foil on top.

I placed my flowers in the corners....

and my sentiment at an angle between them.  This card reminds me of the aloha shirts my husband has with the dark background, light foliage and bright flowers.  A reminder of the islands!

Dies used:


Thanks for visiting today.  I hope you have a fun and creative weekend!


Thursday, July 22, 2021

Don't Worry Bee Happy

Hello Scrapping Cottage Friends

It is Pam on the blog with you today!

We have a HUGE SLIMLINE DIE RELEASE with 20 fantastic dies.  The dies are at a savings of 25% off right now in the store.  The new designs are just so amazing.  They are sure to put your imagination into overdrive!!  Check them out right HERE.

I am having fun with our new Honeycomb Background Slimline today!


Design Steps:

1.  Use a white slimline card base, cut a piece of yellow DP 3 3/8 x 5 3/8, use the Honeycomb Background Slimline and cut it out of white card stock
2.  Glue the yellow DP to the white card base then glue the honeycomb on top of the yellow set aside
3.  Using the Stitched Honey Bee die cut out the bees in yellow, black and vellum (for wings).  Cut the branch in dark brown and the hive in brown also cut the leaves in green
4.  Slightly shade the bees in orange and the hive in brown and then assemble using a fine tip glue.  For the eyes use a white Sukara Gelly pen
5.  Place the branch and hive on the card first and then arrange the bees and sentiment.  I popped up the bees using dimensional dots

CottageCutz Products


The slimline background dies make for a wonderful textured card.  The cards also come together very quickly.  I would definitely check them out.  Thanks so much for stopping by today.

Blessings and Take Care

Pam


Wednesday, July 21, 2021

Heard you Caught a Bug

Hello! This is Sukie and today I'm sharing a card.  For my project, I used one of the new Slimline dies.  This die release consists of 20 new die sets and they are absolutely amazing for creating slimline cards!  They are all on sale right now too!

I used the Lattice Slimline to cut out the background panel for my card.  The Doodle Bug die was used for all of the other die cuts.
Next, I adhered the lattice panel on a slimline card base and used my Oxide Ink to shade it in the yellow color.  I wanted some of the yellow to peek through the lattice windows for a subtle effect on my card.  
The two butterflies were adhered in the top and bottom corners of my card panel.
The other doodle bugs were scattered in between the 2 butterflies filling in the empty spaces.
The sentiment was stamped on a hand cut flag and affixed in the empty space on my card.
Here are the die sets used on my card, available in the store:

Monday, July 19, 2021

Little Farm Envelopes

It's Anja here for my Monday's post. I made little envelopes decorated with cute farm animals for today's project.

For this card I used:

- Cottage Cutz dies (Farm Cow Peeker, Farm Pig Peeker, Filigree Daisy Envelope),

- Distress Inks,

- white card stock for die cuts,

- yellow card stock for die cuts,

- black pen, 

- white ink,

- black pigment ink,

- sentiment stamp,

- acrylic block,

- scissors,

- paper glue. 


First I cut and colored the pig and the cow. Next I cut both envelopes. I cut the envelopes two times. I used one piece of each color to cut out the middle part. I did that with the scissors. I used this part to insert in each envelope. Then I assembled the envelopes, added the sentiment and adhered the animals. And my cute little envelopes were done. 


And that's all from me for today. Have a nice week and see you again on Sunday.

Anja Z.


Cottage Cutz dies I used:


Sunday, July 18, 2021

Happy Birthday

It's Anja here. I have a birthday card for you today. This time I used patterned paper for the background to emphasize this cute piggie.

For this card I used:

- Cottage Cutz dies (Playful Piggies, Pierced Rectangle Set),

- Distress Inks,

- craft card base (12,6x12,6 cm),

- white card stock for die cuts and background (3,5x12 cm),

- patterned card stock for background (12x12 cm),

- brown card stock for background (12,4x12,4 cm; 4x12 cm),

- black pen, 

- white ink,

- black pigment ink,

- sentiment stamp,

- acrylic block,

- adhesive foam pads,

- paper glue. 


First I cut and colored the pig. 

Next I cut the background parts. I used patterned and brown card stock.

I stamped the sentiment on a white strip of card stock. I also cut another strip of brown card stock to go underneath.

I placed all the parts to my card base and adhered it. Last I added the rectangle with the pig. I used adhesive foam pads to adhere that one. And my card was done.


And that's all from me for today. Have a nice Sunday and see you again tomorrow for my Monday's post. 

Anja Z.


Cottage Cutz dies I used: