Sunday, January 17, 2021

Missing You

Hi!

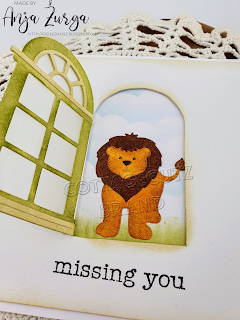
It's Anja here. I have another card for you today. This time I made it with a window and a cute lion on the other side.

 
For this card I used:
- Cottage Cutz dies (Safari Lion, Classic Arched Window),
- Distress Inks,
- white card base (15x15 cm),
- white card stock for die cuts,
- watercolor paper for background (14x14 cm),
- pencil,
- paper cutting knife,
- black pen,
- white pen,
- scissors,
- plastic foil,
- folding bone,
- plastic stencil (clouds),
- sentiment stamp,
- acrylic block,
- black pigment ink,
- adhesive foam pads,
- paper glue. 

First I cut the window with the die. I used scissors next and straighten the edges. I used this as a stencil to draw the shape of the window on the watercolor paper I trimmed in advanced.

Next I cut another two windows and the lion. I color all the pieces and glued it together.

Then I cut out the window using a cutting knife.

Then I put a piece of foil between two windows and glued it together. Before that I folded the smaller parts of the window so that I can glued the window to the background.

Next I colored the background directly to the card base. I used a plastic stencil to color the sky.

Then I used a bit of color to emphasize the edges of the background. I also shaded around the edges of the open window.

After that I added the sentiment.

 
And then I just put all the pieces together on the card base. I used adhesive foam pads to glue the background on the card base. Last I added the lion. And my card was done. 


That's all from me for today. Have a nice Sunday and see you again next week.

Anja Z.


Cottage Cutz dies I used:


Saturday, January 16, 2021

Burger to my Fries

Hello Scrapping Cottage friends! Thanks for taking the time to stop and visit with us today. It's Mary Marsh here bringing you the Saturday edition of the Blog. 

We have a brand new release of dies in the online store. It's our Circus release with 16 new designs. They are currently on sale at 25% off individual dies. The Safari release dies are also on sale at 25% off individual dies. This was our Black Friday release. 

The Circus dies are so cute for Birthday, Valentine, Thinking of You or even Father's Day cards. Just let your creativity soar. The DT has been showing some great ideas for ways to use these dies all week. So if you missed any check back on the Blog.  

Today for your viewing pleasure, I am featuring the new Build-a-Burger die and I created a Valentine card. I remembered a punny sentiment that I had which would work well with this die image.  I usually let some of the men from Church and neighbors pick a card to give to their wives for Valentine's Day. That's where this one will go. 

So let's get started on some details of how I created my card. 

Design Steps:

I started by cutting the hamburger and fries images. For the hamburger I used various colors of cardstock to match the photo on the package. I used the following Stampin'-Up cardstock: hamburger (baked brown sugar), tomatoes (real red), lettuce (garden green), pickles (cucumber crush), cheese (mango melody), onion (confetti white)

For the fries I cut in so saffron cardstock (soft yellow) and then sponged with wild honey distress ink to get more of a golden glow. 

Next, I chose this layout that I found on the web. I liked it because I could use designer paper and add some extra layers. For the oval, I used the largest stitched oval eyelet die. Looks like it's out of stock,  but you could also use the 2nd largest die from the Stitched Oval set. 
For the 2 angled rectangles I used the 4th largest die from the Rectangle set
Next, I selected my designer paper. Then I chose cardstock colors that matched the designer paper for the card base, the oval and the center rectangle panel. The center rectangle panel is embossed with a heart embossing folder.  
red card base: 4 1/4" x 5 1/2"
designer paper layer: 4 1/8" x 5 3/8"
heart embossed layer: 4 1/8" x 1"
white rectangles: 2 7/8" x 3 7/8"

My final step of preparation is the sentiment. I masked and stamped the sentiment on both of the rectangle panels. I used a stamp-a-ma-jig for placement. 

Now, I am ready to start card assembly. I attached the designer paper, embossed layer and oval to the card base with double sided tape. 
 

The white rectangle panels are attached with double sided tape. For the images, I used dimensional adhesive. 
To finish off the card front, I added a few red heart sequins. 
I added a Valentine sentiment on the card inside. I used an older die from CottageCutz - Valentine Phrase & More.  
Well, that's it for me for this post. See you next Saturday!

dies I used to create card:


Friday, January 15, 2021

Ringmaster of My Heart

Happy Friday! It's Jeanne today and I have another Valentine's card for you.  However, this would also be wonderful for an anniversary or just an "I love you" card.  I adore the new release of Circus dies; they make for some really fun cards!  And they are on sale right now for a limited time!

I started by cutting my Ringmaster from white cardstock and coloring the face, hands and hair with Distress Oxide inks.

For his suit, hat, megaphone and staff, I used various colors of cardstock including gold foil for the top of his staff.

 I assembled the Ringmaster.

I used a stencil and Daffodil Delight ink to create a background.  I wanted a burst and although this is a sun burst I knew the sun would get covered up.

Using the largest of the Wacky Stitched Oval Dies I cut an oval from my stenciled background. I also cut an A2 panel from Poppy Parade (a red-orange color) and a white panel 4 1/8 x 5 3/8 inches.

Before adhering the white panel to the red I used a corner punch to give some visual interest to the panel.

Next I heat embossed my sentiment in white and created a banner by fishtailing the ends of the strip.

I assembled all the elements on the card.  With its bright colors and fun theme this makes for a very happy card!

Dies used:


Thanks for visiting today!  I hope you have a fun and creative weekend!


Thursday, January 14, 2021

Bananas for You!

Hello Everyone

It is Pam creating with you on the blog today!

So excited to share this wonderful New Circus collection with you today.  I must say it was a sad day when Barnums and Bailey Circus went into the history books.  It certainly was a form of entertainment in the days gone by.  But this cheerful and playful group of dies brings back fond memories.  The new release has 16 bright, happy and detailed dies.  They are on a special bundle price right know in the online store.  Just click this highlight store to check them out.

The dies can be used for just about anything from a kids birthday, fun thank you or a Valentine like I am showing today. 


Design Steps

1.  Using the Juggling Monkey die cut out the pieces with Kraft, tan, yellow, red and blue card stock
2.  Shade the pieces and assemble them using a fine tip glue
3.  Use a A2 white card base, cut a piece of corrugated kraft card stock 4 x 5 1/4, cut 3 strips of DP with hearts 1 1/2 x 3 3/4 and last cut a piece of white card stock with the 2nd from the largest Pierced Rectangle die
4.  Glue the corrugated kraft card stock to the front of the white card base.  Equally lay out the DP hearts paper across the corrugated kraft card stock as shown and glue down.  Pop the white rectangle up using dimension tape.  Add the Juggling Monkey, bananas and the sentiment.  To Finish add the twine

CottageCutz Products


Thanks so much for stopping by today!  We love seeing you here and don't forget to leave a comment and check out this fabulous new release!

Blessings
Pam


Wednesday, January 13, 2021

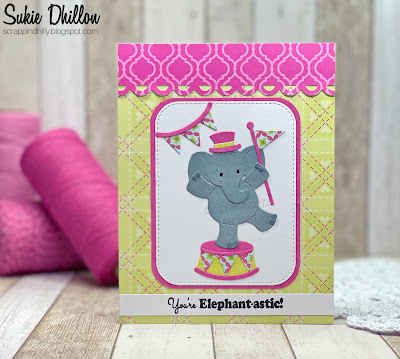
You're Elephant-astic!

Hello!  This is Sukie and today I'm sharing a whimsical card for my design team day! There's a brand new Circus die release in the on line store consisting of 16 new die sets.  They are all currently on sale and I'm showcasing one of them on my card this week.

I cut out the all of the pieces from the Balancing Elephant using some bright colored card stock.  The elephant was shaded with my Oxide Inks.  I cut out an extra banner to use as an embellishment on my card. I also cut out a Stitched Rounded Rectangle using basic white card stock.
The card stock for my card base is from my stash and coordinated perfectly with the hot pink paper.  I'm really liking this bold color combination.  The whimsical sentiment was stamped on a strip of card stock.
Using the corner rounder punch, I created a layer for the die cut rectangle.  A second punch was used to create an accent border for my card.
The layered rectangles were adhered to my card based and topped off with the punched border.
The elephant was affixed inside the rectangle on top of the stand.  I tucked the extra banner into the corner as an embellishment.
The sentiment strip was stretched along the bottom of my card base, it is such a fun play on words and perfect for my card!
Here are the die sets used on my card, available in the store