Thursday, June 06, 2019

By the Sea!

Good Morning Everyone!

It is Pam creating with you today on the blog

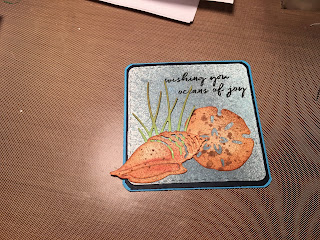
I live near the beach and in the summer that is the place to be here in South Carolina!  I was already to move cross country as some of you may have read in my earlier post a couple of months ago.  But our house sale fell through so we are still in SC.  It really is a nice place to live!  But the summers are pretty steamy!!  Anyway the beach is what inspired my card today. (This card was also inspired by the wonderful card maker Michelle Zindorf)

Design Steps:

 1.  You will need a white A2 card base, a slightly smaller piece of navy, then a slightly smaller piece then the navy of blue, then a piece of sand card stock 3 3/4 x 5. You will also need a 3 1/4 x 3 1/4 blue square, 3 1/8 x 3 1/8 navy square and a 3 x 3 white square.
 2.  Stamp the sand color card stock with a bunch of splashes using Versa Mark ink
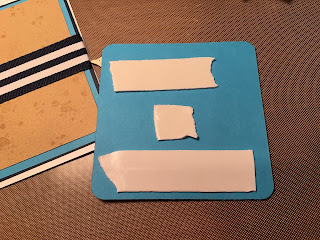
 3.  Glue the blue to the navy then add the sand card stock on top of the blue.  Add the strip of striped navy ribbon using double sided tape

4.  Attach the panel to the front of the card and set aside
 5.  Round the corners of all of the squares.  And on the white square use blue ink spray to create a watery look
6.  Stamp the sentiment with black ink.  I used a positioning took to stamp it twice to get a nice dark black
 7.  Cut out the shells on tan card stock using the Sand Dollar and Trumpet Shell die.  Cut the sea grass using the Spring Meadow die and green card stock.  Use TH vintage ink for the shells and grass then add a little coral ink to the Trumpet Shell
 8.  I then sprayed the shells with some Walnut ink
9.  Glue the layers of square together and add the sea grass first then the shells
 10.  Pop the shell panel to the front of the card
11.  For the inside I added a Scallop Shell which I inked in the corner.  Next layered the sentiment on blue and glued it to the card.  Glue the panel to the inside of the card
CottageCutz Products


Thanks for stopping by and make sure to check out our new release called Magical Garden you won't be disappointed and happy summer!!

Blessings
Pam


Tuesday, June 04, 2019

Hello Card

Hello!  This is Sukie and today I'm sharing this CAS card for my design team day.  This card came together very quickly with a few die cuts.
The patterned paper inspired the colors and rustic tones of my standard A2 sized card.  The scraps left over from other projects worked perfectly with the patterned design.
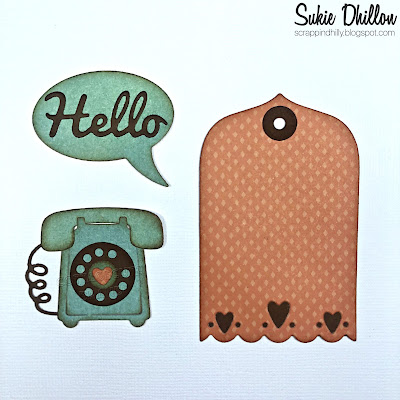
The Telephone is absolutely adorable with the coordinating speech bubble.  I used the Hello die cut for a larger sentiment.  The sweet tag is from the Love Tags Set, I added a strip of brown behind the heart cut outs.
Once I created the base of my card, the tag was offset to one side of my card.  I adhered the tag directly on top of the patterned paper.  I love the striking contrast of the colors.
The next step was to add the speech bubble with the sentiment onto my card base.  The rustic telephone was adhered in the center of the tag creating a "happy hello card."
As a finishing accent on my card, I added a small bow created with some Totally Natural Trendy Twine.
Here are the dies used on my card, available in the shop:


Sunday, June 02, 2019

Spring Frog

Hi!

It's Anja here. I have another simple card for you today. I combined tho die sets to make the scene with this cute frog.


For this card I used:
- Cottage Cutz dies (Spring Frog w/lily Pad, Clouds & Sun),
- Distress Inks (Mustard Seen, Tumbled Glass, Wild Honey, Shabby Shutters, Twisted Citron, Mowed Lawn, Peeled Paint, Spun Sugar, Stormy Sky, Vintage Photo, Black Soot) and Oxides (Broken China, Faded Jeans),
- white card base (15x15 cm),
- white card stock for die cuts,
- water color paper for background (14,5x14,5 cm),
- plastic stencil (clouds),
- white pen,
- water spritzer,
- heat gun,
- adhesive foam pads,
- paper glue.

First I cut and colored the frog.


Then I did the same with the sun and clouds.


Next I made the background. I used Distress Oxides to color it and then I added a few water drops to add a bit of dimension. I dried it with the heat gun.


On the upper side I used plastic stencil to make the clouds.


When I had everything cut and colored I put the card together. I used adhesive foam pads to glue the frog. And my card was done.


That's everything from me for today. See you again next week.

Have a great Sunday.
Anja Z.


Cottage Cutz dies I used for this card:


Saturday, June 01, 2019

Floral Corners

Hi, Janja is here with you.
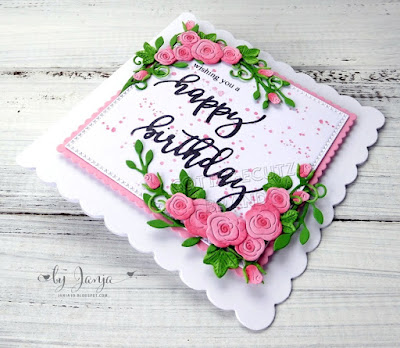
For today's blog post, I prepared a simple birthday card with roses.
I placed roses on the opposite corners of the central layer.


- CottageCutz dies: Little Princess & Roses, Fresh Spring Floral, Cross-Stitched Square Set, Nested Stitched Scallop Square Set
- white card base: 4.6 x 4.6” (11,7 x 11,7 cm), folded
- colored cardstock
- colored ink pads
- white foam
- glue, double-sided adhesive tape

First we cut out the wreath and roses.


Cut a white square with the largest die from the set. Create a background with a spray or use a stamp.
Stamp a sentiment.


Cut the wreath into four parts with scissors. Paste them into the background with glue.


Now place the roses as in the photo.


Prepare a white card base. Cut two squares. Use a foam and a pink cardstock.


Assemble the card.


Have a nice day.
Janja


Friday, May 31, 2019

Your Carriage Awaits

Happy Friday!  It's Jeanne posting today.  I have a card for those of you who believe in fairytales!  This was a simple card to make with an unexpected (but fun) twist on the background.
I started by cutting the pieces from the Princess Carriage and Fairytale Princess dies using white and gold card stock.  I colored the pieces using Distress Oxide inks.
I assembled the pieces and used a small piece of Dazzling Diamonds glitter card stock for my shoe.
I wanted something besides a plain background so I decided to stencil one using a fleur de lis pattern I have.  I used Shaded Lilac Distress Oxide ink on a 4 1/8 x 5 3/8 inch Highland Heather panel.  I thought I would just have one purple shade on another but the combination has an almost iridescent quality.
It is difficult to see in the photos but the color of the background shifts as you tilt the card.  You can see it a bit in the photo below.
To finish the card, I adhered the assembled panel to a purple A2 card base.  The pillow and shoe are lifted using foam dots and I added gold rhinestones to the center of the wheels.

Dies:
http://www.scrappingcottage.com/cottagecutzfairytaleprincess.aspx
http://www.scrappingcottage.com/cottagecutzprincesscarriage.aspx

Thanks for stopping by today!  I hope you have a fun and creative weekend!