Thursday, November 09, 2017

Christmas Town!

Hello Scrapping Cottage Fans!

It is Pam on the blog today and ready to show you my card for today!  Making Christmas cards is a fun way to show your family and friend your crafty side!  It is also a way to make cards that specifically fit someone's personality.  The card I am sharing today is going to a friend who lives in California.  She doesn't get any snow for Christmas so I thought I would send her some on my card!


 Design Steps:
1.  Using the Christmas Town and Season's Greeting w/Banner die cut out both of them in white.  On the Season's Greeting die cut off the deer and glue down the Season's Greetings
 2.  Use an A2 white base and cut out a piece of silver 4 x 5 1/4, a piece of white embossed with dots 3 3/4 x 5.  Then use the Double Stitched Rectangle die and cut out a piece of navy DP
 3.  Glue the silver and embossed paper to the card front
 4.  Glue the Season's Greetings to the banner and the Christmas Town to the navy DP
 5.  Place dimensional tape to the back of the navy DP and attach to the center of the card front
 6.  Add the sentiment banner as shown
 7.  Using the Snowflake Set cut out silver snowflakes
8.  Attach the snowflakes as shown below.  I glued the larger snowflake to the inside of my card

Cottage Cutz Products:


Hope you are started on your Christmas cards! If not stop by our store we have a ton of wonderful dies and stamps to inspire you!

Blessings
Pam


Wednesday, November 08, 2017

Get To Know Pam MacKay


Hello Scrapping Cottage friends! Thanks for taking the time to stop and visit with us. We started a new feature last week that we are continuing with today on the Blog.  Over the next several weeks, we will be giving you a closer look at our designers.  It's  a "get to know the design team"  and today we are featuring Pam MacKay. 


To introduce myself here is a little background info. I was born in Akron, Ohio.  We moved down to the Dayton area when I was in high school. I went to Ohio University and got my teaching degree. I married my high school sweetheart who happened to live right across the street! We moved cross country to Oregon, Washington and then settled in Southern CA for 38 years.  I taught in Laguna Beach until I retired. After hubby retired we moved to South Carolina to be closer to family. 
 
I have been stamping for over 20 years. I got really hooked when I went to a card making class with a friend. My wallet became very light from that day forward! I enjoy all styles of card making. I cant really put my finger on my style but I will say I usually like lots of layering. I have taught a number of card making classes.  And I have been on a number of design teams. I can spend hours in my womans cave making cards but I do have to feed the husband on occasion!
 
I am really enjoying being a part of the Scrapping Cottage Design team.  The dies are wonderfully detailed and the cards that I make with them are so cute that it is very hard to send out. I just want to keep them all to myself!  Here are some of my favorite CottageCutz creations and to tell you the truth it was hard to pick just a couple of them.


Tuesday, November 07, 2017

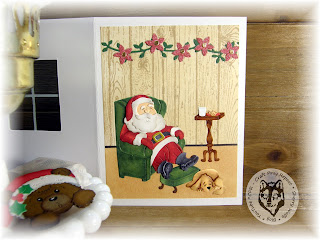
Santa Napping Die + Video

Hello Scrapping Cottage friends! Thanks for taking the time to stop and visit with us on this Tuesday in November.

Have you checked out the online store lately? The new Christmas dies are currently on sale and you can save 25%. It's a great chance to get some dies that might be on your wish list. The DT has been showing some great cards and card ideas for Christmas.

Today, for your viewing pleasure we are featuring another one of the new dies, this one is the super cute Santa Napping. And it's also a double feature because we have a guest designer with us. Sherry Wolfe, was one of the video artists who took part in the video hop a couple of weeks ago.

She had such a cute idea for this die as well as the Window with Shutters and the Window Christmas Friends dies. She has graciously prepared a process video for us. The video is attached and I have also included some photos of the super cute card that she has made.


inside of card

close up view

card front

Please leave her a comment and give her video a thumbs up on You Tube.  


Dies used to create card :
 
http://www.scrappingcottage.com/cottagecutzsantanapping.aspx

http://www.scrappingcottage.com/cottagecutzwindowwithshutters.aspx

http://www.scrappingcottage.com/cottagecutzwindowchristmasfriends.aspx
 

Monday, November 06, 2017

Sweet Treat Screen Divider Card

Hi, Lois here with my regular Monday post.  It's hard to believe Christmas is right around the corner.  I don't know if you're like me, but I make Christmas cards all year long.  It keeps the panic at bay!  I have a Christmas card today made with a fun new die from CottageCutz, Cocoa and Sweet Treats.


To start my card, I cut my cardstock as follows:

White - 5 1/2" x 10 1/2"
Green - 3 1/2" x 4" (3 panels)
Patterned paper - 3 1/4" x 3 3/4" (3 panels)


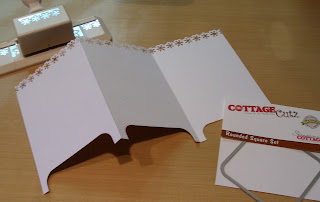
I scored the long white panel at 3 1/2" and 7", creating three sections.  Using a Martha Stewart snowflake border punch, I punched along the top of the white panel.  I then lined up the top of the largest Rounded Square die along the bottom edge of the first panel and cut out the "legs" of my screen.  I then duplicated this process on the second and third panels.


I constructed my screen by gluing the patterned paper onto the green panels, which I then glued to the white screen.


Then came the fun.  I die-cut all the pieces from the Cocoa and Tasty Treats die -- some from colored cardstock and the majority from white cardstock.


I colored the white pieces with Copic markers and constructed my images.  Note the top of the cup for the first panel.  It is cut from a small piece of vellum.


All that remained was to glue the cups and treats to the panels and stamp the sentiments.


Be sure to check out all the dies in the new Christmas release over on the CottageCutz website.  Dies used on my card today are:

http://www.scrappingcottage.com/cottagecutzcocoaandsweettreats.aspx

http://www.scrappingcottage.com/cottagecutzroundedsquaresetbasics.aspx


Sunday, November 05, 2017

Holiday Car and Trailer

Hi!

It's Sunday again and I'm (Anja) back with my new post. It's been a busy few weeks for me at work and crafting really helps me to relax after a stressful day at work. And I'm still testing all the beautiful Christmas themed dies that are available in the Scrapping Cottage store. This time I tried two new dies that can also be used after the Holiday season.


For both cards I used:
- Cottage Cutz dies (Vintage Holiday Car, Christmas Trailer),
- Distress Oxides (Fired Brick, Black Soot, Worn Lipstick, Lucky Clover, Peeled Paint, Broken China, Faded Jeans, Seedless Preserves, Intense Violet, Antique Linen, Spiced Marmalade, Ice Spruce),
- white card base (2 13x13 cm),
- craft paper (2 12x12 cm),
- white card stock for die cuts,
- silver pigment ink,
- Versafine Onyx Black ink pad,
- white acrylic paint,
- heat gun,
- sponge,
- acetate foil,
- roller,
- paper distresser,
- Zig brush (flesh tone),
- black pen,
- foam adhesive pads,
- sentiment stamp.

First I die cut both motives and colored them with Distress Oxides. I colored all metal pieces with silver pigment ink for additional shine.


For the little elf I used Zig brush and black pen to finish his face.


Then I started with the backgrounds. I put some acrylic paint on to acetate foil. I used two pieces of foil and squashed the color between it.


Then I put one foil on top of craft paper and transferred the color with a roller.


I got two different patterns. With a sponge I put a little more color to the edges of both papers. I dried the paint with my heat gun and then added a bit more interest to the edges, using my paper distresser. 


I stamped the sentiment on a strip of white paper. Again I distressed the edges.


I adhere the sentiment and the motives on the background with foam adhesive pads to give it a bit more dimension.


And these are my finished cards.


Thanks for stopping by. I'll be back soon. Have a nice Sunday.
Anja Z.


Cottage Cutz products I used: