Monday, November 06, 2017

Sweet Treat Screen Divider Card

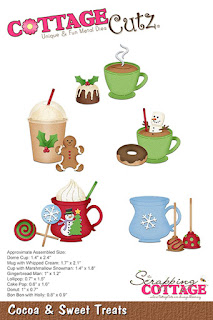
Hi, Lois here with my regular Monday post.  It's hard to believe Christmas is right around the corner.  I don't know if you're like me, but I make Christmas cards all year long.  It keeps the panic at bay!  I have a Christmas card today made with a fun new die from CottageCutz, Cocoa and Sweet Treats.


To start my card, I cut my cardstock as follows:

White - 5 1/2" x 10 1/2"
Green - 3 1/2" x 4" (3 panels)
Patterned paper - 3 1/4" x 3 3/4" (3 panels)


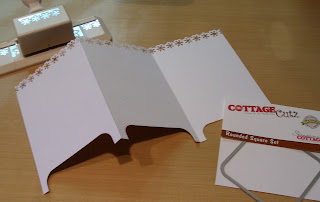
I scored the long white panel at 3 1/2" and 7", creating three sections.  Using a Martha Stewart snowflake border punch, I punched along the top of the white panel.  I then lined up the top of the largest Rounded Square die along the bottom edge of the first panel and cut out the "legs" of my screen.  I then duplicated this process on the second and third panels.


I constructed my screen by gluing the patterned paper onto the green panels, which I then glued to the white screen.


Then came the fun.  I die-cut all the pieces from the Cocoa and Tasty Treats die -- some from colored cardstock and the majority from white cardstock.


I colored the white pieces with Copic markers and constructed my images.  Note the top of the cup for the first panel.  It is cut from a small piece of vellum.


All that remained was to glue the cups and treats to the panels and stamp the sentiments.


Be sure to check out all the dies in the new Christmas release over on the CottageCutz website.  Dies used on my card today are:

http://www.scrappingcottage.com/cottagecutzcocoaandsweettreats.aspx

http://www.scrappingcottage.com/cottagecutzroundedsquaresetbasics.aspx


Sunday, November 05, 2017

Holiday Car and Trailer

Hi!

It's Sunday again and I'm (Anja) back with my new post. It's been a busy few weeks for me at work and crafting really helps me to relax after a stressful day at work. And I'm still testing all the beautiful Christmas themed dies that are available in the Scrapping Cottage store. This time I tried two new dies that can also be used after the Holiday season.


For both cards I used:
- Cottage Cutz dies (Vintage Holiday Car, Christmas Trailer),
- Distress Oxides (Fired Brick, Black Soot, Worn Lipstick, Lucky Clover, Peeled Paint, Broken China, Faded Jeans, Seedless Preserves, Intense Violet, Antique Linen, Spiced Marmalade, Ice Spruce),
- white card base (2 13x13 cm),
- craft paper (2 12x12 cm),
- white card stock for die cuts,
- silver pigment ink,
- Versafine Onyx Black ink pad,
- white acrylic paint,
- heat gun,
- sponge,
- acetate foil,
- roller,
- paper distresser,
- Zig brush (flesh tone),
- black pen,
- foam adhesive pads,
- sentiment stamp.

First I die cut both motives and colored them with Distress Oxides. I colored all metal pieces with silver pigment ink for additional shine.


For the little elf I used Zig brush and black pen to finish his face.


Then I started with the backgrounds. I put some acrylic paint on to acetate foil. I used two pieces of foil and squashed the color between it.


Then I put one foil on top of craft paper and transferred the color with a roller.


I got two different patterns. With a sponge I put a little more color to the edges of both papers. I dried the paint with my heat gun and then added a bit more interest to the edges, using my paper distresser. 


I stamped the sentiment on a strip of white paper. Again I distressed the edges.


I adhere the sentiment and the motives on the background with foam adhesive pads to give it a bit more dimension.


And these are my finished cards.


Thanks for stopping by. I'll be back soon. Have a nice Sunday.
Anja Z.


Cottage Cutz products I used:


Saturday, November 04, 2017

Penguin in SnowGlobe Christnmas


Hello Scrapping Cottage friends! Thanks for taking the time to stop and visit today. It's Mary Marsh here bringing you the Saturday edition of the Blog.

Welcome to November and my favorite upcoming seasons of the year- Thanksgiving and Christmas. I love making Christmas cards and once I start it's hard for me to stop (lol)!!!  So you know where my Blog posts will be going over the next several weeks.

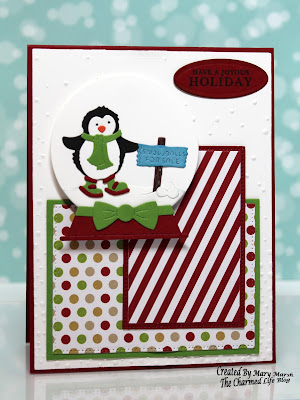
Today, I am showing a couple of the new 2017 Christmas dies released by CottageCutz. They are the Snowglobe w/Fawn and the Snowglobe Friends dies. So let's get started with some details on my card for today.

Step 1: I started my card this week with my layout. I found this great sketch on Splitcoaststampers that I thought would work well for my card idea. Using a sketch is a good starting point when you are creating a card.
I look at the sketch design and then think of possibilities that would fit the circles, rectangles etc. It helps me to get my Mojo in gear. In this case, as soon as I saw the circle I thought of a snowglobe. You can see I am in Christmas mode.
Step 2:  Since my dies were already chosen, I needed to decide on the card colors as well as patterned paper. Of course, I wanted it to be red and green so I just needed some coordinating papers. Looked through my Christmas papers and found some stripes and dots paper.
Step 3: I decided on a white background for layer 1 of the sketch. But, I didn't want it plain white so I used a falling snow embossing folder. I like the deep embossing I was able to achieve with this folder.
Step 4: I cut layer 2 and 3 of the sketch from cardstock and the patterned paper. Used the CottageCutz Rectangle and Pierced Rectangle dies. On the dotted panel (Layer 2) I used the 2nd largest rectangle die and the 3rd largest pierced rectangle die.
On the striped panel, I used the 4th largest rectangle and the 4th largest pierced die.
Step 5: Now I am ready to cut my snowglobe and penguin. These dies are just too cute and so detailed. Even the snowballs for sale sign has incredible detail. And look at his cute little ice skates. You can click on any picture to make it larger.
Step 6: Time to start assembly of my card. Layered the embossed panel to the cherry red cardstock.
Then layered the patterned paper panels.
And finally, the snowglobe is attached it with dimensional adhesive. I doubled up on the dimensional adhesive because some of the globe was on the patterned paper panel and some directly on the embossed panel. By doubling up it evened everything out.
 Step 7: To finish off my card I wanted a Christmas sentiment. I used the smallest CottageCutz oval die and stamped the sentiment.
I hope I have given you an idea for using this new die. Wouldn't it be great as your own Christmas card this year? The die is in the online store ready for ordering.
 
Remember, we are also on Instagram. Click on the photo below to view our Instagram photos.
https://www.instagram.com/
 
 Dies I used to create card:
http://www.scrappingcottage.com/cottagecutzsnowglobefriends.aspx

http://www.scrappingcottage.com/cottagecutzsnowglobewfawn.aspx
http://www.scrappingcottage.com/cottagecutzrectanglesetbasics.aspx

http://www.scrappingcottage.com/cottagecutzpiercedrectanglesetbasics.aspx


Friday, November 03, 2017

A Cup of Warmth

Happy Friday!  It's Jeanne posting today.  The card I'm sharing today uses three dies; one of which is a personal favorite.

I love cute cards (actually I love most ALL styles of cards) and I really like Mr. Snuggles.  Today, I made him a polar bear hugging a cup of cocoa from one of the new Christmas dies - Cocoa and Sweet Treats.  This is an A2 side fold card.  The card base is 8 1/2 x 5 1/2 folded to 4 1/4 x 5 1/2.

I started by cutting a panel from plaid paper that was 4 1/4 x 5 1/2 inches.  I cut three blue panels and one white panel with the Rectangle set. 

The sentiment was stamped on the white panel.  I stacked and glued the blue panels together and then glued the white panel on top.  This gives a nice edge to the white panel and allows it to be popped up off the card face without using foam dots or tape.  When creating a stacked panel, the Rectangle Set is super helpful.  It's important that the panels all be the EXACT same size - something difficult to do with a paper cutter but very easy with a rectangle die.

I added two ribbons that match some of the plaid lines.  One was placed under the white sentiment panel and the smaller one I placed on top.
I die cut the bear, cocoa, steam and snowflake from white card stock.  I used blue for the cocoa cup.  Copic markers were used to color the cocoa for inside the cup, ear insides and nose; I used a multi-liner pen for the bears eyes.  To give him some depth, I sponged his edges in a light grey ink.

Finally, I glued him together and added him to the sentiment panel along with a few buttons.
http://www.scrappingcottage.com/cottagecutzcocoaandsweettreats.aspx
http://www.scrappingcottage.com/cottagecutzmrsnuggles3x3.aspx
http://www.scrappingcottage.com/cottagecutzrectanglesetbasics.aspx
Have a great weekend - see you next Friday!

Thursday, November 02, 2017

Let it Snow!!

Good Morning Scrapping Cottage Family!

It is Pam crafting with you today! Cottage Cutz has released a number of wonderful stamps sets.  And I decided to work with the Snowglobe Fun set which has a tiny snowglobe and little images to go inside the globe plus some small sentiments.


Design Steps:
1.  Using the Snowglobe Fun set stamp the images with an ink that works great with Copic markers.  I used Memento Tuxedo black.  Color the images with your markers

2.   Use the coordinating dies from the Snowglobe set to cut out the images.  Use the Cross Stitch Circle dies to cut out 2 blue card stock circles.  Stamp the smaller circle with the sentiment
3.  Cut two strips of DP 1 inch and the other 1/2 inch.  Cut a 4 x 5 1/4 piece of designer paper and 4 1/8 x 5 3/8 piece of blue card stock.  Glue the DP to the blue card stock then mount on an A2 white card base.  Add the strips and circles as shown.
4.  Pop up the stamped images onto the larger circle and add the sparkle ribbon

Cottage Cutz Products Used:

I hope you get a chance to be crafty this week and we would love to hear your comments!

Blessings

Pam