Thank you very much for all 33 beautiful cards and projects you've made for Challenge #6. Two lucky winners will be announced at the end of this post. So, stay tuned.
And here is time to start new challenge.
This time theme is FALL
Fall is so inspiring with the beautiful colors. So, create a card or any other projects wich will represent fall and colors which are characteristic for this time of the year.
So, grab your favorite Fall/Autumn dies. But please, use ONLY CottageCutz dies and not any other dies. "Add your link" button is available under the list of used dies. If you are not familiar with this button, please check this post for more explanation. Challenge will be closed on 31st of October!
So, grab your favorite Fall/Autumn dies. But please, use ONLY CottageCutz dies and not any other dies. "Add your link" button is available under the list of used dies. If you are not familiar with this button, please check this post for more explanation. Challenge will be closed on 31st of October!
So, before I announced the winers, I'm going to show you my project for today. Here is my card:
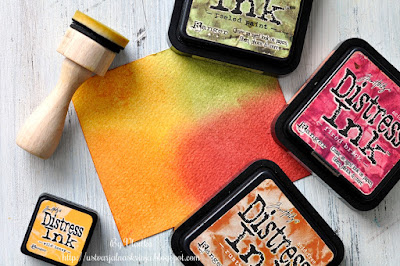
1. First we are going to prepare paper for all die cuts. So, let's take first piece of watercolor paper and color it with different Distress Inks: Peeled Paint, Rusty Hinge, Fossilized Amber, Fired brick...
2. Now spray a water on it, to cause colors to move and blend. Leave it to dry or speed the drying process with heat gun.
4. With Autumn Foliage cut foliage out of previous colored watercolor paper. This will give beautiful autumn look. If you want, you can distress edges with the same distress inks, which were used for coloring the paper.
5. Take another piece of watercolor paper and color just with different shades of orange distress inks and spray it with water. Cut the pumpkins out of it. Distress pumpkins edges with darker shade of orange distress inks. Color also the pumpkin stems with green distress ink. and glue everything together.
7. Now take additional piece of white cardstock and glue all die cuts as shown on photo:
8. Cut also one strip out of white paper and stamp happy fall or any other sentiment on it. Glue it under dies cuts. If you want, you can aslo flick some droplets of gold shimmer spray and let it dry. Now, glue everything together on cardbase and card is finished.
This is it for today. All I want to show you before I left is the list of CottageCutz dies which I used on my project. Here they are:
Basics:
White card base: 4 1/4 x 6 inches (cut 4 1/4 x 12 inches, fold in half)
Additional piece of white cardstock and some red and kraft cardstock to cut out the die cuts. Prepare also some watercolor paper.
Other Supplies:
CottageCutz Dies: Listed Below
Distress Ink: Peeled Paint, Rusty Hinge, Fossilized Amber, Fired Brick, Aged Mahogany, Forest Moss, Rusty Hinge
Other: acrylic block, Scissors, Paper trimmer, Sizzix machine, water, spray bottle1. First we are going to prepare paper for all die cuts. So, let's take first piece of watercolor paper and color it with different Distress Inks: Peeled Paint, Rusty Hinge, Fossilized Amber, Fired brick...
2. Now spray a water on it, to cause colors to move and blend. Leave it to dry or speed the drying process with heat gun.
3. If you want you can add more layers of colors, but after each layer of color and water, paper needs to dry.
4. With Autumn Foliage cut foliage out of previous colored watercolor paper. This will give beautiful autumn look. If you want, you can distress edges with the same distress inks, which were used for coloring the paper.
5. Take another piece of watercolor paper and color just with different shades of orange distress inks and spray it with water. Cut the pumpkins out of it. Distress pumpkins edges with darker shade of orange distress inks. Color also the pumpkin stems with green distress ink. and glue everything together.
7. Now take additional piece of white cardstock and glue all die cuts as shown on photo:
8. Cut also one strip out of white paper and stamp happy fall or any other sentiment on it. Glue it under dies cuts. If you want, you can aslo flick some droplets of gold shimmer spray and let it dry. Now, glue everything together on cardbase and card is finished.
-------------------------------------------------------------
And now go back to our challenge a little bit more. As I told you before, two lucky winners will be randomly chosen and will get gift certificate for Scrapping Cottage store.
First one will get gift certificate value of 50$...
... and second one in the value of 25$.
You have time till 31st of October to participate.
Both winners will be announced at the beginning of November.
All you need to do is take your CottageCutz dies and start creating!
Please, use only CottageCutz dies!
Have fun and don´t forget to show us all your projects.
"Add your link" button is available under the list of used dies.
-------------------------------------------------------------
And of course we should not forget about the winners for the fifth challenge.
Congratulations!
Please, contact Joanne at scrappingcottage@cox.net to claim your Gift Certificate.
This is it for today. All I want to show you before I left is the list of CottageCutz dies which I used on my project. Here they are:


