Wednesday, July 06, 2016

~Framed Sofa & Chair Scene~


Hello Scrapping Cottage friends! Thanks for taking the time to stop and visit today. It's Mary Marsh here bringing you the Wednesday edition of the Blog.

Today for your viewing pleasure, I am featuring several new dies set from the June "Home Sweet Home" release. This release is chock full of dies that are all about the home. They can be used in so many creative ways as the Design Team has been showing you for the past 2 weeks.
 
Today, I thought I would make a card to send to a friend who has had some stressful days at work. We all need to take time to relax a bit. Don't you agree? The sofa & chair dies were so perfect for my card idea. So let's get started with some card details.
 
Card Base: 5 1/2"  x 4 1/4" - used a Caribbean Blue shade of cardstock.
Embossed Paper Layer:  5 3/8" x 4 1/8" - used a vanilla cardstock
 
Step 1.  Created the background texture using an embossing folder and my BigShot machine.
 
 
Step 2. I wanted this panel raised from the card base. The card has nice dimension that's not picked up in these photos. I decided not to use mounting tape. Instead I has some fun foam which works quite nicely. I only had blue but once it's on the blue card base you can't really see it. It gives about an 1/8" lift to the panel.


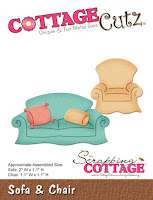
Step 3. I die cut my frame using the Pierced Wide Rectangle Frame set and attached it to the embossed layer. Added some pearls to the frame corners. I die cut my sofa and chair in a medium brown cardstock and the sofa pillows with a striped patterned paper. This card could also work for a guy just eliminate the pearls.
 
Since I don't have the floor lamps, rugs and plant dies, I punched an oval for my rug and used the flower pot from the Garden Accessories and the leaves from the Fancy Pocket Plus to create my plant. Just another way to get more use out of the CottageCutz dies you own.  I attached the dies with a variety of adhesives - double sided tape, glue dots and multi-matte medium.
 
 
Step 4. To complete my card, I stamped my sentiment on a die that is also part of the Fancy Pocket Plus set. I added a bit of thick baker's twine that matches my cardstock color. I decided to add a couple of cats to this scene because my friend likes cats and that finishes off the card. 
 
Well friends, that's it for me for today, so until next time.......inky hugs.


http://www.scrappingcottage.com/cottagecutzsofaandchair.aspx
http://www.scrappingcottage.com/search.aspx?find=fancy+pocket+plus
http://www.scrappingcottage.com/cottagecutzgardenaccessories.aspx
http://www.scrappingcottage.com/cottagecutzpiercedwiderectangleframesetbasics.aspx
 
 
  .

Tuesday, July 05, 2016

Singing birds

Hi everyone, Janja here!

The sun's rays are more powerful every day and in the morning you can listen to the birds singing.
So, today I share with you two cards with birds.


For the cards we need: 
- white card base: 4 1/4 x 5 1/2" (10,8 x 14 cm), folded
- light brown cardstock: 4 x 5.2" (10 x 13 cm)
- patterned paper: 3.7 x 4.7" (9,5 x 12 cm)
- gray cardstock: 3.6 x 4.5" (9 x 11,5 cm)
- white cardstock
- watercolor paper
- Distress inks: Mustard Seed, Wild Honey, Rusty Hinge, Lawn Mowed, Peeled Paint, Broken China, Faded Jeans, Weathered Wookd, Fired Brick, Aged Mahogany and Tea Dye
- Memento ink: Cantaloupe

From the watercolor paper cut out two birds with the tweet die and paint them with Distress inks.


Prepare another cutout and paint it with Distress ink only around the birds. The birds cutout are not removed. Paste them on the back side of the paper.


Once the paper is dry, cut out a rectangle with the largest die from the stitched rectangle set. Paste the colored birds.


Cutout the inscription hello and assemble the card.


For the second card prepare cutouts from white cardstock with the die birdhouse with vine and shadow them.


Place a birdhouse in frame which was cutout with the largest die from the stitched wide rectangle frame set. Stamp inscription and assemble the card.


That's all for today. I hope you like it and thank you for viewing.

Janja

List of dies used: 


Sunday, July 03, 2016

Go with the Flow

Hello everyone,

It's Donna here today to share with you an easel card. I am loving these cute fish and shell dies. The fish are called "Happy Fish 1 (blue) and Happy Fish 2 (yellow).  They sure do look happy! I had so much fun creating this card....let's get started on how I created it.

This card is an easel card.  The base of the card is 4 1/4 x 11 long.  I scored at 4 1/4 and 2.  I added my design paper and then created all the elements on the card.  The sentiment was computer generated.


Here is a closer look at the fish 

 sentiment was computer generated

Here is started coloring the fish with copics. I love how the colors I choose they make the fish look so vibrant! After I finished coloring these, I used dimensional's to pop the fish on the circle.  

 I then colored the shells and then arranged them on the card.  I popped up the beige color shell over the yellow one.  I also used dimensional's on the green shell and used it to hold the fold up on the card.   

I cut out the largest cross-stitched circle from the cross-stitched circle set. The paper is already embossed with water like lines, and I thought it would make the perfect water background.  I used some distress inks to give the water an ombre look.  After adding all the elements to the circle die I adhered it to the center of the easel card.  To finish the card off, I added some bling to look like bubbles in the water.  I also added some tiny bling to the fish eyes. 


I hope you were inspired by my card.  Here are the list of dies I used:


Saturday, July 02, 2016

Sweet Home With Flowers


Hello dear friends,

It's Saturday today I am Anita here and I have a new card for you made with the new release HOME SWEET HOME collection. Such minute detailed dies are included in this series that I am amazed. You can build your entire house with this release.
However, as my forte is flower making, I decided to make a delicate blue floral card adorned with pretty flowers and a sweet home. So here is my card along with the close up pictures to show you the details of the cards and how the dies have been used.


 The card measures 7.5 inches by 5.5 inches.
I have used an embossed dotted paper in blues and have added some zig zag stitching to it, to coordinate with Stitched rectangle die.
This card is all about layering.
The flowers have been created using the CottageCutz 3D flower # 5 and many leaves. The leaves have been coloured with Distress ink Peeled Paint.


List of dies used.


Do leave your comments and happy crafting !!!


Friday, July 01, 2016

Bird Trio Die + Sketch


Hello Scrapping Cottage friends! Thanks for taking the time to stop and visit today. It's Mary Marsh here bringing you the Friday edition of the Blog.

Today for your viewing pleasure, I am featuring the bird trio die from the May "This & That" release. This die could be used for a variety of card types, and I made it as a card of encouragement for my BFF who is battling breast cancer.

So let's get started on some details on how I made this card.

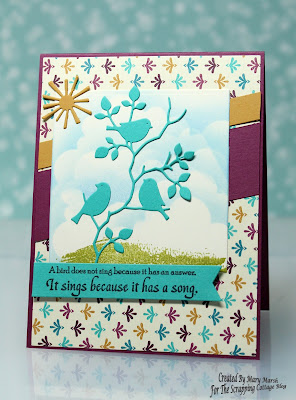
Card Base: 4 1/4" x 5 1/2"
Patterned Paper Layer: 4 1/8" x 5 3/8"
Image Panel: 3 1/4" square (largest CottageCutz square die)
Angled panels: 1 1/4" wide & 1/2" wide (trimmed at ends to fit card)
Sentiment flag: 5/8" wide

I started this card by selecting my colors first. I found this rich looking patterned paper in my stash and that determined my card colors of raspberry, mustard and blue-green. I had this sketch saved and decided it would work well with my die cut.
I did some sponging of clouds for the background. Used a cloud template I have which makes it so easy to get perfect clouds every time. I used a grass stamp for a little green and the background was complete.
I die cut the bird trio in the blue-green cardstock and layered that over the background panel. Added a sun that is cut from the Spring Stamps die to complete the image panel.
 
 
 Stamped my sentiment on the flag panel to complete this card. Well, that's it for me for today. We are celebrating July 4th Independence Day here in the US this weekend. There will be lots of festivities and fireworks. So until next time.......inky hugs.
 
Oh and speaking of bird trios. We have a robin's nest underneath our deck. Today the little ones heard my hubby and I talking and put their heads up and mouths open. I pulled out our 6ft step ladder and took a quick photo while they were performing. Mama Bird wasn't around so I didn't get attacked (lol)!!!
 
http://www.scrappingcottage.com/cottagecutzbirdtrioelites.aspx
http://www.scrappingcottage.com/cottagecutzspringstamps.aspx
http://www.scrappingcottage.com/cottagecutzsquaresetbasics.aspx