Thursday, February 14, 2013

Old Fashioned Phone

Happy Valentines Day!

It's Simona here. Today I would like to share with you 
a card showcasing a new beautiful die from 
Vintage Release CottageCutz Old Fashioned Phone (4x4). 
In addition I used the CottageCutz Long Stemmed Rose (4x4).


The Old Fashioned Phone was cut out of white cardstock and
colored with Copics (brown tones). The Long Stemmed Rose was
also cut out of white cardstock and colored with Copics 
(reds and greens).


For the letter behind the phone and the rose
I used white photocopy paper, stamped the writing 
in dark brown craft ink and distressed the paper with 
Distress Inks - Antique Linen, Brushed Corduroy.
I tore the edges of the letter with my fingers and distressed them.


I put some gold sparkles on the edges of the rose petals.


And here is another look at my card.
The possibilities are endless with this beautiful die...

Thank you for stopping by!

Hugs,
Simona


Wednesday, February 13, 2013

Mini book


Hi everyone Cindy here with a SWEET CottageCutz Design. Here is the third page of a little mini  book that I have created. I have used CottageCutz Eiffel Tower Mini and the ADORABLE CottageCutz Poodle Mini.

CottageCutz Eiffel Tower Mini


Hi every one Cindy here I want to show you some new dies, first up I have the GORGEOUS CottageCutz Vintage Lamp, and CottageCutz Perfume Bottle.
CottageCutz Perfume Bottle
Check out my post with this design here!!
Check out my post HERE!!~


Hugs Cindy xoxo

Tuesday, February 12, 2013

CottageCutz - Just NOTE card

Hi Everyone! 
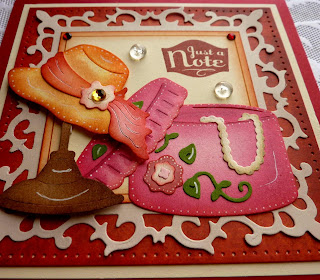
It's Olena here today to share with you new Just a NOTE card!   
I made this card using the Super CUTE CottageCutz dies- Elegant Hat Box dies from NEW 2013 Vintage Collection.

I cut all pieces from the die set and sponged the edges with craft ink. Then,  I cut out square frame and stamped sentiment "Just A Note" in right corner of the square frame. I added  all die cuts to square card front as shown in picture above.
 I decorated card with clear Dew Drops and rhinestones.

For this card I used:


Monday, February 11, 2013

Heart Rose Wreath

Hi everyone!

Kathy here with you today!  I'm so excited to show you a new die from CottageCutz, the Heart Rose Wreath


I just LOVE this new die!  I paired it with the bird from the Bluebird die that I placed inside the wreath.  I cut everything out in white cardstock and used chalk inks and make-up applicators to color the pieces.  These are the dies that I used on this.


I embossed the bottom portion of the card base, added some Cotton Candy Baker's Twine, made a bow, and added some pearls, Liquid Pearls, and a charm.  Super easy card to make!


Sunday, February 10, 2013

CottageCutz Heart Shaped Box

Hi Everyone! It's Lisa here today and I am sharing a Valentines Heart Box with you.

This is a candy box purchased at the dollar store. I ate the candy **snicker** just so I could decorate the box! 


I used several beautiful CottageCutz dies on this. 


I did some punching and layered that on the top and bottom of the box. I also dyed some lace with glimmer mist to match.

The box was finished off with some chipboard accents. I covered the in gesso then stamped with a musical note stamp and embossed them in gold.


Saturday, February 09, 2013

CottageCutz Vintage Mini Tussy Mussy


Hello everyone, today I wanted to share My Vintage Mini Toilet Paper Tussy Mussy that I made. Carol was the Inspiration for these Toilet Paper Tussy Mussy's :) Thank You CAROL!!!!

On this one, I used CottageCutz "Fancy Perfume Bottles" from the Vintage Release. I ABSOLUTELY LOVE this RELEASE!!!!


I wanted a vintage look to my Tussy Mussy, so I went with Vintage Laces, and ruffles, and Vintage Seam Binding, all from my stash. Then I picked a dp that I thought could be vintage looking, and went off of those colors for my perfume bottle. 

The CottageCutz Perfume Bottle is cut out with a design paper, then distress with brushed Corduroy ink. Next I cut the hose and top pieces all with cream card stock and distressed it with tea dye. The bulb is airbrushed with copic YR61 and then distressed with old paper. My flowers were colored with copics R32, YR61 , for the greenery on the bottle I used YG95 & G99 copic markers.


The Lace I used on the bottom ,top, and handle are very very old. The ruffled behind the bow, Im not sure how old that is. I also used Really Reasonable Ribbon Brown Antique Gold Ribbon for my bow. Now behind the hearts is a peach seam binding, I just ruched it up. Lastly I added a string of pearls to the bottom :)


If you havent seen the NEW CottageCutz Releases you will have to take a moment and stop by The Scrapping Cottage Store HERE :)


*************************

Here is another MINI Tussy Mussy I did this past week
Thank you again Carol for the Inspiration to make these Toilet Paper Tussy Mussy's they sure are fun to make! I think PERFECT to hold some small candies :)


Thank you for looking and have a lovely day!!
Hugs to all,
Cheryl


Friday, February 08, 2013

CottageCutz Vintage Bag Tag


Hello friends.   It's Carol here and today I have what is called a bag tag made with the adorable Vintage Lamp and Dress Form Mini Dies from CottageCutz.  What is a bag tag?  It is a cute little paper bag that has been altered to hold a sweet tag.  It's almost like a card and envelope, but it's a bag with a tag and they are super fun to make. This was inspired by ILuvVintageScrap-Ms Juliana on YouTube.  Her's are gorgeous!

 So here you can see the tag outside the bag.  I went with a Shabby Chic theme.  I used a 3-1/2" x 6-3/4" White Paper bag that I had in my stash from Michael's.  I got some regular paper bags out (lunch bags) and used them for the background.  I don't have any precise measurements because I just played with my stuff and did what looked good to me.  Tear the paper bag to cover most of the white paper bag.  Crumple it up, then unfolded and hot glue it to the bag.  I used white paint and brushed some on top of the bag.  Tear a page out of an old book and glue it to the top of the bag.  Cut a piece of white cardstock, run it through a crimper and distressed the edges with Rangers Brushed Corduroy and glue that on top of the book page.
I chose lace, pearls, burlap, chipboard butterfly, buttons, eyelash yarn, feathers and a premade rose and arranged them like you see here.  I wrapped the eyelash yarn in the rose and attached with a little glue.  The top flower is made from a paper bag.  Cut two pieces with the smallest scalloped circle Spellbinders die and four of the next size up (You could use a scalloped punch if you have one).  I rolled and scrunched up the paper, then unfolded, glued together, and added a pearl in the center.  If desired, brush white paint on the flower.  All edges of flowers are stickled with Icicle stickles.  For the inside tag paper doilies and crochet flowers were used to decorate it.

For the lamp, I cut all the pieces on white cardstock and used copic markers to color it except for the lamp shade.  I just distressed it with some of the Brushed Corduroy distress ink on the edges.


The dress form was cut on kraft cardstock and attached to the top of the inside tag.  A little button was glued to the center and a bow was made from white crochet thread.  This is so much fun to make and I invite you to try your hand.  You will love it!


Thursday, February 07, 2013

XOXO!!

Hi, Friends!
Today I have a new card showcasing very pretty 


 Paper from Recollections by Michaels.
 Other: charm, button, ribbon and
rhinestones.
Hugs,