Monday, December 19, 2022

New Year's Slimline Shaker

Hello crafty friends!  Wishing you a Merry Christmas this week!

Kristine here with you today and shaking it up with a slimline shaker card for New Year's using the cute Polar Bear Trio with Igloo die from the Christmas #2 Release, and the Fifties Phrases #1 die from the Classic 50's Black Friday Release and more!

Let's Party 2023

The SCS color challenge the next 2 weeks is
Basic Black
Metallic Silver
Metallic Gold
And the dessert option is:  NEW Year's

I chose a slimline paper pack called Shine Bright.that has silver and gold with subtle Snowflakes.

CUTTING & SCORING

Black Cardstock:
 • cut 8" x 9", score along the 8" side at 4"-  score & burnish
• die cut Fifties Phrases #1

Silver Metallic (or foiled) Cardstock: 
• cut 8-3/4" x 3-3/4" 
• die cut Stitched Numbers

Gold Metallic (or foiled) Cardstock:
• die cut balloon from Star Windows Slimline set

Patterned Paper (Silver Snowflake): 
• cut 8-1/4" x 3-1/4" 

Patterned Paper (Gold with Snowflakes):

Acetate or Window Sheet: 
• cut 8-1/4" x 3-1/4"

White Cardstock:

DESIGN STEPS

#1  Cut all your layers and die cut pieces.

#2  Adhere your silver layer to card front.

#3  Rub a used dryer sheet or anti-static pouch to both sides of your acetate sheet and attach to back of star cut-out layer with double-sided tape.

#4 Using foam strips, outline the edges of acetate and around the star shapes.  Peel backing off the strips and add shaker elements inside your 3 sections.


#5  With your silver snowflake paper, pattern side down, carefully center it over your star layer, matching up the edges best you can and adhere.

#6  Turn shaker layer right side up and attach to card front.


#7  Color your polar bears and attach all die cut elements to card front as shown.


Wishing you all the crafty goodness in 2023!
Kristine

PRODUCTS:


Saturday, December 17, 2022

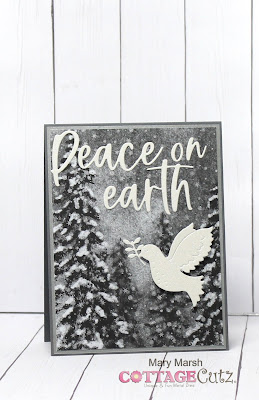
Peace On Earth

Hello CottageCutz friends! Thanks for taking the time to stop and visit with us today. It's Mary Marsh here bringing you the Saturday edition of the Blog. 

It's crunch time now for Christmas cards. I still am not done making all my cards and then there is the addressing and mailing to be done. Yikes! I needed a few quick cards to finish up for Christmas 2022. 

So for today I am featuring the Peace on Earth and the Holiday Dove w/Floral dies. Both are from the Christmas Part 2 collection and are on sale for 30% off. 

Here are the card details:

I found these card bases in my stash and I loved the foggy yet peaceful and serene snow scene. I thought they would be a great backdrop for the Peace on Earth phrase as well as the Peace dove. And my card for this week was born. 

I had 3 of these bases and decided to cut them in half to create more cards. So I was able to get 5 cards in this design.  The background is very sparkly and my photos aren't doing the paper justice. 
In order to create an A2 card (4 1/4" x 5 1/2"), I cut the panel to 4" x 5 1/4". For my layering panel I wanted to use some silver paper but I didn't have any, but I found these silver envelopes. I cut them apart (4 1/8" x 5 3/8") and used them- they worked perfectly. My card base is a dark gray - 4 1/4" x 5 1/2". 
I cut my phrase sentiment and the dove in a white glitter paper. My camera isn't picking up the sparkle in this paper either. They both look great against the snowy background. These aren't traditional Christmas colors, but I like to create cards for the Holidays using non-traditional colors. 
Now that my card elements are prepared, I am ready to start card assembly. I attached all the layering pieces with double sided tape. 
Next, I attached my sentiment with clear glue and the dove with dimensional adhesive. 
And that's my card for this week. See you next Saturday!


Dies I used to create card:


Friday, December 16, 2022

5x7 Bench Fold Card - Santa Stopping By a 50's Diner


Hi everyone! Linh here and I have a new video up on the Cottage Cutz YouTube channel. This is a fun bench fold card. I think sometimes even Santa needs to stop by a diner for an ice cream sundae to fuel the rest of his Christmas deliveries. :) I've combined some of the most recent releases - the Classic Fifties along with various Christmas sets.


Thursday, December 15, 2022

Joy to the World

Hello Scrapping Cottage Friends

It is Pam sharing with you today!

We are only a few days away from Christmas and I have another card for you today.  This one is a bit more country.  I used the Rustic Wreath and a great Christmas plaid for the design.


Design Steps:

1.  Use the Rustic Wreath die and cut out the following colors of card stock: dark brown, light brown, deep red, red, light red, pinkish red, yellow, dark green, green, light gray and dark gray.  After cutting the pieces assemble with a fine tip glue.  Dot the birds eye with a black gel pen
2.  Layer the pieces onto the wreath and adhere with a fine tip glue once you are satisfied with your design

3.  Use a kraft A2 card base, deep red 4 1/8 x 5 3/8, plaid DP 4 x 5 1/4, an embossed piece of kraft cut with a dove tail 4 1/2 x 2 1/2 (I layered the kraft piece with gold card stock which is not shown)

4.  Glue down the deep red to the kraft card base, next adhere the plaid and then add the gold and kraft dove tail piece all glued flat

5.  Glue down the wreath and then using the Joy Expression die cut it out of deep red.  Stamp your sentiment on kraft and layered it on deep red.  Glue the stamped sentiment down and then glue down the word Joy. To complete the card add a small raffia bow under the wreath

CottageCutz Products


We have more inspiration on our YouTube Channel check it out HERE

Thanks so much for stopping by!  And I will see you next Thursday.

Blessings and Take Care


Wednesday, December 14, 2022

Finding Card Inspiration


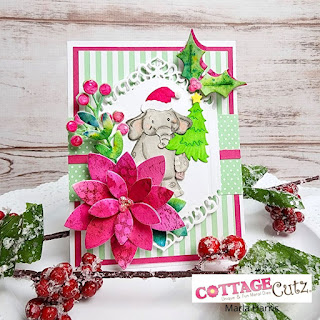
Hello, my crafty friends.  Marla here with another CottageCutz YouTube video.  Christmas is around the corner and I'm finishing up a few last-minute cards.  Often, when I am at a loss and not sure where to start, I look for card challenges.  Each month "Scrapbook Cards & Today" posts such challenges.  It was the December Challenge photo below that inspired my card today.


Not only did the color palette inspire me, but the new "Poinsettia Floral" die was the perfect jumping off point for the card design.  I've had the "Festive Elephant" on my desk begging to be used and think he adds a touch of cuteness to the card.    

If you want to learn more about this card design and would like to enter for a chance to win the "Poinsettia Floral" die, head over to the CottageCutz YouTube Channel.  

Until next time.... Marla


Tuesday, December 13, 2022

Stable Nativity Ornament And Greenery White on White Card

Happy Tuesday Cottage Cutz Friends!
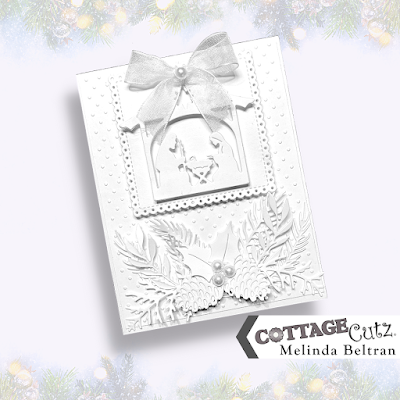
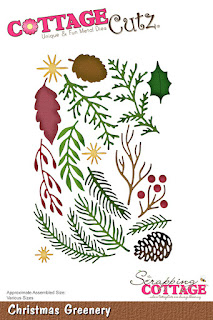
Melinda here with you, and today I am sharing an elegant yet very easy Christmas themed card I created featuring the Stable Nativity Ornament and Christmas Greenery dies from this year's amazing Christmas release!
My card is a standard A4 card and the completed size measures 4.25 x 5.5. It is a side folding card with a white cardstock base.  


I started by cutting my card base and then a corresponding white mat. I ran it through my machine with a small swiss dot embossing folder to give the mat some texture. Texture plays a larger part when creating a card that is tone on tone... or in this case white on white :-).

Once I adhered the mat to the card base, I added some large glue dots towards the bottom center of the mat. See photo above.

I proceeded to cut out some of the various foliage from the Christmas Greenery die all in white. I then started placing them on the bottom of the card and used the glue dots to press them down on the end. Doing this keeps the die cuts "loose" on the other end and gives them a feel of being loose and gives them more movement. I finished by adding three little flat back pearls on the holly leaves instead of the dots themselves.

I then die cut the Stable Nativity Ornament out a couple of times and layered them together to give them some strength. I added some pop dots to the bottom to give them some lift. I then added that to the scalloped stitched square die from that set. To the top I added a small organza bow and a little pearl in the center. I then adhered all of that to the top of the card...and voila! All done! I purposely did not put a sentiment onto the front of this card. I wanted to let the dies speak!

Here is one last look at the completed card. I think this card turned out super cute!


Don't forget to head over to the CottageCutz YouTube channel and check out all of the amazing projects on there. Our video team is doing a wonderful job of filling the channel with all sorts of creative content! You don't want to miss it!

Dies I Used
Stable Nativity Ornament

Christmas Greenery


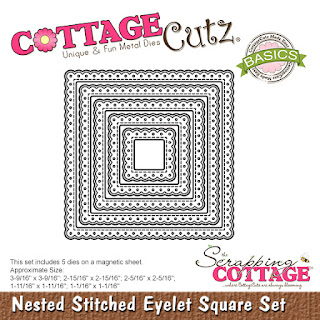
Nested Stitched Eyelet Square Set


Here's a look at the entire release. Be sure to head over and grab them while they last!

Well that about covers it for today! Until the next time, have a wonderfully craft-die day!
Melinda Beltran