Wednesday, October 06, 2021

Holiday Ice Skates

Hello Scrapping Cottage friends! Thanks for taking the time to stop and visit with us today. It's Mary Marsh here bringing you the Saturday edition of the Blog.

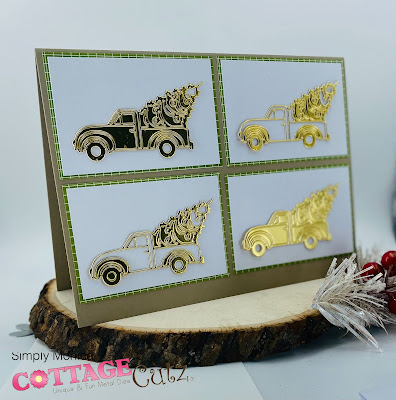
IT'S NEW RELEASE TIME! The new Christmas dies are in the online store with 40 new designs and they are on a limited time sale at 30% off. It's not too soon to get started on your Christmas cards. 

Today for your viewing pleasure I am featuring the new Holiday Ice Skate Floral  and the Merry Christmas w/Snowflakes dies.  So let's get started with some details of how I created my card. 

Design Steps:

I started my card this week with the colors from the Splitcoaststampers color challenge #864. We were to use real red, bermuda bay and black for the color trio. 
bermuda bay, real red, black
Optional was to use something weathered. I went with a distressed designer paper. 

Red card base: 4 1/2" x 5 3/4"
Medium brown layering panel: 4 1/4" x 5 1/2"
Designer paper panel: 4 3/8" x 5 3/8"
Next, I cut my ice skates and the floral images in the challenge colors. 
I cut the Merry Christmas sentiment in red. I decided to cut it 2x to give more dimension to my card. 
Now that all my card elements are prepared, I am ready to start card assembly. I attached both layering panels to the card base using double sided tape. 
To attach the images I used a combo of double sided tape, glue dots and art glitter glue (my new fave -it dries clear). I scattered a few bermuda bay sequins and my card is completed. 
I hope I have given you a fresh idea on a way to use this new ice skate and sentiment die. And, remember they are both on sale.

See you next week!

Dies I used to create card:


Tuesday, October 05, 2021

I Heart Fall Banner

Hello Scrapping Cottage friends! I'm so glad you stopped by. My name is Melinda and this is my first post for Cottage Cutz. My project features a die from the newest release. The release includes 40 wonderful Christmas themed dies! Now is the perfect time to pick them up! They are 30% off and they are ADORABLE! They will get your creativity rolling for all your Christmas projects!  

Here is my project. I created this cute little banner for fall. It says I {heart} fall. Yes, that's right. It's a fall themed project even though it features a Christmas themed die. I love to find different ways to use my dies. I used the new Deer Floral Spray die for my banner panels.

Here is a shot of each banner panel not hanging. I had intended to use it for my tiered tray, but it was just a tad too big. So I am hanging it on my wall instead.

I started by die cutting all of my pieces with white cardstock. I colored the pieces with a variety of mediums. For the Burgundy flowers, I used a watercolor marker from Arteza.

I also used some of my Chalks to brush on some of the softer colors. Using the pom-pom with the gator clip applicator is one my my most tried and true uses for shading and coloring die cuts.


Once I finished coloring all my pieces, I cut some gray cardstock mats and ran them through my machine with a wood grain embossing folder.

Once the embossing was done, I went ahead and started to assemble them. For the base, I used the Rectangle Double Stitched Nesting Set. I then added the gray wood-grain embossed mat to that.

I then added the double stitched rectangle mat that was two sizes smaller than the base. I added a mat with some pretty plaid paper that I created and printed out. I then used the Wacky Nested Stitched Square Set to cut the smallest one. I cut a mat with the same patterned paper and used some foam dots for a little lift. 

For the "I", "heart" and "FALL" letters/shapes, I cut them using my electronic die cutter. I added some foam tape and then added the adorable little dears to the bottom corners. 

I assembled the spray at the top with the deer antlers, flowers and the pretty foliage. I used my Spectrum Noir pen to add some sparkle to the flowers and to the burnt orange leaves. For the center of the pink flowers, I added some dots with my Bronze Sharpie marker. 

I then used my hole punch to punch holes in the top corners of the panels. This allowed me to thread the twine through and add a bow between each panel.

 
Here's a closer look at the "A" panel.

Here's a closer look at the "F" panel.


Here's a closer look at one of the "L" panels.


And finally, here's one last look at the panels not hanging up.


The Dies I used to create this banner:


Well that about covers it for today! Be sure to head over to the Cottage Cutz You Tube Channel where some of the designers will be posting videos! Make sure to come back by each day for some more great crafty inspiration from the super talented team. Until the next time, have a wonderfully crafty day!

Monday, October 04, 2021

Easy Clean and Simple

Hi everyone Happy Monday. I am back with a easy Christmas card for The Scrappin Cottage using one of the new releases called Christmas Truck w/Tree from the September 2021 release. 


I diecut the image on gold foil paper a total of 4 times but I left certain sections off the cut to add variety. 


Once I diecut each four times and mat them against some gingham green patterned paper. 


Once done I adhered it to a 5x7 card base to complete my card. 

ANNOUNCEMENT: Don't forget to check out the new video on our YouTube Channel - there is a stamp giveaway for subscribing, leaving a comment and giving a thumbs up on the video. Click here. We are giving away the Country Farm Cows die that was used in the video.

Die I used to create card:


Sunday, October 03, 2021

From our Gnome to yours

Good morning Cottagecutz Fans, it’s Wendy bringing you the blog today. I really hope your enjoying your weekends. Mine was spent crafting (of course) and long doggy walks with hubby and Border Terrier Betty. 
ANNOUNCEMENT: Don't forget to check out the new video on our YouTube Channel - there is a stamp giveaway for subscribing, leaving a comment and giving a thumbs up on the video. Click here. We are giving away the Country Farm Cows die that was used in the video.

Todays card is made using my favourite die ‘Snowy Gnome Home’. What I like about this die is there are so many elements, you can just pick a few to use on a tag or mini card.


Firstly I made a white card measuring 5.5” x 4,5”. I then cut the ‘Slimline Clouds’ die so I could use it for a mask to create the background. I used quite a muted distress ink (Speckled Egg) as I wanted it to feel wintery. Again I have used a brush to apply the ink. Start half way up the card and move the mask up and you will get a really lovely design


Next I cut out the ‘slimline hills’ in both green and white. I thought this gave the appearance of snowy hills. I applied to my card and trimmed the excess


Now I have cut out all the elements from the die I wanted. I’ve assembled the smaller parts just so I don’t lose them


Finally I added all the elements on my card. To finish off I used some chalk to highlight certain parts, like the stones. I also used some flat back crystals t for the lights under the mushroom


I printed a sentiment to finish the card which I thought was cute. I used the nested stitched rectangles to cut it out. So that’s my card done


I really hope you like the card and it has given you some inspiration. So I will see you on Friday with another blog post. Have a wonderful week and make sure you find time to craft
Wendy

Dies I used


Saturday, October 02, 2021

Christmas Puppies

Hello Scrapping Cottage Friends,

It is Pam creating with you today!

ANNOUNCEMENT: Don't forget to check out the new video on our YouTube Channel - there is a stamp giveaway for subscribing, leaving a comment and giving a thumbs up on the video. Click here. We are giving away the Country Farm Cows die that was used in the video.

I have some great news OUR NEW CHRISTMAS RELEASE IS HERE!!  AND IT IS SO DARN CUTE!! AND EVEN BETTER NEWS IT IS ON SALE RIGHT NOW IN THE ONLINE STORE!  

I am using what I think is the sweetest die in the collection. It is the Holiday Truck w/Puppies! 


Design Steps:

1.  Use the Holiday Truck w/Puppies and cut out all of the pieces using: green, dark green white, tan, black, brown silver red, and dark red
2.  Using a variety of inks and a small applicator shade the pieces and then assemble with a fine tip glue
3.  For the base use a white A2 card, silver card stock 4 1/8 x 5 3/8, red checked DP 4 x 5 1/4 and cut a piece of snowy DP cut with the largest Stitched Scalloped Square die
4.  Glue the silver to the base card next the red checked and last the snowy square as shown
5.  Pop up the truck, stamp and layer your sentiment on red glue to card and add the bow.  Your card front is complete

6.  I decided to use some of my scrapes inside the card so I added a 1/2 x 4  strip of the red check paper and one of the little pups

I had two wonderful labs so this card is really special to me.  The white lab was Cookie and the black lab was Magic.  I miss them so much!  They were such fantastic dogs!  Don't forget to check out the sales things go pretty quickly!!

And don't forget to check out the CottageCutz YouTube channel. We are starting to publish videos there again. If you subscribe, comment and like the video, you will have a chance to win the Country Farm Cows die used in the video. 

Blessings and Take Care

Pam

CottageCutz Dies