Saturday, November 23, 2019

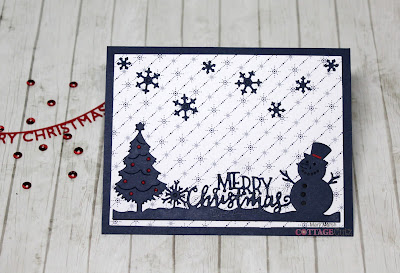
Merry Christmas Border Die

Hello Scrapping Cottage friends! Thanks for taking the time to stop and visit with us today. It's Mary Marsh here bringing you the Saturday edition of the Blog. 

We have the new release of Christmas Part 2 in the online store and they are all in stock and available for delivery. There are 34 new designs in this release. 

This release has something for everyone. So if you prefer a more religious tone to your cards- we have you covered. If you like a more whimsical design featuring Santa, reindeer, gnomes, moose or even a hot chocolate theme you will find some really cute dies.

I actually do a combo of religious and whimsical for my Christmas cards. Today, for your viewing pleasure, I am going whimsical with the new Merry Christmas Border die. It's from the Part 2 release.   It's only a month until Christmas, so if you haven't started your cards as yet this die would be a good one to use to make multiples. 

I thought I would bring you a sample today that is on the clean and simple side. One that would be easy to mass produce since it's only a month until Christmas. We all have designer paper in our stash that we haven't used. This die is perfect with a snowy, snowflakes or starry background paper. So let's get started with some details on how I created my card.

Step 1: Since I had the die in mind to use, I looked for the right designer paper. I found this starry background paper and thought it would work well.

Navy Card Base: 4 1/4" x 5 1/2"
Designer Paper: 3 7/8" x 5 1/8"
The stars on the designer paper are a navy color and cutting the border image in navy would make it pop on the paper.


Step 2: Next, I started card assembly. The border image is attached to the background paper with glue dots and Ranger multi medium matte. I cut the tree again in red cardstock to add some red ornaments onto the tree. And, for the snowman I put a little red band on his hat. 
I decided to scatter a few snowflakes in no particular order to my card. I cut them with the Holiday Hedgehog die. Attached the card base and my card is finished.

I hope I have given you an idea for a way to use this new border die. See you next Saturday!

dies used to create card:


Friday, November 22, 2019

Christmas Cardinal

Happy Friday!  It's Jeanne today with a card using the Christmas Cardinal from the new Christmas release and an older die, Birch Trees.  I plan to send this card to a neighbor who collects cardinals.  She frames any cardinal Christmas cards she receives and displays them over the holidays.
This card would also make a wonderful masculine birthday card - just change the holly behind the bird to less seasonal greenery.  The Seasons Floral 1 and 2 dies have some lovely pine cones and leaves that would work well.
I cut all the pieces from white cardstock and shaded the cardinal and birch trees using Distress Oxide inks. The rest were colored with  Copic markers.

To get shading under some of the feathers, I used a small piece of paper slipped into one of the slits on his wing as a mask.  This is a nice way to add depth to your die cuts.
I created a misty background using two shades of DO gray ink on a 4.25 x5.5 inch panel.
My birch trees are shaded with the same grays.
To create the card, I cut half an inch off the side of the panel so is is now 3.75 x 5.5 inches and added a thin strip of gold washi tape.  On an A2 card base I glued a .75 inch strip of plaid paper.
After adhering the panel to the card base, I glued the birch tress and greenery.
I added some gold thread, then popped the cardinal off the card using foam dots.

Dies:
http://www.scrappingcottage.com/cottagecutzchristmascardinal.aspx
http://www.scrappingcottage.com/cottagecutzbirchtreeselites.aspx

Thanks for joining me today.  I hope you have a fun and creative weekend!


Thursday, November 21, 2019

Christmas Gnome and Friend

Good Morning Scrapping Cottage Friends

It is Pam creating with you today!

I can't believe Christmas is only a month and a few days away!  I am enjoying making my cards this year because of the adorable dies in the new Christmas releases Part 1 and 2.  There is everything you could want in these 2 releases.


Design Steps:

 1.  Use the Holiday Gnomes w/Fox die and cut all the pieces out in white card stock
 2.  Color and shade the piece with you favorite markers.  After they are colored assemble the pieces
 3.  Cut a piece of purple card stock 4 x 5 1/4 and run it through an embossing folder.  Cut a piece of snowy designer paper 3 x 4.  And cut a circle 3 1/4 inch circle using the Stitched Circle die.  Also cut the snowbanks using the Polar Bear.  Glue all pieces to the purple card stock
4.  Glue the purple panel to a white A2 card base.  Use dimension tape and pop up the gnome and fox.  Cut out the sentiment and scalloped circle using the Christmas Tag Topper set.  The snowflake is cut with the Santa Over Christmas Town


CottageCutz Products


Thanks so much for stopping by today!  I really appreciate you taking a look!  Here is the link to our store if you haven't taken a look!  These dies make great gifts to your crafty friends!

Blessings


Pam

Wednesday, November 20, 2019

Be Merry

Hello!  This is Sukie and today I have a fun and festive card to share for my design team post.  I went with a non-traditional color theme for this Christmas card.
I used a total of 4 different die sets to cut out all the pieces for my card.   The snowflakes are from the Santa Over Christmas Town set and the reindeer is from the Silly Holiday Reindeer die set.  I opted to use the Springtime Window for my card even though the reindeer coordinates with the Winter Window which I used on this card.  The Icicle Border was the final die piece for my card.
The reindeer was nestled inside the window and icicle border was trimmed on the edge to fit along the window sill.  I stamped a sentiment from the APB Merry and Bright stamp set on a hand cut flag.
I created my card base with a non traditional color theme which definitely has a winter vibe.  The snowflakes were scattered on the base of my card.
The reindeer and window was the next element added to my card. The window was adorned with the icicle border completing the winter scene.
The sentiment was placed below the larger snowflake as the finishing touch on my card.
Here are the dies used on my card available in the store:

Tuesday, November 19, 2019

Warmest Wishes

Hi! Janja here with you.
For today, I made a quick and easy Christmas card.


- CottageCutz dies: Sweet Christmas Reindeer, Nested Stitched Scallop Oval Set
- blank card: 4.25 x 5.5 "(10.8 x 14 cm), folded
- patterned paper: 4 x 5.2 "(10 x 13.2 cm)
- colored cardstock
- colored ink pads
- clear embossing ink pad
- white embossing powder
- heat tool for embossing powder
- glue, double-sided adhesive tape, self-adhesive foam pads

Start by cutting sweet reindeer out of colored cardstock. Color the edges with colored pads.


Trim the selected patterned paper.
At the bottom, cut a semicircle with the largest die from the set as shown. Before cutting, mark where you will finish cutting.


Paste another patterned paper at the bottom to get the right size.


Heat emboss the sentiment in white on red cardstock.
Cut a strip and attach it to your card just a little way up from the bottom of the card.


Have a nice day.
Janja


Monday, November 18, 2019

Group Post Samples

Hello Scrapping Cottage friends! Thanks for taking the time to stop and visit today. We are sampling DT cards for the next several Mondays using dies from the Christmas Part 2 release.

There are 34 new designs in this release. This release has something for everyone. So if you prefer a more religious tone to your cards- we have you covered. If you like a more whimsical design featuring Santa, reindeer, gnomes, moose or even a hot chocolate theme you will find some really cute dies.

We thought you might like to have some new and creative ideas for your Christmas cards using the Part 2 dies. So let's get started with the cards for today.

Sample 1: Our first sample for today is from Anja Zurga. She used the Nativity w/Donkey die to create this beautiful card that represents the meaning of Christmas. The nighttime sky was created by cutting a circle and coloring it with distress oxide inks, and for the stars she sprinkled a mixture of perfect pearls and water. It gives the appearance of looking out from the stable into the night sky.  To give the die cuts a bit more dimension, she popped them up on brown foam.

Sample 2: Our next sample is from Pam MacKay. She used the Christmas Cardinal die to create her card.  It's a classic style Christmas card that incorporates the cardinal, plaid and doily. The oval doily gives it such a retro vibe and for added interest she raised the cardinal off the background to give it a bit of dimension. If you haven't started on your cards as yet, this one would be easy to mass produce and the die is available. 
Sample 3: Our last sample for today is from Sukie Dhillon. She used the Santa Workshop die to create this whimsical card. The bright and cheery die cuts pop against the embossed snowflake background.  The snow mound was perfect for anchoring the sentiment pole.  This card is perfect to tuck in with a toy gift for the special kiddo in your life.
Well, that's our samples for today. I hope the team has given you some fresh ideas on ways to use these dies.

dies used to create cards:
http://www.scrappingcottage.com/cottagecutznativitywdonkey.aspx

http://www.scrappingcottage.com/cottagecutzsantasworkshop-2.aspx

http://www.scrappingcottage.com/cottagecutzchristmascardinal.aspx