Wednesday, August 14, 2019

Happy Birthday

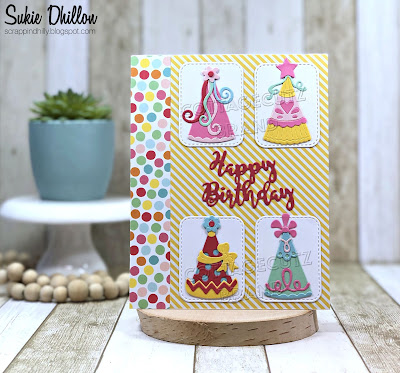
Hello!  This is Sukie and I have another fun birthday card to share today.  This festive card was created with the new Cottage Cutz Birthday dies.
I selected the 2 patterned papers for my card base and then used the polka dots to pick out the colors for the die cuts on my card.
The Party Hats were cut out of the different colors of card stock.  I also cut out the sentiment from the Happy Birthday Swirly Cake die cut and trimmed off the cake.  The rectangles are from the Stitched rounded Rectangle Set.
Once I put together my card base, I added the strip of polka dotted paper along the left edge.  The four rectangles were placed in the four corners of the striped card stock.
I continued to build my card by adding each of the Party Hats at the center of each of the rectangles.
Once I had all of the Party Hats adhered to my card, I placed the sentiment at the focal point of my card.
Here are the dies used on my card, available in the shop:

Tuesday, August 13, 2019

Let’s Celebrate With a Cake

Hi, Janja is here with you.
Today I have two simple birthday cards with a cake for you. Let's see how they look in different color combinations.


- CottageCutz dies: Mad Hatter Cake, Nested Stitched Scallop Rectangle Set, Rectangle Set, Build An Easter Egg (bow), Stitched Wide Rectangle Frame Set
- card base: 4.48 x 5.66" (11,4 x 14,4 cm), folded
- colored cardstock
- colored ink pads
- self-adhesive foam pads, glue
- white craft foam

First, cut out all the pieces for the cake from colored cardstock. Assemble and paste them together.


Prepare the card base and cut two rectangles out of beige and kraft cardstock - 4.21 x 5.47" (10,7 x 13,9 cm).
Cut out the red ribbon with the largest die from the Stitched Wide Rectangle Frame set.
Use the largest die from both basic sets for the frame.


Apply glue to the back of the frame and paste it to the rectangle. Create an extra dimension with craft foam.


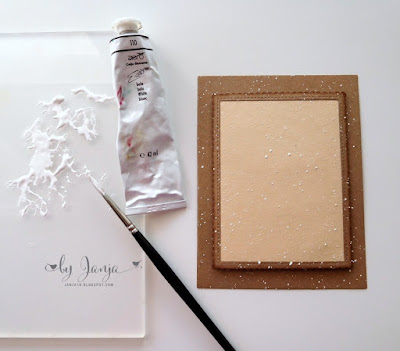
Now spray the background with white paint. Use a brush.


Once all the elements are ready, assemble the card.


Have a nice day.
Janja


Sunday, August 11, 2019

Mouse With A Cupcake

Hi!

It's Anja here. I have another card for you today. Again with a little different opening. This time I used a cute mouse lightening a candle. 


For this card I used:
- Cottage Cutz dies (Mouse With Cupcake, Pierced Circle Set, Circle Set, Nested Stitched Scallop Circle Set),
- Distress Inks (Spun Sugar, Antique Linen, Worn Lipstick, Mustard Seed, Spiced Marmalade, Brushed Corduroy, Vintage Photo, Black Soot),
- white card stock for die cuts,
- patterned paper for die cuts,
- black pen,
-white pen,
- liquid drops (yellow),
- hole puncher,
- split pin,
- paper glue.

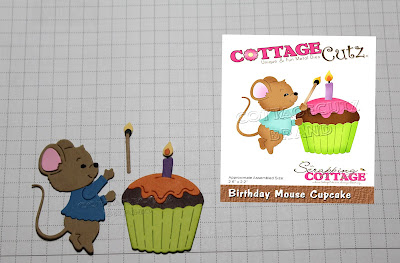
First I cut and colored the mause and the cupcake. I used liquid drops for the icing.


Next I cut three pairs of circles. I colored the middle circles around the edges.


Then I glued the circle together and made a hole on top to insert a split pin.


And then I just glued the mouse and the cupcake on top and my card was done.


Have a nice Sunday and see you again next week.

Anja Z.


Cottage Cutz dies I used for this card:


Saturday, August 10, 2019

Birthday Mouse & Cupcake

Hello Scrapping Cottage friends! Thanks for taking the time to stop and visit with us today. It's Mary Marsh here bringing you the Saturday edition of the Blog. 

We have a brand new release of Birthday dies in the online store. There are 25 new designs and they are currently on sale at 25% off. This release is filled with cute little whimsical animals, birthday cakes, cupcakes and birthday phrases. Everything you need to create some outstanding birthday cards.

Today, I am featuring the Birthday Mouse Cupcake die. I needed a birthday card for a 4 year old boy and these new images are perfect for kids as well as adults. So let's get started on some details on how I created my card. 

Step 1: I selected my designer paper first this time around. I wanted something festive with balloons and presents, and I found the perfect pattern in my collection. The card base is an 1/8" longer and wider than an A2 card. I wanted more of the card base to show around the designer paper.
Pacific Point (royal blue) Card Base:  4 3/8" x 5 5/8"
Designer Paper Layer: 4 1/8" x 5 3/8"
Pumpkin Layer: 2 11/16" x 3 11/16" (2nd largest rectangle die)
White Image Panel: 2 1/2" x 3 1/2" (3rd largest stitched rectangle die)

Step 2: Next, I cut the mouse and cupcake image. I used the colors from the designer paper and then added a couple. I wanted to keep it more on the boy side with the colors. I used pacific point for his shirt, lemon-lime twist for cupcake holder, pumpkin for icing and choc chip for cupcake.
I stamped my first sentiment at the top of the image panel. It was a bit too long for the panel so with the help of my MISTI, I stamped on 2 lines. The first stamping was a bit light so without moving the stamp I reinked and stamped again. That's the great thing about a MISTI, it allows you to stamp an image multiple times.
Since I didn't want the images "floating in air",  I decided to cut a flag in pacific point cardstock and stamp another sentiment. I used the MISTI again just in case I needed a 2nd stamping and it turns out I did.
Step 3: Now that all the card parts and cut and stamped, it's time to start assembling. First, I attached the designer paper to the card base with double sided tape. 
Next, I attached the image panel to the pumpkin layer. 
For the images, I used dimensional adhesive. I wanted them lifted off the panel for added interest and dimension. 
To finish up my card, I attached the image panel to the card base and again I used dimensional adhesive. I cut a few streamers with the Festive Birthday Greeting die in pumpkin and red cardstock and scattered them on the designer paper. 

Well that's it for me for this post. I hope I have given you an idea for this cute little mouse with his cupcake. See you next Saturday!

dies I used to create card: