Saturday, November 11, 2017

Christmas Cocoa Thanks

Hello Scrapping Cottage friends! Thanks for taking the time to stop and visit today. It's Mary Marsh here bringing you the Saturday edition of the Blog.

Well we went from having record warm temperatures here in PA to having record cold temperatures. Tonight our low will be 19°. That's cold!! And when the cold comes can Christmas be far behind?

Today, I am showing another of the new 2017 Christmas dies released by CottageCutz This one the is Cocoa & Sweet Treats die. There are 3 different cup designs plus lollipops, candy apples, a donut, gingerbread man and a Christmas cake in this super cute set. The set also includes other Christmas icons - a tree, snowman and holly.

I know I will need some Thank You type cards after Christmas so that's the idea behind this week's card. Let's get started with some details on my card for today.

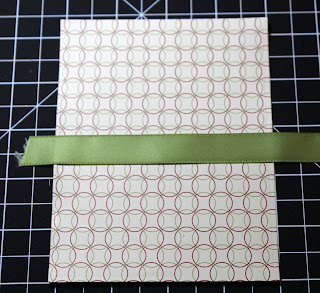
Step 1: I started my card by choosing my colors. I like making Christmas cards in non-traditional colors but this year I seem to all about the red & green. When I looked through my Christmas papers I found this piece with a circle background. I liked the whimsical appeal and thought it would work well with the images I planned on using.
Cherry Red Card Base: 4 1/4" x 5 1/2"
Patterned Paper Layer: 4 1/8" x 5 3/8"
 
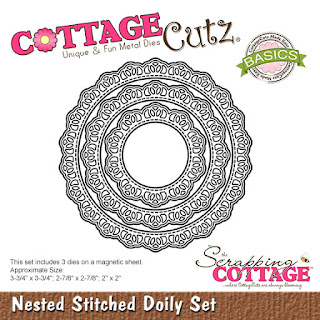
I cut the die images I was using for my card. The cup was cut in a rich, cherry red cardstock that matches the designer paper.  I wanted to layer the cup inside a circle image and decided on using the largest of the Sweetheart Doily dies. I cut in a vanilla cardstock.
Step 2:  Time to start the assembly of my card. I love using ribbon on Christmas cards and decided to add an olive green strip across the center.
Once I put the Christmas Cocoa cup on the vanilla doily, I decided to add a red circle layer underneath. It made it pop against the background. I stamped the sentiment in a circle on vanilla cardstock in chocolate ink. I just continued the circle theme that is going on in my patterned paper. I used the stitched circle dies - the 3rd & 6th largest.
Added the image circle and the sentiment circle to the background layer.
Step 3:  To finish off my card, I added a gold cord bow and some green sequins. I hope I have given you an idea for a card using this cute new set. Have a great week-end and I will see you next Saturday.
 
Dies I used to create card:
http://www.scrappingcottage.com/cottagecutzcocoaandsweettreats.aspx

http://www.scrappingcottage.com/cottagecutzsweetheartdoilies.aspx
http://www.scrappingcottage.com/cottagecutzstitchedcirclesetbasics.aspx


Friday, November 10, 2017

Autumn Greenery

Happy Friday!  Although I know it's getting closer to Christmas and time to mail those Christmas cards, I wanted to do one more fall card.  I love autumn and Thanksgiving so I just couldn't help myself.
This card goes together quickly and by changing up the background paper it could easily be a Christmas card.  It is A2 size.  I cut a piece of vanilla card stock to 8 1/2 x 5 1/2 and scored it at 4 1/4.  It is a top fold card.
I cut two panels from the patterned paper.  The bottom piece is 5 1/2 x 4 1/4, the strip for the middle is 5 1/2 x 2 3/4.  I adhered the strip to the panel and then glued it to the card base.
Next, I die cut the pine cone from a dark and lighter brown, the greenery from various greens (I feel the variety of color adds depth - there is a light, medium and dark green), the doily from vanilla and the berry branches from white.
I used Copic markers to color the berry branches.

I glued the doily circle slightly off center, arranged all the greenery except the main leaves and pine cone, and glued then in place.  I used a sponge dauber and VERY slightly added a little color to the center of the leaf for some dimension. For the pine cone and main leaf I used foam dots to raise them up.  My last step was to add some red sequins for sparkle.
http://www.scrappingcottage.com/cottagecutznestedstitcheddoilyset.aspx

http://www.scrappingcottage.com/cottagecutzpinespray.aspx

Thanks for stopping by today!  Have a creative weekend!

Thursday, November 09, 2017

Christmas Town!

Hello Scrapping Cottage Fans!

It is Pam on the blog today and ready to show you my card for today!  Making Christmas cards is a fun way to show your family and friend your crafty side!  It is also a way to make cards that specifically fit someone's personality.  The card I am sharing today is going to a friend who lives in California.  She doesn't get any snow for Christmas so I thought I would send her some on my card!


 Design Steps:
1.  Using the Christmas Town and Season's Greeting w/Banner die cut out both of them in white.  On the Season's Greeting die cut off the deer and glue down the Season's Greetings
 2.  Use an A2 white base and cut out a piece of silver 4 x 5 1/4, a piece of white embossed with dots 3 3/4 x 5.  Then use the Double Stitched Rectangle die and cut out a piece of navy DP
 3.  Glue the silver and embossed paper to the card front
 4.  Glue the Season's Greetings to the banner and the Christmas Town to the navy DP
 5.  Place dimensional tape to the back of the navy DP and attach to the center of the card front
 6.  Add the sentiment banner as shown
 7.  Using the Snowflake Set cut out silver snowflakes
8.  Attach the snowflakes as shown below.  I glued the larger snowflake to the inside of my card

Cottage Cutz Products:


Hope you are started on your Christmas cards! If not stop by our store we have a ton of wonderful dies and stamps to inspire you!

Blessings
Pam


Wednesday, November 08, 2017

Get To Know Pam MacKay


Hello Scrapping Cottage friends! Thanks for taking the time to stop and visit with us. We started a new feature last week that we are continuing with today on the Blog.  Over the next several weeks, we will be giving you a closer look at our designers.  It's  a "get to know the design team"  and today we are featuring Pam MacKay. 


To introduce myself here is a little background info. I was born in Akron, Ohio.  We moved down to the Dayton area when I was in high school. I went to Ohio University and got my teaching degree. I married my high school sweetheart who happened to live right across the street! We moved cross country to Oregon, Washington and then settled in Southern CA for 38 years.  I taught in Laguna Beach until I retired. After hubby retired we moved to South Carolina to be closer to family. 
 
I have been stamping for over 20 years. I got really hooked when I went to a card making class with a friend. My wallet became very light from that day forward! I enjoy all styles of card making. I cant really put my finger on my style but I will say I usually like lots of layering. I have taught a number of card making classes.  And I have been on a number of design teams. I can spend hours in my womans cave making cards but I do have to feed the husband on occasion!
 
I am really enjoying being a part of the Scrapping Cottage Design team.  The dies are wonderfully detailed and the cards that I make with them are so cute that it is very hard to send out. I just want to keep them all to myself!  Here are some of my favorite CottageCutz creations and to tell you the truth it was hard to pick just a couple of them.


Tuesday, November 07, 2017

Santa Napping Die + Video

Hello Scrapping Cottage friends! Thanks for taking the time to stop and visit with us on this Tuesday in November.

Have you checked out the online store lately? The new Christmas dies are currently on sale and you can save 25%. It's a great chance to get some dies that might be on your wish list. The DT has been showing some great cards and card ideas for Christmas.

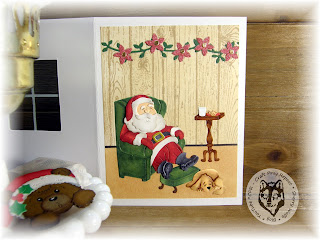
Today, for your viewing pleasure we are featuring another one of the new dies, this one is the super cute Santa Napping. And it's also a double feature because we have a guest designer with us. Sherry Wolfe, was one of the video artists who took part in the video hop a couple of weeks ago.

She had such a cute idea for this die as well as the Window with Shutters and the Window Christmas Friends dies. She has graciously prepared a process video for us. The video is attached and I have also included some photos of the super cute card that she has made.


inside of card

close up view

card front

Please leave her a comment and give her video a thumbs up on You Tube.  


Dies used to create card :
 
http://www.scrappingcottage.com/cottagecutzsantanapping.aspx

http://www.scrappingcottage.com/cottagecutzwindowwithshutters.aspx

http://www.scrappingcottage.com/cottagecutzwindowchristmasfriends.aspx
 

Monday, November 06, 2017

Sweet Treat Screen Divider Card

Hi, Lois here with my regular Monday post.  It's hard to believe Christmas is right around the corner.  I don't know if you're like me, but I make Christmas cards all year long.  It keeps the panic at bay!  I have a Christmas card today made with a fun new die from CottageCutz, Cocoa and Sweet Treats.


To start my card, I cut my cardstock as follows:

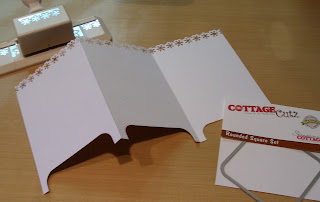
White - 5 1/2" x 10 1/2"
Green - 3 1/2" x 4" (3 panels)
Patterned paper - 3 1/4" x 3 3/4" (3 panels)


I scored the long white panel at 3 1/2" and 7", creating three sections.  Using a Martha Stewart snowflake border punch, I punched along the top of the white panel.  I then lined up the top of the largest Rounded Square die along the bottom edge of the first panel and cut out the "legs" of my screen.  I then duplicated this process on the second and third panels.


I constructed my screen by gluing the patterned paper onto the green panels, which I then glued to the white screen.


Then came the fun.  I die-cut all the pieces from the Cocoa and Tasty Treats die -- some from colored cardstock and the majority from white cardstock.


I colored the white pieces with Copic markers and constructed my images.  Note the top of the cup for the first panel.  It is cut from a small piece of vellum.


All that remained was to glue the cups and treats to the panels and stamp the sentiments.


Be sure to check out all the dies in the new Christmas release over on the CottageCutz website.  Dies used on my card today are:

http://www.scrappingcottage.com/cottagecutzcocoaandsweettreats.aspx

http://www.scrappingcottage.com/cottagecutzroundedsquaresetbasics.aspx