Sunday, October 13, 2013

Happy Halloween card


Today, I am sharing a NEW Halloween card  I created with 
Beautiful NEW Halloween Collections 2013.


For this card I used NEW "Midnight Witches Brew" die. I cut image out 2 times. First image I glued to orange card panel. From second image I cut out witch and cat. Glued parts on first image using foam tape. Added glitter on images and sentiment "Happy Halloween". 
Very easy to make.


For this project I used: 

Have a Wonderful Day! Olena


Saturday, October 12, 2013

BOO! Card


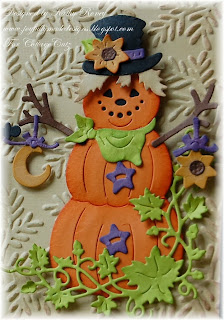
Happy Saturday everyone!  Kathy with you and today I have a cute Halloween card using 3 new Fall CottageCutz Dies.  From the Halloween Release I use Scarecrow Pumpkin and Spooky Ironwork Sign, and from the Harvest Release I used Harvest Fall Corner Dies! 


Aren't these too cute? 

I used a bunch of different colored cardstock (mostly scraps) and ink for this.  I shaped some of the pieces and inked in some shading and shadows.  The background is a piece of Iced Cocoa Coredinations Cardstock that is embossed with Triad Leaves Embossing Folder.  It's hard to tell in the picture, but the card base is black.   Here's a close-up of the Scarecrow Pumpkin with Harvest Fall Corner.


Here's a close-up of the Spooky Ironwork Sign.  I used a black marker to write "BOO!" on it.


These are the dies I used on this.


Friday, October 11, 2013

Happy Halloween Bendy Card


Hello everyone, Cheryl here with a Bendy card. I was so inspired to created one of these due to Carol and her post with her beautiful Bendy card. I just LOVE the fold for this. Thank you Carol for the inspiration to create one of these.


For my card I used TONS of CottageCutz Dies. The dp is Graphic45, and I thought the print was fitting for the occasion :) hehehehehee

Next I used the spooky Iron fence along the bottom of the inside and outside of my card. I placed the Lantern Tree on the front and the backside, to make it more sturdy, and so you could see the entire tree when opened. I used the tombstones along the inside like a cemetery. I figured the cute Jack o Lanterns would be darling on the front, but again I wanted you to see them on the inside too. 

I absolutely LOVE all the NEW Halloween CottageCutz dies, as they worked PERFECT for my card today :)

Here is a list of CottageCutz used:
CottageCutz Haunted House


In this photo you can see the tree, with the ghost, and the Iron sign. I added Welcome to it :)


Original Photo tutorial by Emma can be found here
Thank you for looking and have a lovely day!!
Hugs to all,
Cheryl

Thursday, October 10, 2013

Christmas Tags & Card


Hello everyone, Cheryl here with 2 super fun Christmas Tags made for The Scrapping Cottage using the Darling CottageCutz dies.

For my 1st tag here
 I used the super sweet CottageCutz Jolly Cardinal, colored her with copics and then layered my tag with the CottageCutz Winter frost border and the Fancy Flurry Snowflake. Next I cut out the Merry Christmas with the die from the Homemade Christmas Gift Set.. The dp is from StampinUp! and so is the stamp. Love how fun these tags are to make!


My 2nd tag
I used the Sweet CottageCutz Dakota & Daisy die, the Tree's are from the Homemade Christmas gift Set. and the snowflake is the Cottagecutz Crystal Flurry. I also used the Winter Frost Border. I did the same thing and just layered all my pieces over the dp(SU!), and then stamped the to: and From: also from the Homemade Christmas Gift Set. All ribbons and flowers are Really Reasonable Ribbon.


***************************
Next I wanted to share a Card I Made using the Beautiful CottageCutz Snow Swept Border and CottageCutz Winter Frost Border

For the main image I used flower soft on the snow swept border, and then added some angel dust. The CottageCutz Winter Frost border does have angel dust on them both. Its hard to see in the photo


Thank you for looking and have a lovely day!
Hugs to all,
Cheryl

Wednesday, October 09, 2013

WinterWonderland Card

Greetings Happy Crafters!  Today it's Carol to share with you a creation made with the fabulous CottageCutz dies.  This card is called the Bendi fold and was created by my friend Bibiana.  You can see her absolutely fabulous creation here.  Thank you so much Bibiana for the inspiration.  I added something extra to the Bendi Fold--------I am going to call this card "The Tent Topper Bendi Fold"......lol
This card was so much fun to make.  I have been wanting to try it out for some time.  It is so much easier than it looks.  When I received these dies from CottageCutz, I just knew I would be doing this card with them.  I love these dies-they were perfect.
Here is my card opened up.   Everything you see here is CottageCutz dies except for the fence.  That is a Martha Stewart punch.  I used Diamond Stickle dry glitter on all the white dies.  They sparkle in real life beautifully.
Here is a list of the dies from the bottom up:  Winter Wonderland Deer (the deer were cut apart), Winter Wonderland Border (the house on the left was cut off to fit the card),  Snow Swept Border (the tree on the right side was trimmed) Winter Snowflake Wreath, and Santa & Reindeer Flying.  On the inside of the card-Winterland Village, Homemade Christmas Gift Set (the sentiment) and the Rabbit at the fence is from the Rustic Sign & Tree die.  The trees are also from the Rustic Sign & Tree Die.
Love, Love, Love this card style.  Don't you think it is perfect for these dies!  Thanks a bunch for stopping by today to view this Tent Topper Bendi Card!  Sure do appreciate it.  See you soon!

Here are the dies: