Monday, January 28, 2013

CottageCutz- Shabby Chic Sweet Cottage


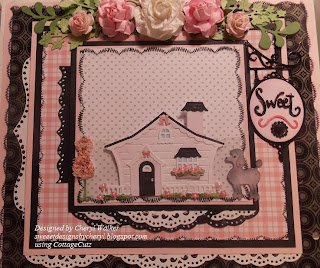
Hello everyone, today I'm sharing the Inside Cover page of my album.

 I love the way this one turned out, I used several CottageCutz Dies on this page. and used different techniques.

So for my CottageCutz Sweet Sign I used CIP's Black Embossing powder to make the sign shinny , and I LOVE the look it gave it. I also did the SWEET in heat embossing as well.

Next for the CottageCutz Mini Dress Form I used Flower Soft on the top and then colored the bottom green to make it look like a flower tree outside of the house.

For the MINI POODLE I dusted her in pink and black distress inks, and then did a clear embossing powder over her.

HOUSE- is CottageCutz CottageVille /Santa's Retreat. LOVE that you can use these all year round, and make them anything you want. I made my a Shabby Chic Cottage!!

Greenery is CottageCutz Ivy , and Then Greenery Dies

All of the scalloped Borders on the bottom 
of the layers are the CottageCutz Oval Doily & Frame , cut and layered. Its nice to be able to use this die in a different way.


Lastly I added room for photo's on the 3 tags , 2 pull out the sides, and the middle one that is behind the Cottage


Thank you for looking and have a lovely day!
Hugs to all,
Cheryl

Sunday, January 27, 2013

Vintage Style


Hello everyone!  Today my card features the CottageCutz Elegant Purses Die and the CottageCutz Pumps mini die as the focal image.  I cut the purse from patterned paper and inked the edges with distress ink, Vintage Photo by Tim Holtz.  I cut the pumps from white cardstock and colored them with Copics.  They were also distressed slightly with Vintage Photo distress ink.
The doily is the CottageCutz Scalloped Doily.  I added some vintage style lace and a crocheted flower to finish the card.  I added distress ink to the lace and crocheted flower as well.  Enjoy the day!

Hugs and smiles,
Janice

Saturday, January 26, 2013

CottageCutz - LOVE card

Good morning everyone!
Welcome to CottageCutz Blog!   
This is Olena.  Today is my third post as designer!
I wanted to share my NEW LOVE card. 
I made this card using the Super CUTE CottageCutz - Eiffel Tower, Lamp & Poodle dies from NEW 2013 Vintage Collection
There are so many beautiful dies included in the new collection.
I cut the lamp in grey cardstock and sponged the edges with craft ink. 
I put under the lamplights a piece of yellow paper to showing brighter color of this part. 

Then I cut two times a cute dog in cream paper and sponge the edges with brown craft ink. I ,also, added nose and eyes for dogs using black craft marker.
I some try to reversed the one, so they would be facing each other. 
I added  all die cuts to card front as shown in picture above. 
Then, I decorated card with clear Dew Drops, paper hearts and pearls.


For this card I used:

Friday, January 25, 2013

CottageCutz Poodle LOVE


Hello everyone, today I'm sharing Page 6 of my mini.

On this page I used the 3 x 3 CottageCutz French Poodle and reversed the one, so they would be facing each other. I thought it would be super CUTE to have them like this. 

The oval tags that you see in the small pocket on front are from CottageCutz Elf & Snowman Tag set 4 x 6. Perfect for this mini page.  I LOVE the tags as they are perfect all year round.


Now there is a LOT Of room for PHOTO's here. there are 5 spots on this inside flaps. Also you can have writing as well. There is a Pull out tag on the right side and room for 2 more photo's on it.

I stamped with CottageImpressions on the page using Frame 1 Lettering Stamps

 I also used the beautiful CottageCutz Shabby Chic Border


Thank you all for looking and for your wonderful comments!!!
Hugs to all,
Cheryl

Thursday, January 24, 2013

Birdcage


Hi everyone Cindy here with a SWEET CottageCutz Design. Once again I have used I have used the BEAUTIFUL CottageCutz Birdcage w/ Two Birds. I just love this die and love all the different looks I get by adding other dies. Today I added Plumeria & Leaves, I cut them out with pattern paper and curled the ends under with my stylist, then added a pearl in the middle.


CottageCutz Birdcage w/ Two Birds


Plumeria & Leaves


 Thanks for dropping by!!~
Hugs Cindy XOXO

Wednesday, January 23, 2013

Fancy Perfume Bottles


Hi everyone!  Kathy here today with the new Fancy Perfume Bottles Dies!


I cut the perfume bottles in cream, green, and peach cardstock to match the designer paper I used. I ink the edges and shaped the pieces a little with my fingers, then pieced and glued them together. I used the same green for the mat behind the designer paper and the peach for the card base. To finish it off, added some lace, seaming binding, pearls, and a premade flower.


Here is a picture of the dies:


Tuesday, January 22, 2013

Hi Everyone! 
It's Lisa here today to share a tag I created featuring CottageCutz Shabby Chic Doily . There are so many fun and beautiful dies included in the Vintage Collection.  I love making tags and these dies are the perfect embellishment for them.

I used distress markers with Glimmer Glam on the doily. The Distress marker gave the doily a vintage finish and the glam gave it a beautiful sheen. I also used some liquid pearls to make my pearls on the doily.

I used a cream color seam binding to make my bow and I colored it with Tattered Angels Glimmer Mist to match my papers.
I added some florals, pins and ribbon to complete the look.
Hope you enjoy and grab one of these dies for yourself!


Monday, January 21, 2013

For a Valentine!

Hi, Friends!
Today I have another card for you
showcasing one of the new dies from the


I die cut the Eiffel Tower 4 times and folded two of them in 
the middle and then glued them all together.
Also used the Scalloped doily and the sentiment


Hugs, 


Sunday, January 20, 2013

Watering Can with Tulips


Hey, Vladka here with my second project on the CottageCutz blog and my first mixed media project at the same time. I really wanted to try this with this beautiful CottageCutz die, the Watering Can and Tulips. I have to tell you this is great and such fun! You don't have to worry about the paint on your fingers and you don't have to be afraid that you will ruin your project, because this is the point - to play with different paints and materials and get messy :))). Yupi Yupi Yay! This is my project where I’ve used different acrylic paints, some stamps, distress Inks for coloring the die cuts and of course this fantastic die:
And there is another thing I’ve tried. For the first time I’ve used an aluminum foil on my project and cut out the watering can twice, from the Kraft paper and from the foil. I’ve glued it together and tapped it with a sponge and different acrylic paints. It will be easier if I just show you :) Here is the link to my tutorial blog, where you can see what I mean and how I did it. :)
I just know that I will do it again, with the foil and with different mixed media techniques. I already have something in my mind :) So, until the next time, enjoy your life and be creative! :)
And here is the CottageCutz die I have used: