Tuesday, December 18, 2012

Funky Fold with Santa


Hello everyone, today I'm sharing a Funky Fold Card made using several CottageCutz dies. 
First I used CottageCutz Holly Jolly Legs, and then I thought how cute would it be to use the CottageCutz Witch Cake plate, but decorate it up for Christmas :) So I did just that!! I used the CottageCutz Mistletoe & Holly Berry to use on the top of the cake plate :)


For the Inside I used the CottageCutz Holly & Berry Border, and thought it would be perfect fit for the inside and it was. I also used more of the Mistletoe & Holly for the front of my card as shown below. I did use some Creative Inspiration Paints on all my pieces, and glitter too!!!


I added some sewing, and there is NO ribbon on this card, Shocking I know....hehehehehe


CottageCutz Die's are LINKED by Photo! Just click on each photo and it will bring you there :)


I hope everyone has a wonderful week and a Very Merry Christmas!!!
Hugs to all,
Cheryl

Monday, December 17, 2012

CottageCutz Holiday Carolers

Hello CottageCutz fans!  Today my card features the CottageCutz Holiday Carolers.  I cut the images from white cardstock and then I cut the gowns from red plaid from the Recollections Sugar Plums line.  The rest I colored with Copics.  The printed song behind the carolers is from Old World Winter paper pack by the Paper Studio.  I used Vintage Photo distress ink around the images.  It makes the images look less flat.  I assembled the card and punched a few snowflakes from glitter paper, then tied a little  bow from string to finish the card.
Have a great day!
Hugs and smiles,
Janice

Friday, December 14, 2012

Festive Owls


Hi everyone Cindy here with a SWEET CottageCutz Design.   I love this Festive Owl with his Santa Hat!!~


CottageCutz Scalloped Doily
 
Tea Time Tags
 
All my die parts are sponged using my SU dye inks!!~
Hugs Cindy xoxo

Tuesday, December 11, 2012

Santa & Reindeer Gift Tags


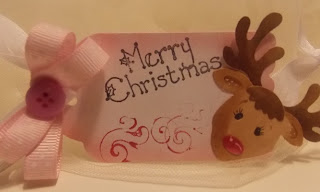
Hello everyone, Cheryl here with some super CUTE CottageCutz gift Tags. I made these darling tags using CottageCutz Santa & Reindeer Tag Set

For both of my tags, I cut them using white card stock, then airbrushed the tags, with a pink and a purple. Next I colored the Santa and Reindeer using copic markers. I stamped the sentiments in Black ink, and then added some RRRibbon and some buttons to complete these darling gift tags. They are super fun to make!!!


Thank you for looking and have a lovely day!!
Hugs to all,
Cheryl

Monday, December 10, 2012

Filagree Ornaments Tie-Ons


 This week I made Mini Ornament Tie-Ons for gifts. I used the Cottage Cutz ::FILIGREE ORNAMENT TRIO"" Die. I made them 2-D so they would lay flat on the gift with the 3-D style on top. . If you double the ornaments you can have 3-D hanging ornaments.
 Start by cutting three each of the ornament, and one silver ornament cap (using a scrap to cut the top of the ornament only). Cut the ornament toppers off the two of the ornaments. Than using a stylis score down the center of the two ornaments. Fold and glue together as shown with the red. Than bend the sides back up and create a V. . . . than clue the V into the center of the main flat ornament. It's like opening up a book and letting the pages fan out. I stickled and added jewels before gluing the V in the center. . it just makes it easier to work.  I tied with Martha Stewarts glitter eyelash yarn. (get it now. . they only sell it at Christmas).

 The card was made using the same Cottage Cutz ""Filigree Ornament Trio "" die along with the Cottage Cutz ""Splish Splash"" Alphabet Die.

I know it is hard to see, but here I am showing you, 1.) that you need to use the thinner glitter paper for best results in cutting. and 2.) do not face the glitter paper DOWN onto the foam die. Over time this will mess up the foam on the die, and leave glitter holes embedded into the foam . .  facing the glitter down you will be trying to cut though plastic glitter chips to get to the paper, you do not need to cut the glitter. It is easier to cut the paper first and safer on the foam if you face the glitter paper UP , than add a place a piece of tissue on top of  the glitter paper. . than your plastic cutting mat. . . . . .You will be cutting your paper and glitter glue, the glitter will automatically separate with the paper (never needing to cut the glitter), and the glitter does not embed its self in your foam. any glitter that comes off will stick into the tissue. . . .note: this does not work with alphabets, sorry you will need to do them the old fashion way. . glitter down.. . but in some cases you made need to shim in order to cut though the glitter to get to the paper.

Thanks Barry

Sunday, December 09, 2012

CottageCutz Holiday Cardinal

Greetings everyone.  It's Carol here and today I have a card made with the beautiful Holiday Cardinal from CottageCutz.  This die is gorgeous. 
 
This card used Spellbinders Floral Oval, Large Oval, and Holly Motif Corners.  Martha Stewart Holly punch around the page and branch punch.  The plain oval die cut was embossed as well as all the white background.
 The berries on the background of the CottageCutz die were cut on red metallic paper.  The flowers are recollection and were sent to me by my friend Pam.  Thank you Pam!   The leaves are the "Greenery" die from CottageCut.
 Below you will find a picture of the dies I used.  Thanks for visiting today.  I really appreciate it.


Friday, December 07, 2012

3 Fun Cards to Share

Good Morning friends!  Today I have 3 cards to share with you.  (I know, don't faint!)  I will start with my favorite card first.  It took me quite some time to think of how I wanted to showcase this CottageCutz Holly Jolly Legs die.  Once I thought of a clothesline nothing else would do.  So I went to my trusty google to search for clothespin images.  I should back up a little.  First I cut the legs from different colored papers, assembled, colored and inked them to add dimension.  Then I found the perfect snowy sky paper for my background.  Now here is when I searched google for clothespin images.  I found the ones I liked, printed and cut them out.  I made the snowy hills by cutting some white cardstock and adding lots of glitter.  I finished the card with a red bow and a silver bell.  Hope you like it! Oops!  I just realized I forgot to add the buckles to Santa's boots.  I think it still looks fine.
My next card I used the CottageCutz Red Bird Wreath die.  My son brought home some adhesive copper that was being tossed so I decided to try it out.  It was a little difficult to work with, but I kind of like how it turned out!  It is very different than what I am used to but I think it is good to step outside your box and try something new.
Finally I used CottageCutz Mistletoe and Holly die to make my third card.  I used a couple shades of green cardstock to cut the image from as well as from white.  I inked the greens, colored the red berries and assembled the die cut.  Next I choose my papers.  Sometimes this takes me a very long time, trying several options until I am satisfied.  I am embarrassed to say that I might spend a couple of hours searching for the right mix.  Some people choose their papers first and then design the card.  I color my images first and then choose the papers.  I am sure I would save myself a lot of time if I chose my papers first, but I prefer to color my images the way I want without having color restraints from the papers.  How about you?  Do you color first or choose papers first?  Well sorry to be so chatty today and take up so much of your time.  Here is my final card.
Have a great day!
Hugs and smiles,
Janice

Thursday, December 06, 2012

Build a Poinsettia Layout


Hello everyone and Happy Thursday to all! Today I wanted to share a Merry Christmas Layout made for CottageCutz using the BEAUTIFUL "CottageCutz Build a Poinsettia Die" from the CottageCutz  Christmas Traditions Release.

I cut them all out using Red Card Stock, and then I airbrushed them with a red copic, not sure if you can see the airbrushing very well in my photo's. Next I used Liquid Scrap Dots to give them a 3-D look, and then added some CIP's gold glitter to the centers of them all.
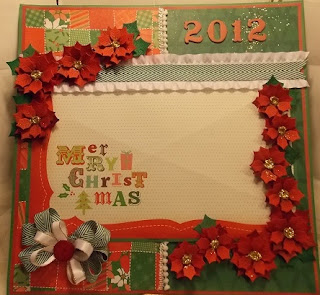
These were easy to make, I just put them all together at the same time, let them dry, and then added the glitter, set aside and worked on my layout. My layout is super simple as it only consist of 2 dp pieces for the backgroud layers, then I took another design paper piece and cut it down to create a matt for photo's. 

Lastly I added lots of Really Reasonable Ribbon, and a button!


Thank you for looking and for all your wonderful comments!!!
Hugs to all,
Cheryl

Wednesday, December 05, 2012

 Sleigh Bells Ring are you listening.  In the lane snow is glistening.  A beautiful sight, we're happy tonight.  Walking in a winter wonderland.  Today is a CottageCutz card made with the beautiful Holiday Sleigh die.
 Isn't this sleigh gorgeous.  I couldn't help but to die cut and just paint it with glue and glitter this with red glitter.  That's all you need to do to make this card "Glisten".  Just a quick tip:  when glittering images be sure to use card stock in the same color family as the glitter.  That way you will not have any unwanted paper color showing through your glitter and it gives it a nice even tone.
 I used Spellbinders Decorative Labels One to showcase my focal point.  The Martha Stewart Skyland Snowflake punched piece was sewn to the top.  The green glitter branch is from Michaels.  The Recollection Happy Holiday sentiment is also from Michaels.  Here is the die I used, you can find it here.


Thank you for stopping by today.  It's really appreciated. 

Tuesday, December 04, 2012

Build-a-Poinsettia


Hi everyone Cindy here with a SWEET CottageCutz Design. I have used the BEAUTIFUL CottageCutz Build-a-Poinsettia. I inked it up withRiding Hood Red and Cranberry Crisp. My leaves are ink up with Old Olive and Wild Wasabi. I then added some Crystal Snow and place on CottageCutz Scalloped Doily, just perfect ornament for my Christmas Tree!!~


CottageCutz Scalloped Doily


Hugs Cindy xoxo