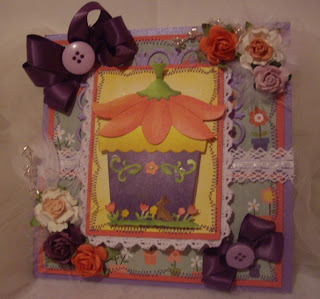
The spring collection of CottageCutz dies from the Scrapping Cottage are so adorable! And I'm going to show you how to adjust a seasonal die to use all year long! The CottageCutz Spring Doily is so cute with the bunnies and Easter Egg, but if you are not doing an Easter card, it's so easy to transform this into a cut you can use all year long. Just make a couple of snips to remove the center, and you are left with this great diecut. You could use it like a doily as I did here- or it would make a fantastic wreath base. Don't be afraid to change your dies up a bit and use them in unexpected ways. I also used the CottageCutz Watering Can, Tulips die set. This is one of those dies that you can use for so many occasions.
Monday, March 05, 2012
Welcome Spring!
The spring collection of CottageCutz dies from the Scrapping Cottage are so adorable! And I'm going to show you how to adjust a seasonal die to use all year long! The CottageCutz Spring Doily is so cute with the bunnies and Easter Egg, but if you are not doing an Easter card, it's so easy to transform this into a cut you can use all year long. Just make a couple of snips to remove the center, and you are left with this great diecut. You could use it like a doily as I did here- or it would make a fantastic wreath base. Don't be afraid to change your dies up a bit and use them in unexpected ways. I also used the CottageCutz Watering Can, Tulips die set. This is one of those dies that you can use for so many occasions.
Sunday, March 04, 2012
Easter Sweet Treat
Who doesn't like a little sweet treat, especially on Easter. I created a lollipop cover using CottageCutz Easter Basket Bunny. These are so much fun to make and the Easter Bunny really makes it stand out. The matching Peachy Keen stamp set that comes with the die, creates a precious face.
Now to go make 23 more of these for my son's class.
Friday, March 02, 2012
Flower Pot House Card with Pocket/& Video
Hello everyone today I'm sharing my card made using CottageCutz flower Pot House & Love Tags. I also have a Video showing how I made this Pocket using the CottageCutz dies.
Ok I just LOVE this CottageCutz Flower Pot House, its super SWEET and when I saw this, I knew what I wanted to do with it from the get go. There are other options as well. You can just cut one, and use scor-tape on the sides and bottom to create a pocket, or cut it out like i did and tape just the sides for a pocket. Perfect for scrapbooking and Mini albums.
I thought having this CottageCutz flower pot house pocket/fold down area would be perfect for writing, or sentiments, and you have the tag to write or stamp on as well!!
My card has a couple of different fold down and up area's I think they are fun to make, and will have some different folds coming soon too! Love doing different types of cards, and havent really focused on this since my accident, but now I will be doing more :) woohooo!!!! hehehehe
Dp is from My Little Shoebox, and I just love this stuff, its DARLING!!!
There is also room for writing under the flap where the flower pot is on. the picture below shows that area.
As you can see the CottageCutz Flower Pot House below there are options on what you can add to the House, or leave off. I Left off the door andwindow and focused on the flowers and grass and bunny. Super CUTE!!!!
CottageCutz Used:
Also my video shows how I colored with copics and Dusted the flower pot, and all colors are given in my tutorial. Hope you enjoy :)
Thursday, March 01, 2012
CottageCutz/Front Cover of Cardmaker Magazine
We are super excited to share that one of the CottageCutz DT members(Gini)card made front Cover of CardMaker Magazine, using CottageCutz !!! Congratulations Gini!!!!
Her Beautiful card not only made the magazine but also made Front cover!! Her card is the Merci multi fold card! We are soo excited for you Gini, and your card is BEAUTIFUL!!! Love the choice of CottageCutz you used!!
Gini used CottageCutz:
by The Scrapping Cottage!
Thank you all for looking and have a lovely day!!!
Hugs to all,
The CottageCutz Design Team!!
Wednesday, February 29, 2012
Beary Special Tea
Hi everyone, today it's Carol and I am here to show you my "Beary Special Tea", using CottageCutz Springtime Tea die. Two themes in one card that I just adore-bears and tea. What a winning combination. Wouldn't this be cute to send a special little girl as an invite to tea. You can buy very inexpensive chine teacups and teapots and throw a vintage tea party with just a few desserts and classic cucumber sandwiches. With very little effort you can create memories to last a lifetime!
This was such a fun project. I cut my bear from white card stock and then used Ranger Vintage Photo and Tea Dye Distress Inks to color this sweet bear. I used a bit of pink chalk to color the bears cheeks and the inside of the ears. I cut my cup and saucer with designer paper and the doily with white paper and distress inked all the edges. The edges have been kissed with stardust stickles.
Just click on the picture above and it will take you right to the die. As you can see I used the bow from the rabbit on the bear and also the heart and flower. That's whats so fun about these dies-no rules!!! Also, I carried the heart design element on my embellishments for matching interest on the card.
Thanks for taking a look at today's project. Be inspired to create wonderful memories for those special girls in your life. Until next time-have a great day!
Bear Hugs,
Carol
Sunday, February 26, 2012
Spring Chickadee and Video
Hello friends. Today I am sharing a card I made using the Spring Chickadee Cottage Cutz die. I also made a video showing how I made my little Chick. I didn't realize until after I uploaded the video that Cheryl had also done one on the same die. I am a little behind in reading the other posts, so I apologize for that. We both have different styles, and I show how to use a Peachy Keen face on mine, so you will learn something different if you choose to watch it. I hope you do, and enjoy!
Janice
Cottage Cutz... A little Behind!
Happy Sunday to you!! Boy, does my blog title say it all today!! I've had a plan for this card ever since I saw the cute Bunny Front and Back Cottage Cutz dies from The Scrapping Cottage. The thought for this card immediately came into my head, and I got right to work! Well, the best laid plans often go awry (as the quote goes), and that's exactly what happened to me!! I finished my card, even saved all of the markers I'd used into a basket for photographing, and all I needed to do was computer generate the "We're A Little Behind" sentiment. THAT is as far as I got! I got busy and completely forgot to print the sentiment and post my card!! SO, I'm late today and I do so apologize for that! With ALL that being said, here is my card for you, and I hope it was worth the wait. It sure makes me laugh when I see these bunny behinds, and I hope it gives you a chuckle, too!
All of the card stock and paper for this card came from my scrap bin. I added some pleated satin ribbon and chocolate colored pearls for embellishment, and kept it at that, because I want these bunny behinds to shine!! They are, afterall the main attraction, and what cute little behinds they are!!
(Click on the Picture to see a bigger photo.)
This basket contains every marker that I used to color these bunnies, and yes, I DID use each and every color, AND you can add C1,C3, and C5 to that mix, because I took those out to work on something else, and they didn't make it back to the basket.
So glad you could visit us today here on The Scrapping Cottage Blog. Make it a great day... EVEN if you're a little... BEHIND!!!!
Saturday, February 25, 2012
CottageCutz Treat Bag
If you are need a cute treat bag to make, I've got one to share with you. When I saw the CottageCutz / Peachy Keen Shower Peepers die from The Scrapping Cottage, I knew what I wanted to make. I always think that shading my die cuts with distress ink adds so much more life to them - but on this little chick, I was having a hard time getting too much ink, so I added it a little different. I used my water pen, and picked up a little Scattered Straw ink for her body, and just a touch of Worn Lipstick for her cheeks. This gave me much more control, and a very light touch of ink. The face is so cute - it's a Peachy Keen stamp that comes with the set (actually you get three different faces so your little peeper can have different expressions).
If you want to make the gift bag, here's how:
The acrylic bubble that I used on the front of the bag is a Flower-Soft Display Globe, but you could also just use a flat piece of acrylic, and cut your opening to any size and shape that you would like.
Cut another strip of paper, 1" x 12" and attach to the sides for a handle. Use dimensional tape to attach your die cut.
Scrapping Cottage Dies: Shower Peepers
Patterned Papers, Buttons: American Crafts Garden Cafe
Acrylic Dome: Flower Soft Display Globe
Distress Ink: Scattered Straw, Worn Lipstick
Water Pen: Close to My Heart
Patterned Papers, Buttons: American Crafts Garden Cafe
Acrylic Dome: Flower Soft Display Globe
Distress Ink: Scattered Straw, Worn Lipstick
Water Pen: Close to My Heart
Friday, February 24, 2012
Oh Baby
Happy Friday!!! I don't know about you but I love to look at my dies and think about them in ways other than what they were intended for. Like this adorable CottageCutz Baby lamb and friends, from our current Easter release. Granted it's adorable for Easter projects, but isn't he also perfect for Baby themed projects....just perfect.
He was super easy to create....I just die cut him and then inked the edges with distress ink on the shadows...this really makes him looks finished and it takes just a minute to do. The only paper piecing that is needed is his bow, nose, eyes and hoofs...it took no time at all.
I love using our pennant dies that coordinate. Pennants are so HOT and you see them on all types of projects...our dies make pennants easy peasy. I used the plain and scalloped die to create the Baby Banner. Can't tell you how much I love these dies.
Here is a complete list of dies and products used for this card:
Kara Ashley Alphabet Die
Simple Stories Designer Paper
Unity Stamps
Wednesday, February 22, 2012
Spring Chick A-Dee Z-fold Card/Coloring Video
Hello everyone today I'm sharing a Sweet Cottage Cutz Spring Chick-a-dee from The Scrapping Cottage! I've also done a video showing how I colored her and with what colors.
My card is the opposite of the Z-Fold card, when open it should fold like a Z but i wanted to do mine a little different, so it folds in :)
I love Cottage Cutz Spring Chick-a-dee, she is sooo cute, and super fun to color. I almost was going to use the Dusting technique i love doing on these but decided to color with copics today.
Ive added some pearls to both their dresses, and to the flower by the mailbox. The LOVE is stamped from Cottage Cutz Vintage Key.
mailbox was dusted with Tim Holtz Colors-
The Post was dusted in-Tea Die
Mailbox=Spun Sugar
Letter in Mailbox=antique linen
Grass=G99,G24,YG13
Copic Colors I used for Spring Chick-a-dee
For Spring Chick=YR31,Y11,Y08
Cheek Color=R20
Beak and Feet=YR09,YR15
Dress & Hat=RV34,RV23
These colors were used on this Spring Chick-a-dee below. and all the chicks above, the only color i cant remember is the one on the front of the card, since that green was used on the hat a few days ago. I think for the dress on the front I listed it in the video below. :)
Hope you enjoy my video!
I did forget to show how i add the cheeks in the video since it was running out of time, but I just add them with R20 and if you want to soften them use the clear blender copic. I didnt soften them in these. I also added some white gel pen to the cheeks.
Sunday, February 19, 2012
Filigree Spring Tulips
This week I am bringing to you Cottage Cutz Filigree Tulip Basket, one of several new dies from Cottage Cutz. You have several options to create the basket of Tulips. Here I cut the filigree ttulips from pre-glittered card stock, as well as Bazzlell Famingo card stock. Than I cut the solid base of the basket with Bazzill Bling White. I glued the flamingo card stock directly behind the glitter card stock creating a thick raised filigree texture. I than glued the filigree basket to the solid white card stock. The card was made in the flamigo pink and white. I used foam dots to raise the basket and tulips on the card. The verse SPRING was from the Cottage Cutz Bunnies in the Grass Border die. I did the same cut it twice, once in flamingo and the top is the glittered card stock.
You can see I cut the additional items on the Cottage Cutz Bunny in the Grass Border Die in green to show you all the other items on the die.
Thanks Barry
You can see I cut the additional items on the Cottage Cutz Bunny in the Grass Border Die in green to show you all the other items on the die.
Thanks Barry
Subscribe to:
Posts (Atom)