Tuesday, October 02, 2018

Jolly Santa Claus

Hi, Janja here!

Today I'm sharing with you my new card with Jolly Santa Claus.


Supplies:
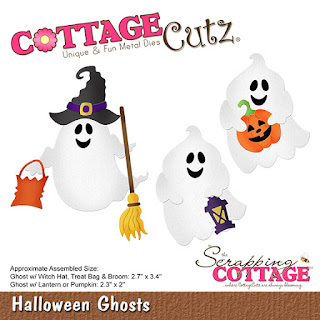
- Cottagecutz dies: Jolly Santa Claus, Tea time Doily
- white card base: 5.3 x 5.3" (13,5 x 13,5 cm), folded
- patterned paper: 5 x 5" (12,7 x 12,7 cm)
- patterned paper: 3.94 x 3.94" (10 x 10 cm)
- white and colored cardstock
- colored ink pads
- glue, double-sided adhesive tape, self-adhesive foam pads

Die cut all the pieces for jolly Santa Claus. Ink the edges, and attach all pieces to each other.


Prepare a white card base. Cut square, and two strips of patterned paper. Paste both on a white cardstock.

Cut two smaller squares from white and patterned paper. Cut a round lace from a white cardstock. With a scissor cut it in half.


Attach all layers as shown.


Now stamp a sentiment. Attach Santa Claus with self-adhesive pads on the background.
And we're at the end.


I would like to remind you that the new Christmas dies (Part 3) and the new Halloween dies are already in the store. They are currently on sale for 25% off.

Thanks for stopping by. Have a lovely day.


Monday, October 01, 2018

Halloween Z-Box Fold Card

Hi, Lois here at the start of a new month  It's October -- time for colorful leaves, pumpkins, and Halloween!  Halloween is what I'm bringing you today.  CottageCutz has a brand-new release of really cool Halloween dies -- currently on sale at 25% off, along with their Christmas (Part 3) release.

I'm a big fan of fun-fold cards, and my card today is a relatively simple fun-fold card -- a Z-Box Fold card, using two of the new Halloween dies.


To start the card, cut cardstock and patterned paper as follows:

Black - 4 1/4" x 5 1/2"
Orange - 4" x 9 3/4"
Patterned paper - 4 3/8" x 2 7/8"
Patterned paper - 7/8" x 5 1/8" (one piece), 7/8" x 2 1/8" (two pieces)


Place the orange cardstock in your paper trimmer with the short side at the top and place the long side at the 1" mark.  Cut a 1" slit from the 3" mark down to the 7 1/2" mark.  


Place the cardstock in your scoring board and score down to the cut line at the 3" mark, up from the bottom at the 7 1/2" mark, and all the way through at the 5 1/8" mark.


Place Scor-Tape on the back of the largest section of the orange cardstock, as shown.


Fold on the score lines and adhere to the black 4 1/4" x 5 1/2" panel.


Cut three ghosts from the die.


Color and construct the ghosts.


Cut the Spooky Garland from a scrap of black cardstock.


Adhere the patterned paper to the card base and sponge around the front panel.  Add the ghosts and garland, and your card is completed.


CottageCutz dies used on this card are:

http://www.scrappingcottage.com/cottagecutzhalloweenghosts.aspx

http://www.scrappingcottage.com/cottagecutzspookygarlandelites.aspx

Sunday, September 30, 2018

Peace Wreath

Hi!

This is Anja again. I have a very simple card for you today. I'm still busy at work, coming home late and lacking time for crafting. Happily things slow down in October, so I'll have more free time.

Sometimes also a simple design can be useful, especially if we have to make a lot of cards and we don't have enough time. So this is quite a simple card to make.


For this project  used:
- Cottage Cutz dies (Grapevine Wreath w/ Bird, Love Peace & Joy),
- Distress Oxides (Antique Linen, Squeezed Lemonade, Faded Jeans, Black Soot),
- white card base (11x11 cm),
- white card stock for die cuts,
- water color paper for background (10x10 cm),
- water spritzer,
- heat gun.

First I made the background. I used Distress Oxides this time and blended the three colors together. I went from light to darker color around the edge of the paper.


The I spritzed some water on top and dried it with the heat gun.
I also used Distress Oxides around the edges of the card base. 


Then I die cut the wreath and the sentiment. I again used Distress Oxides around the edges.


When I had everything colored, I glued the elements on top of the card base.

And my card was finished.


Before I go I want to invite you also on The Scrapping Cottage website to check all the new goodies in the store. Can't wait to try it out.

Have a nice Sunday and see you again next week.

Anja Z.


Cottage Cutz products I used:


Saturday, September 29, 2018

A Spooky Wish Hello

Hello Scrapping Cottage friends! Thanks for taking the time to stop and visit with us today. It's Mary Marsh here bringing you the Saturday edition of the Blog. 

My card today is from the 2018 Halloween release and a sneak peek of the Autumn 2018 release.  There are 10 new designs in the Halloween release. You will find these in the online store at a 25% off sale.
I used the Halloween Ice Cream Cone  and the Fall Phrases dies for my sample today. This die is a sneak peek of the new Autumn release coming soon. So let's get started with some details on how I created this card.

Step 1: I looked through my paper collection for a Halloween themed design. I found this paper that has the title of "spooky night" and I liked the laboratory beakers and flasks on the paper. I thought it would work well with my Halloween themed card. 
I cut both sheets of the patterned paper at 4" x 5 1/4" and then cut on an angle. The panels are joined together with some matching ribbon.
Cajun Card Base: 4 1/2" x 5 3/4"
Orange layer panel: 4 1/4" x 5 1/2"
Patterned Paper: 4" x 5 1/4"
***After I started card assembly, I decided to add another color for my card base. I chose a cinnamon shade for the card base***
Step 2: I cut my ice cream cone in similar colors to the die packaging. The hello word is cut in the Cajun (cinnamon) cardstock. 
I used the Rectangle Set & the Pierced Rectangle dies as a backdrop for my ice cream cone. Stamped my spooky wishes sentiment on the white panel in black ink. 
The ice cream cone is secured with dimensional adhesive and the hello phrase with Ranger multi matte medium.
Step 3: To finish off my card, I scattered 3 black rhinestones. It balanced the image panel nicely.  Attached the panel to the card base with double sided tape. 

Well, that's it for me for this week. I hope I have given you an idea for a way to use these new dies. And, remember they are 25% off in the online store. See you next Saturday!

Dies  I used to create card:

http://www.scrappingcottage.com/cottagecutzrectanglesetbasics.aspx

http://www.scrappingcottage.com/cottagecutzpiercedrectanglesetbasics.aspx


Friday, September 28, 2018

Pumpkin Latte

Happy Friday!  It's Jeanne posting a card today using a super versatile die from the Christmas Part 2 collection.

Before I get to my card I'd like to encourage you to  check out the Christmas Part 3 and Halloween dies that are on sale right now on the website.  Look for samples from the design team coming soon.

Now on to today's card.  I used the Coffee and Cocoa Warm Wishes set.  With all the coffee sentiment stamp sets out there, this die set with it's variety of mugs and cups could be used for virtually any occasion.  Today I went with a fall theme - I love my pumpkin spice!
To make this a fall themed card all I needed to do was change my paper and colors to go along with my pumpkin spice sentiment.
I used three dies (the second and third from largest and the second smallest) from the Double Stitched Rectangle set.
Then I cut the latte pieces from coordinating card stock.
And glued them together.
For the card base, I decided to use a green A2 base.  I don't normally use colored bases much but the color really worked well on this one.  I cut a rectangle from brown card stock 1/16" larger on each side than the leaf rectangle to give it some definition.
I cut a piece of ribbon 15" long and tied it around my leaf panel.
I then assembled the card and used foam dots to pop the latte cup off the orange panel.
This was a super easy card to make but really makes an impact.  Just by elongating one of the rectangles you could use several of the mugs instead of just one.  I LOVE this set!

Dies used:
http://www.scrappingcottage.com/cottagecutzcoffeeandcocoawarmwishes.aspx


http://www.scrappingcottage.com/cottagecutzdouble-stitchedrectanglesetbasics.aspx

Thanks for stopping by - have a relaxing and creative weekend!