Showing posts with label shaker tag. Show all posts

Monday, December 26, 2022

Shaker Tag Gift Card Ornaments

Merry Christmas CottageCutz friends!  I hope you had a wonderful holiday with your loved ones. 

Kris here sharing with you today.  I know most of you are done making Christmas projects now, so maybe you want to save this idea for next year's gifts... OR you can always change the theme and use these for gift bag tags (thinking Valentine's... Birthdays...any special occasion!) ☺  

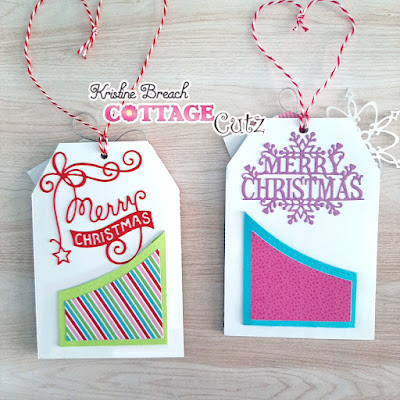
I'm a huge fan of shakers, so I made 2 ornaments that are shaker tags with gift card holders on the back, using the Jolly Santa Gnome from the Christmas 1 Release & I made the other with the Polar Bear Trio with Igloo from the Christmas 2 Release.  


The patterned papers and tiny tags are from 
Winter Wonderland (Polar Bears Tag) and 
 Let it Snow (Jolly Santa Gnome) from Doodlebug Designs

JOLLY SANTA GNOME TAG
White Cardstock:
• cut 5-1/2" x 3-3/4"
• die cut Jolly Santa Gnome
Red Cardstock (back of tag):
Acetate/Window Sheet:
• 3-1/2" x 4-1/4"
Patterned Paper #1 (red with Santas):
• 5-1/2" x 3-3/4"
Patterned paper #2 (green trees):
• 3-3/4" x 3" - then cut the top with a Hills Slimline die
Patterned Paper (tiny tags):
• cut apart one of the tiny tags and punch hole where indicated

HOW TO:

1.  Glue patterned paper #2 to the bottom of patterned paper #1.

2.  Measure along the TOP of the patterned paper #1 and make pencil marks at 3/4", 1-7/8" and 3"

3.  From the TOP, measure down each SIDE and place a mark at 1-1/4"

4.  Make a diagonal cut from the TOP 3/4" marks down to the 1-1/4" SIDE marks.

5.  Punch a hole about 1/2" down from the center (your 1-7/8" mark)

6.  Place that tag over your white piece and use as a guide to cut the corners off of white tag and punch hole in middle. 


7.  Using a rectangle die, (I used the 3rd largest of the Nested Wacky Stitched Rectangles) center it over your Patterned Paper tag and cut.

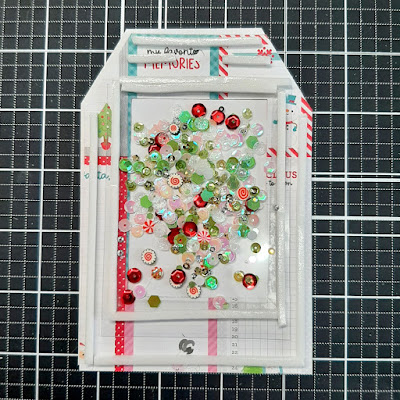
8.  Turn that tag onto back side and place Scor Tape (or other strong double sided adhesive) close to the rectangle cut-out.  Attach your window sheet.

9.  Add foam strips/tape just outside the rectangle and around edges of tag.  (See photo below)

10.  Add sequins/shaker elements.


11.  Carefully place your WHITE TAG on top, lining up edges and the hole at top.


12.  Color your Jolly Santa Gnome and attach to tag front using foam tape for dimension. 

*Optional (but highly suggested):  Add Snow Writer (puffy snow, etc) to the trim on his hat & coat!  LOVE the dimension it gives 😊


13.  Glue the red Merry Christmas Ribbon to back of tag.

*Optional:  Add a pocket to the back for a gift card!


POLAR BEAR TRIO WITH IGLOO TAG
Same cutting measurements as the Santa tag with the following exceptions:
• the 2nd patterned paper I glued to the top of the white tag (inside shaker, instead of the front & cut the bottom with the hills die)
• I used the 2nd largest Nested Wacky Stitched Rectangle (larger than the one on Santa shaker)
• I die cut a large snowflake from the Snowflake Set
• I die cut Merry Christmas w/ Snowflakes (for back of tag) from purple cardstock


How CUTE are these?!!  
♥ these adorable CottageCutz dies!

They are for my girls, so here they are on the tree ☺


Merry Christmas to you all, and wishing you all the crafty goodness in 2023!
~Kristine

PRODUCTS USED:


Tuesday, October 12, 2021

One die three ways

Happy Tuesday Cottagecutz fans, It's Wendy bringing the blog to you today. It’s my birthday today so I am sharing 3 full tutorial projects with you. I have a shaker tag or it could be a bauble, some cupcake toppers and a Shaker Napkin Ring


So I’m going to start with the gift tag and then the napkin ring as they are very similar to make. Take 2 of the nested circles dies measuring 3” and 2” and cut a ring


Next take some acetate and choose a circle die that is just smaller than the ring, cut it our and glue to the reverse of the ring


Next use some 3D foam pads at lease 2-3mm and apply all around the ring and pop to one side


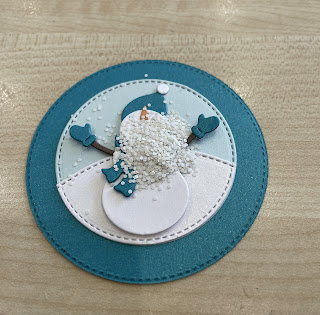
Now cut another 3” circle in the teal, a cut two 2” circles in the lighter blue and white. glue the lighter blue circle in the middle of larger circle. Then with the white circle create a snow hump using one of the slimline hills dies and stick to the light blue circle


Now cut out the snowman from the ‘Joyful Snowman’ die in coordinating colours and attach to the base you have created 


Now I’ve added chunky glitter onto my snowman scene but you could use little beads


Now you can peel off the foam pads from the acetate circle you made and carefully place over top to make your shaker element. I’ve cut a circle at the top to thread through some ribbon and added some holly for decoration. So this could be a bauble or a gift tag.


We’re going to make the napkin ring now and It’s exactly the same method as above, you just don’t need to cut the hole for the ribbon or add the holly. So here is how I made base ring for the napkin. Take a piece of card 7” x 1.5” and mark at 1” either end. At the same time cut one of the nested stitched circles measuring 3”


Take a stapler and staple one end to the middle of the circle


Take the other end of the card and staple to the middle of the napkin ring. Make sure the more pointy part of the staples are facing out as we’ll cover that up


Next add 1mm 3D foam pads to cover all of the circle


Attach to the shaker design we made earlier


Here is your fun and final shaker napkin ring


Finally we come to the cupcake toppers. These are so quick and simple to make. So using the ‘Joyful Snowman’ again, cut the main body 12 times if you are making 6 cupcake toppers.Then cut our the remainder of the design 6 times as we are only going to decorate the front of the toppers 


Now to create the basic cupcake topper. I would use 2-3mm foam pad and add this to one side of the snowman but leave enough room for a cocktail stick. In that void use a strong blue such as cosmic shimmer and then app,y another snowman over the top before inserting the cocktail Stick.


Finish by adding the remaining elements onto the snowman and you are done. There are so many other dies that Cottagecutz has that lends themselves to make cupcake toppers


I hope you’ve enjoyed the projects today. Have a lovely week and I’ll look forward to seeing you on Friday
Wendy    

Announcement: 
The winner of the YouTube giveaway is Karen Ladd. Contact Mary Marsh at mrmarsh917@gmail.com to make arrangements for your prize. We will be having another giveaway on YouTube starting Wednesday when the newest goes live. 

Dies I have used