Showing posts with label happy birthday. Show all posts

Monday, March 06, 2023

Floating Sentiment Shadowbox

Happy Monday CottageCutz friends!

Kris here sharing with you today.  I have a Floating Sentiment Shadowbox type of card.  I've used Flower 1, Flower 6, and Flower 7 from the newest Flowers & More Release.


This style is very easy to make, but if you'd like to watch a video, Jennifer McGuire recently shared this one and I was inspired to try it for my card this week. ☺

Design Steps:

1.  I cut a white card base at 5" x 10" and scored at 5 inches.  

2.  I cut another piece of white cardstock at 5" x 7" and scored along the 7" side at 1/2" and 1" on both ends.  Accordion folded them and burnished.

3.  I stenciled a background with the Plaid stencil from the Daisy Stencil set (La-La Land Crafts) with Tumbled Glass Distress Oxide ink.


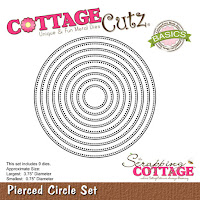
4.  I die cut a circle from the center of that piece using the 2nd largest Pierced Circle set.


5.  Next, I die cut my flowers from white cardstock and added Distress Oxide ink in Squeezed Lemonade, Wild Honey, Carved Pumpkin, Twisted Citron, and then I added some shading to the leaves with a Copic marker. 

6.  I then placed them around the opening and glued them down.


7.  I stamped & embossed my "Happy" sentiment and die cut the "Birthday" from the Happy Birthday w/ Shadow die.  

8.  I cut a strip of window sheet about 4-3/4' x 1-1/2" and added Scor Tape to each end.


9.  I then taped the window sheet to the back of my flower layer, in the center.


10.  I attached my sentiment pieces to the front of the window sheet.  I ended up cutting off one of the limbs from the stem on the left so it didn't cover up my sentiment too much. 

11.  I then tried out different colors of cardstock as my backdrop for my flowers and decided on this light teal color.  I cut it to 3-7/8" x 4-7/8" and set it aside.  *This is not attached to the front floral panel.


12.  I added Scor Tape to the 1/2" scored flaps of the flower panel piece and lined them up with the side edges of my card front.  I love how it causes the front panel to dome out!

13.  I then added glue to the backside of my blue panel and inserted it between my front floral panel and the card front so that the 4-7/8" is vertical.  


Done!


PRODUCT I USED:


Thanks for taking a peek!  I hope you are inspired to get creative with your favorite CottageCutz dies!

~Kristine


Tuesday, June 07, 2022

Happy Birthday Gnome Paper Piecing Card

Hello Scrapping Cottage friends!  
Melinda here with you on this Terrific Tuesdie!  Today I am sharing a FUN card featuring more dies from the New Sweet Treats Release! Last week I shared this cute little gnome piecing I created with some leftover pieces. This week I will show you what I used and share the cute little card he is on!
Here's a look at my completed card. I started with a horizontal top folding card base. I used some white cardstock for that. I then cut a piece of some colorfully cute diagonal striped patterned paper I had in my stash. I cut it to 4x5.25 for the mat. 

Here's the photo I shared last week of the little Gnome I made with some leftover pieces.

So here are the pieces I used to create this cute little fella. They are all pieces from various dies in this "SAHWEEET" release! 

So here's a closer look at the pieces I used for his arms (the top pieces). I cut off the bottom part and used that for his "hand". I also cut off that extra piece around the edge and it made a little lip at the bottom to look like a slight cuff.

Here are the pieces that I used for his "head". I added the side pieces to fill in the sides for the "hair". I did cut off the extra  once his beard was in place.

Here is what his head pieces look like. I loosely layered them onto each other to give you the idea.


Here is his body along with his two "shoes". I just cut the extra lip off the bottoms.


Here's another look at little Mr. Gnome. I mounted him onto a stitched rectangle scalloped mat with a yellow cardstock mat. I put some of those super cute cupcakes along side. I added some glaze to that tiny cherry, but it doesn't really show on the photo. I also added some stickles to the top cupcake and the centers of the flowers on the bottom cupcake.


Here's a closer look at the large cupcake and the Happy Birthday sentiment. I did add some foam tape underneath them all to give them just a little lift. I also added some cinnamon stickles to the brown swirls. It didn't show up too well in the photo but the swirls are nice and sparkly.

Here is the new sweet treats release.

Sweet Treats Release


The Dies I used to create this project:


The jar piece on the right is what I used for the gnomes arms


I used this cupcake and the top for the gnomes head and beard. I also used the top right "pink" piece for his mustache.

I used this cupcake top piece for his hat and the longer swirl piece for his "hair". I did also use this complete cupcake to decorate my card.

I used the sundae cups top ruffled piece (just above the heart) for the Gnome's hat brim.

I used the brown frosting on the cupcake on the top right for the gnomes hat top. I also used some of the cupcakes from this die to decorate my card.

Nested Scallop Rectangle Set


Make sure you head over to the CottageCutz YouTube channel and check out all of the amazing projects on there. Our video team is doing a wonderful job of filling the channel with all sorts of creative content! You don't want to miss it!

Well that about covers it for today! Until the next time, have a wonderfully craft-die day!
Melinda Beltran

Tuesday, May 17, 2022

Happy Birthday Slimline Birthday Card

Hello Scrapping Cottage friends!  
Melinda here with you on this Terrific Tuesdie! Today I am sharing a project featuring dies from the SUPER SWEET New Sweet Treats Release! Talk about sweet! This set is over the top adorable!  Here is what I created.

I created this fun and festive Happy Birthday Slimline card. I started with a standard 3.5 x 8.5 size.
I cut all my pieces out in plain white cardstock. I love to color my pieces in.


I then mounted all of my ice cream cones onto the smallest scallop stitched rectangles.  I used some adorable festive green dot patterned paper for the card front base.  I added a fun patterned paper background to each scalloped mat. 

For the center cone, I used the next largest scallop stitched rectangle and the same cute stitched patterned paper. I absolutely love this die set. The possibilities truly are endless!

To finish off the card, I added the Happy Birthday Sentiment
I am trying to build up my Birthday card stash as it is severely lacking! These dies are perfect to achieve that task.

Here is the new sweet treats release.

Sweet Treats Release


The Dies I used to create this project:

Build An Ice Cream Cone


Have you checked out the CottageCutz YouTube channel yet? 
It is filling up with beautiful projects and great how-tos!  
Head over and check out the latest video! 

Well that about covers it for today! Until the next time, have a wonderfully craft-die day!
Melinda Beltran