Showing posts with label cottage cutz. Show all posts

Saturday, August 14, 2010

Anything goes with Christmas!!

As soon as I saw these adorable sunglasses from the July #2 Cottage Cutz Release, I knew I had to have them. If there is one thing my girls have always loved, it's dressing up. And nothing completes a good outfit like a pair of shades. I actually have several pictures picked out that are going to look great with this sunglasses shape but I picked these first. Since these pictures were taken around Christmas, I wanted to give the layout an overall Christmasy feel. However, the real reason behind the pictures was the fact that my DD put on my sunglasses and thought she looked so cool! So I used the sunglasses mini die to add an accent border long the bottom to help accentuate the sunglasses in the pictures which are the true focus.
I use lots of different cardstocks in my scrapbooking. For me, it is sometimes more about the perfect color match than the brand of cardstock. However, there are definitely differences among the brands. Some cardstock leaves a white edge after you cut out your shapes. Now depending upon the colors in your layout, and the placement of your diecut, that may not matter at all. On this particular layout, my background was off white, plus I wanted my sunglasses to pop a bit. Therefore, I took one of my Copic markers and edged the sunglasses shapes. By doing this, I was able to get rid of the white edge and give a crisper look to the diecuts. This is one of those techniques that when you look at the layout, you don't say, "Wow, that's some good edging on those sunglasses". But if I had not done it, they would not have looked as clean and crisp.

I hope you enjoyed this quick little tip to help you get the look you want with your diecuts! Have a great rest of the weekend and happy scrapping!!!


Monday, August 09, 2010

It's Monday! "Let's Do Lunch"


I can't believe it is Monday already! Hope you all had a great weekend. For today's card I used dies from the new summer release. I love the Picnic Basket die! I grew up in WI and my Mom would pack a picnic lunch at least once each summer, and we would head off to Bay Beach for a day of FUN! We had one of those metal coolers from the 50's. I love everything from the 50's, especially kitchen decor.

The finished card size is 6x6. I cut the picnic basket using white cardstock and colored with copics. I used a small piece of gingham paper for the cloth inside the basket. I usually use scraps and place the paper over the part of the die I want to cut. Of course if you prefer to color your die cuts, you will have very little waste. I am so glad Lorie gave me that wonderful tip! It opened up a wide range of possibilities. I never really thought about it. I would choose colored cardstock to cut my images, but now the possibilities are endless! Thanks Lorie!

The Picnic Ant and the Picnic Ladybug are so cute! The drumstick and the slice of watermelon are cute too! You could have them carry different items to switch it up a bit. I could have put the drumstick in the picnic basket and have the ant carry the apple.

I used a small alphabet stamp set to stamp the words, "Let's Do Lunch".

Picnic anyone? Enjoy the day!

Hugs and smiles!
Janice

Monday, August 02, 2010

Good Morning Friends!


Hello Everyone! Happy Monday to you! For today's card I have used several dies. I love the window dies, so I used Window w/ canopy. I love the canopy! I also used the flower pot from the Window and Flower Pot die. This card could be used for many occasions. We've Moved, Welcome Neighbor, Housewarming Party....... you get the idea. I like to make scenes when I make cards, so I used my Score-pal to make the "siding" on my house. And of course I had to make a white picket fence with this fabulous Picket Fence die! And finally I used the Daisy die to plant some flowers around the house. I used a light pink behind the 9 panel window. To create a slight shadow I highlighted each window pane with a light cool grey Copic marker. This small detail really makes the window pop! I hope you like my card! I will be back next Monday, but I hope you visit us every day to see the fabulous artistry of the other designers!

Monday, July 12, 2010

Hang In There!


Good morning friends! For today's card I used Frog with branch, and Snail. I tried Lorie's suggestion and cut out my image with white cardstock. I used Copics to color the die cuts. I freehand cut the clouds with scissors and inked the edges in blue. There are so many adorable dies at The Scrapping Cottage! Click here to take a look.
I apologize for the poor quality picture. The card looks much better in real life.
Have a great day everyone and thanks for stopping by!

Friday, July 02, 2010

Something To Crow About (...see rooster below)

Hello, and happy Friday!! My name is Lorie Souther, and I am thrilled to be able to share a card with you today as one of the new design team members for The Stamping Cottage. This is indeed great news for me to crow about!! I am looking very forward to working with the rest of this talented design team, sharing creative inspiration, and making new friends.

For my card today, I used some wonderful 4th of July themed Cottage Cutz dies from The Scrapping Cottage. American Rooster, Firecracker, Patriot Bunting, and Stars Edger dies all went into this fun and festive creation. Since my stamping and scrapping experience started with my love for painting and coloring images, I decided the best way for me to work with what I know was to start with a blank canvas, if you will. I cut each of these (except the stars edger) with regular white card stock, assembled the pieces using Zip Dry paper glue, and then colored each die cut with my Copic sketch markers. For me, this was the easiest way to achieve the color, highlighting and shading that brings everything to life. The white highlights were added using a white gel pen. I did quite a bit of distressing on the edges of the oval background using Tim Holtz distressing ink in the Tea Dye color. My sentiment for this card is simply "Sparkle", and I added a little bit of sparkle to the stars on the firecrackers, although it doesn't show up so well in the photo.

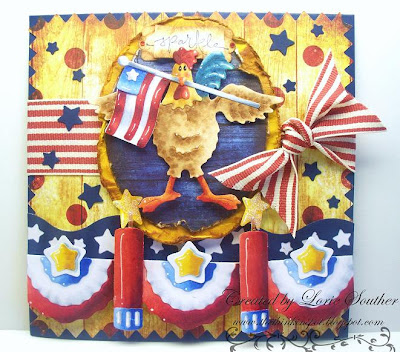
Here's a little closer look at some of the details. Notice that I used the stars from the Stars Edger and randomly glued those around the image. I like to find ways to use as many of my scraps as I can, and in this case, it worked out just dandy.

The technique I used to color the rooster is one I call the "stippling technique". I guess that term comes from my tole painting days, and while I'm not sure that's the official term for it using markers, it works for me. I just pounce the color into the desired areas with my marker layering the color from lightest to darkest.

I'm so happy you could stop by today. Please feel free to visit me anytime at my blog The ThINKin' Spot . Have a wonderful day, and a safe and Happy 4th of July! See ya soon!

Wednesday, June 30, 2010

Hello Everyone! Happy Thursday! Let me introduce myself.

My name is Janice Wilson. I am thrilled to announce that I have been asked to join The Scrapping Cottage design team. I am looking forward to getting to know the other designers and to share my designs with you. I hope that we can be an inspiration to each other and learn things along the way. Most of all, let's have FUN!! I primarily make cards, but on occasion I like to step out of my comfort zone and try something new. For today's card, I used CottageCutz Shih Tzu Peeker and CottageCutz Daisy Seeds. I had a lot of fun making this card. I love the Shih Tzu die. It is so cute! I used a couple shades of brown cardstock to assemble the puppy. I didn't have a picket fence die or a grass die so I just cut them myself. The picket fence was very easy. I cut strips of white cardstock, 1/2 inch wide. 2 of the strips were 5 1/2 inches long. The pickets are about 2 inches tall. I cut one of the points on a picket to use as a template to cut the rest of them. I cut the strip of grass, free hand. I inked the edges and the centers of the daisies with Dandelion Memento ink. I free hand cut the bone sign as well, because I don't have a bone die, yet. I used a twist tie that I stripped the paper off of, coiled each end, and used it to hang the sign.


Thanks so much for stopping by. If you have any questions just leave a comment and I will do my best to answer. Have a great day!