Showing posts with label Valentine Phrase & More. Show all posts

Saturday, January 16, 2021

Burger to my Fries

Hello Scrapping Cottage friends! Thanks for taking the time to stop and visit with us today. It's Mary Marsh here bringing you the Saturday edition of the Blog. 

We have a brand new release of dies in the online store. It's our Circus release with 16 new designs. They are currently on sale at 25% off individual dies. The Safari release dies are also on sale at 25% off individual dies. This was our Black Friday release. 

The Circus dies are so cute for Birthday, Valentine, Thinking of You or even Father's Day cards. Just let your creativity soar. The DT has been showing some great ideas for ways to use these dies all week. So if you missed any check back on the Blog.  

Today for your viewing pleasure, I am featuring the new Build-a-Burger die and I created a Valentine card. I remembered a punny sentiment that I had which would work well with this die image.  I usually let some of the men from Church and neighbors pick a card to give to their wives for Valentine's Day. That's where this one will go. 

So let's get started on some details of how I created my card. 

Design Steps:

I started by cutting the hamburger and fries images. For the hamburger I used various colors of cardstock to match the photo on the package. I used the following Stampin'-Up cardstock: hamburger (baked brown sugar), tomatoes (real red), lettuce (garden green), pickles (cucumber crush), cheese (mango melody), onion (confetti white)

For the fries I cut in so saffron cardstock (soft yellow) and then sponged with wild honey distress ink to get more of a golden glow. 

Next, I chose this layout that I found on the web. I liked it because I could use designer paper and add some extra layers. For the oval, I used the largest stitched oval eyelet die. Looks like it's out of stock,  but you could also use the 2nd largest die from the Stitched Oval set. 
For the 2 angled rectangles I used the 4th largest die from the Rectangle set
Next, I selected my designer paper. Then I chose cardstock colors that matched the designer paper for the card base, the oval and the center rectangle panel. The center rectangle panel is embossed with a heart embossing folder.  
red card base: 4 1/4" x 5 1/2"
designer paper layer: 4 1/8" x 5 3/8"
heart embossed layer: 4 1/8" x 1"
white rectangles: 2 7/8" x 3 7/8"

My final step of preparation is the sentiment. I masked and stamped the sentiment on both of the rectangle panels. I used a stamp-a-ma-jig for placement. 

Now, I am ready to start card assembly. I attached the designer paper, embossed layer and oval to the card base with double sided tape. 
 

The white rectangle panels are attached with double sided tape. For the images, I used dimensional adhesive. 
To finish off the card front, I added a few red heart sequins. 
I added a Valentine sentiment on the card inside. I used an older die from CottageCutz - Valentine Phrase & More.  
Well, that's it for me for this post. See you next Saturday!

dies I used to create card:


Saturday, January 09, 2021

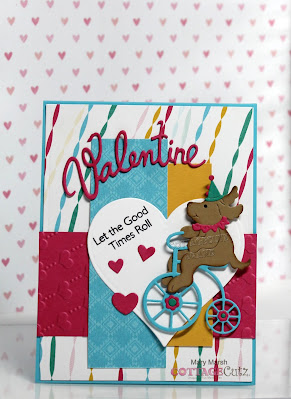
Pedaling Puppy (new die)

Hello Scrapping Cottage friends! Thanks for taking the time to stop and visit with us today. It's Mary Marsh here bringing you the Saturday edition of the Blog. 

We have a brand new release of dies in the online store. It's our Circus release with 16 new designs. They are currently on sale at 25% off individual dies. If you purchase the entire bundle you can save 60% off.
Our Safari dies are also on sale at 25% off individual dies.

The Circus dies are so cute for Birthday, Valentine, Thinking of You or even Father's Day cards. Just let your creativity soar. The DT will begin showing some great ideas for ways to use these dies next week. Here is one that I created using the new Clown with Balloons die. 

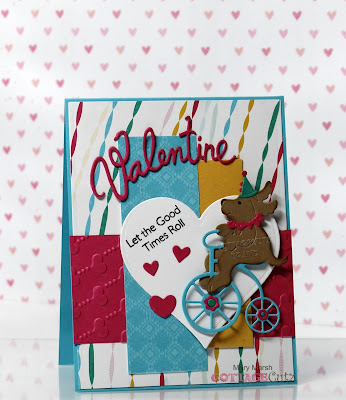
Today for your viewing pleasure I am featuring the new Pedaling Puppy die and I created a Valentine card. I have several little boys on my list that would love this card. I just have to decide which one will receive it. So let's get started with some details on how I created my card. 

Design Steps: 
I started off my card this week with the layout. I saw this sketch #835 on Splitcoaststampers and decided to use it for my layout.
Once the layout was chosen I selected my designer papers and that determined the card colors. I wanted a background paper that was a bit festive, and I think this paper achieves that look. 

For layer # 2, I embossed the pink cardstock with a heart embossing folder. Layer #4 is the reverse side of the designer paper I used for my background layer. 
 
Turquoise Card Base: 4 1/4" x 5 1/2"
Designer Paper: 4 1/8" x 5 3/8"
Layer #2: 2" x 4 1/4"
Layer # 3: 1" x 3 1/2"
Layer # 4: 1 1/2" x 4 3/8"
I cut my pedaling puppy from cardstock colors that are in the designer paper. 
I decided to use a heart for the puppy background since it's a Valentine's Day card. I used the largest die from the Heart Set. I picked a punny sentiment to pick up on the bike movement and stamped on an angle in black ink. 
Now I am ready to start card assembly.  I attached all the card layers to the card base with double sided tape.
Secured the heart with double sided tape and attached the image with dimensional adhesive. 
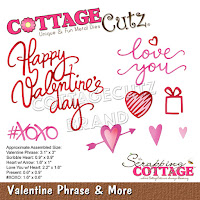
I wanted a bit more of a Valentine theme to my card so I used the 2019 Valentine Phrase & More die and cut some hearts and the Valentine phrase for my card. Cut those in the melon shade of cardstock that coordinates with the embossed panel and the designer paper. 
Well that's it for me for this week. See you next Saturday!

dies I used to create card:


Tuesday, April 14, 2020

Small Cards for Different Occasions

Hi Janja here. Welcome to the blog today.
I hope you all had a wonderful and healthy Easter holidays.

I made four small cards for different occasions. It's always good to have some of these cards in stock.


- CottageCutz dies: Orchids, Thanks Phrase, Potted Cactus, Valentine Phrase & More, Oh No Kitty, Bear Patient, Sending Hugs Bear, Stitched Squares Set, Stitched Wide Square Frame Set
- blank cards: 4 x 4" (10,2 x 10,2 cm), folded
- patterned paper: 3.5 x 3.5" (8,9 x 8,9 cm)
- colored cardstock
- colored ink pads
- glue, double-sided adhesive tape

I used some flowers, animals and expressions dies.
First, start by cutting out the main motives.


Then, cut four squares out of the patterned paper. Use the largest die of the set.
Also cut two white frames for each card and glue them together.
Paste all cutouts to the front of the cards.


Completed cards.


Thank you for stopping by.
Janja


Tuesday, February 05, 2019

XOXO

Hello!  This is Sukie and today I'm sharing a project for my guest designer post.  I had so much fun creating this sweet card with the new Valentine's dies.
The Swinging Monkey was the focal point of my card.  Once I put him together, I added an extra heart to his belly for a whimsical look.  The sentiment was cut from the Valentine Phrase & More die set and the grass was cut from the Grass with Cattails die.  I simply trimmed off the cattails.  All of the die cuts were inked on the edges for some depth and dimension.
I wanted to create a fence for the background of my card so I simply cut strips of paper with my paper trimmer.  Two smaller strips were cut to be used horizontally on the fence.  The paper strips were inked on the edges.
I layered them together along the solid brown background.  Varying the sizes of the strips gives the fence a more natural appearance.
To finish off the fence, I added some bling stickers along each of the "posts" and adhered the grass along the bottom edge.
Nest, I added the sentiment at the top of the fence and then adhered the branch directly below ensuring the sweet monkey would fit perfectly.
Here are the dies I used on my card available here: