Showing posts with label Scalloped Stitched Rectangle Slimline. Show all posts

Saturday, May 22, 2021

Happy Birthday from the Circus Animals

Hello Scrapping Cottage friends! Thanks for taking the time to stop and visit with us today. It's Mary Marsh here bringing you the Saturday edition of the Blog.

We have a brand new release of dies in the online store. Your slimline cardmaking is going to get a lot easier. We have 9 Slimline designs and they are on a 25% off sale. These are wonderful, basic dies that should be a part of every card maker's collection especially if you are liking the new slimline style.

Today for your viewing pleasure I have a slimline birthday card using the Circus Train Animal dies + the Scalloped Stitched Rectangle Slimline die. 
I have a lot of nieces and nephews with young ones and I always seem to need a kids birthday card. These animals are perfect for a kids card. So let's get started on some details of how I created my card.

Design Steps:
I started my card this week with the layout. I saw this sketch #854 on Splitcoaststampers and I thought the layout would work well for the dies I am using. 
Next, I selected the background designer paper. I wanted something fun and found this bright dotted paper.
I cut it with the largest Scalloped Stitched Rectangle Slimline (3 1/4" x 8 1/4") die. The card base is at 6 1/2" x 8 1/4" and then scored at 3 1/4". I used pacific point cardstock (royal blue) cardstock. 
Then, I cut my animal images. The designer paper colors of blue, rose red and yellow would work for the hats and neck scarves the circus animals are wearing. I used different colors of cardstock to cut the animals. You could also cut in white and color with any medium you like i.e. Copic markers, Prismacolors pencils or distress inks. I forgot to take a photo of this step (lol)!

For element 3 of the sketch I used the largest Scalloped Circle die and then cut a portion off the bottom to give it a straight edge. I stamped my sentiment in pacific point ink. It's a long one line sentiment but with the help of my MISTI, I stamped on 2 lines. 
I started the assembly of my card. For element 2 of the sketch I cut another piece of pacific point designer paper 1" x 8", I attached the circle with double sided tape and then secured to the designer paper panel.  
Then I attached three of the Circus Animals in the circle using dimensional adhesive. The seal is attached in the corner for element 4 of the sketch. Instead of him balancing a ball, I have him holding a balloon. It's cut from the Clown with Balloons die. 
To finish off my card, I attached the image panel to the card base with double sided tape. For the 2nd  instance of element 4, I cut a spray of stars from the Circus Side Show die and attached to the right corner. I thought the middle looked empty so I added some rose red enamel dots. 

And that's it for me for this week. I will be back on Tuesday for our Throwback Tuesday post. See you then.

Dies I used to create card:


Saturday, May 15, 2021

To My Favorite Gnomie

Happy Saturday!  It's Jeanne today with a card for you and your favorite gnomie.  I love the new Slimline dies - they offer such fun options for card layout.  I've used dies from both Slimline and Spring release on this card.

To begin this card I cut the gnomes and flowers from white cardstock using the Bunny Gnome 1, Bunny Gnome 3, and Spring Bloom Cottage dies from the Spring release.  I used Distress Oxide ink to colors the images.

I cut the back panel using the largest of the Nested Rectangle dies and the scalloped panel using the largest of the Scalloped Stitched Rectangle dies.

For the scene panels I cut two rectangles from white and a green pattern using the third largest of the Nested Rectangle dies, and a frame with the Windows die.

I made a stencil with the Cloud dies to ink the blended sky.  For my ground, I cut a gentle curve using the Hills dies on the green patterned paper. 

 I then assembled all the layers and stamped my sentiment in the center panel.

After all my panels were assembled I added my gnomes and a few 3D flowers.  A fun card to let friends know you care!

I hope you've enjoyed my card today!  Be sure to visit the online store where the Slimline dies are on sale right now for a limited time!  Slimline cards are really on trend and now is a great time time to add to your stock of basic dies!

Products used:


Thanks for visiting today.  I hope you have a wonderful weekend!


Friday, May 14, 2021

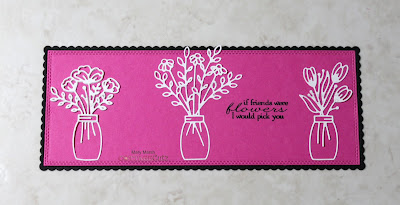
If Friends Were Flowers Slimline

Hello Scrapping Cottage friends! Thanks for taking the time to stop and visit with us today. It's Mary Marsh here bringing you the Friday edition of the Blog.

We have a brand new release of dies in the online store. Your slimline cardmaking is going to get a lot easier. We have 9 Slimline designs and they are on a 25% off sale. These are wonderful, basic dies that should be a part of every card maker's collection especially if you are liking the new slimline style.

Have you ever needed to make a last minute card for a gift or a birthday or anniversary that you forgot about? Well, today I have for your viewing pleasuring a CAS style card that would be very easy to reproduce.  

I am using the Spring Flowers in Jar 1, 2, 3 dies and I created a card in the slimline style. So let's get started on some details of how I created my card. 

Design Steps:

I started by cutting the images in white cardstock. I thought they would standout nicely against a bold and bright background. 
Next I cut the image panel. I used just the double stitched rectangle from the new Lift Flaps Stitched Rectangle Slimline die and cut it from a bright magenta cardstock. 
I wanted an additional layer so I used the largest of the Scalloped Stitched Rectangle Slimline and I cut in black cardstock to continue with the bold look. 
I stamped my sentiment in black ink directly on the magenta image panel.  With this sentiment I will be able to use this card for a variety of occasions by stamping another sentiment on the inside. 
Now I am ready to start card assembly. I attached the image panel to the black scalloped layering panel with double sided tape. Then I attached the Flower jars using Ranger multi medium matte. 
To complete my card I cut a white card base measuring 3 1/8" x 8 1/2". I will add another sentiment on the card inside. 
I attached the image panel with double sided tape and scattered a few white faceted enamel dots. 
And that's it for me for this week. I hope I have given you an idea for a slimline card using both the Spring and Slimline dies. See you next Saturday.

Dies I used to create card:


Sunday, May 02, 2021

Home Sweet Home

Hi!

It's Anja here. I have a Spring card for you today. I combined this lovely cottage with different slimline dies.

For this card I used:

- Cottage Cutz dies (Spring Bloom Cottage, Nested Stitched Rectangles Slimline, Scalloped Stitched Rectangle Slimline, Grass Slimline, Clouds Slimline),

- Distress Inks,

- white card base (9,5x22 cm),

- violet card stock for die cuts,

- white card stock for die cuts,

- silver pigment ink,

- black pigment ink,

- alphabet stamps,

- acrylic block,

- paper glue. 


First I cut and colored the cottage.

Next I did the background. I made a paper stencil with one of the clouds slimline dies and used it to make cloudy sky. I colored directly on the scalloped stitched rectangle. After the clouds I stamped the sentiment.

Then I cut and colored the grass out of the second largest nested stitched rectangle.

I also cut the largest nested stitched rectangle, this time from violet card stock.

 
When I had all the parts ready I finished my card. And this is the final result. 


Before I go I invite you to The Scrapping Cottage online store to check The National Scrapbook day Sale

And that's all from me for today. Have a nice Sunday and see you again next week. 

Anja Z.


Cottage Cutz dies I used: