Showing posts with label Savanna. Show all posts

Monday, September 18, 2023

Safari Slimline Slider Card

Welcome back Scrappin' Cottage friends!

Kris here to share some Monday inspiration with you☺  I made a Safari-themed Pull Tab Slimline Slider card (that's a mouthfull! LOL!)  I made this for my great-nephew's 6th birthday.  

(click the pic to see it larger)

COTTAGECUTZ PRODUCTS:

SUPPLIES:
small magnets
foam tape or strips
ink blending ink pads
glue

CUTTING & SCORING:

• Cut base (green) at 7-3/4" x 9" 
-- score the shorter edge at 3-7/8"
Cut (black) at 8-1/2" x 3-1/2" 
• Cut (black) at 3/4" x 2-1/8" (cut 2 of these)
• Die cut (white) largest Scallop Stitched Rectangle Slimline
• Die cut Safari elements (die cut the cruiser 2x)


DESIGN STEPS:

• With the black layer, use the extended die technique to elongate the cut using the 2nd smallest Nested Rectangles Slimline set as pictured below.


• With the white scalloped layer, die cut the lower portion as pictured using the straightest die from the Hills Slimline set.


• Add vintage photo D.O. ink (or color of your choice) to the lower scalloped part.

• Ink blend the top scalloped part with D.O. wild honey, carved pumpkin, crackling campfire, and candied apple (or colors of your choice).


• Color the Safari die cuts (if cut from white cardstock) 


• Add glue to the TOP only of black layer, leaving 1/8" border around top and sides and add TOP scalloped layer.


• Glue the tree to the bottom of the top scalloped layer as shown below.

• Add glue to bottom of black layer, leaving 1/8" border and add BOTTOM scalloped layer, overlapping the top just a tiny bit.


• Affix the rest of your Safari die cuts.


•  On the back of the safari cruiser, add 2 magnets (I used glue and Scor Tape):  one towards the front and one towards the back.  (I used 3 because I messed up on the placement of my slider wrapper the first time, so I went back and added a 3rd magnet and moved my wrapper.)  


• Add glue and/or Scor Tape to magnets and add the 2nd cruiser on top.  Cover up backside as much as you can w/out adding builk.


• Add glue to the center of both slider wrappers as shown below.


• Add one near the edge of opening on the back and glue the next one 1/2" - 3/4" away from the first (see photo below)

**Important:  the placement of the 2nd Wrapper prevents the Cruiser from running over our baby gorilla when the magnet hits the wrapper!!

• On the front, place cruiser to the far right of card and holding it there, turn card over and place your magnets where they automatically want to attract them.  

•  Add foam strips or tape to the back, around edges and close to the slider opening without hindering it from moving.  


• Add glue to magnets and carefully slide the slider tab thru the wrappers and over the magnets.  You will have 1/4" of the tab sticking out -- this is what you'll need to grab and pull the slider.  


• Pull slider out and write your sentiment, or emboss a stamped sentiment in white!  I used a white and a gold sparkly pen.


• Remove tape backings and attach to center of card front!


I hope you enjoyed this tutorial and that you get crafty with your favorite CottageCutz dies!

~Kristine


Sunday, September 04, 2022

Labor Day SALE and a Bday Box Card

Happy Labor Day Weekend friends!  Kris here with a Birthday Box Card that I made for my daughter who loves cows and she was so excited to get this!  Before I get to it, I want to remind y'all of the BIG LABOR DAY SALE!! Up to 65% OFF so many dies -  Sale ends Thursday, September 8, 2022 at 9:00 PM Pacific Time so HURRY OVER and save!!!  

Also - be sure to check out our NEW CHRISTMAS RELEASE which is also on SALE!

I purchased these adorable Country Farm Cows at last year's Labor Day Sale & right now ALL of the dies I have used on my card today are 40-60% OFF (except the balloon on the back as it's retired.)  I have listed and linked all the products I've used on my card at the end of this post! ☺


This next one is of the BACK of my card - empty space to write a personal message.

And yes it does fold flat to fit into an envelope! 


Design Steps:

1.  I cut a white rectangle using the largest die from the Nested Wacky Stitched Rectangles - then stenciled some clouds with Tumbled Glass Distress Oxide ink.  *Optional:  I then cut off 5/8" from the bottom of my rectangle to fit the size card I was wanting to make, but it's not necessary.


2.  I cut a piece of blue cardstock at 3-1/4" x 4-7/8" and mounted my cloud layer on top.  *If you didn't want to cut the bottom off of your cloud layer in step #1, then you would cut your blue piece at 3-3/4" x 4-7/8" ☺


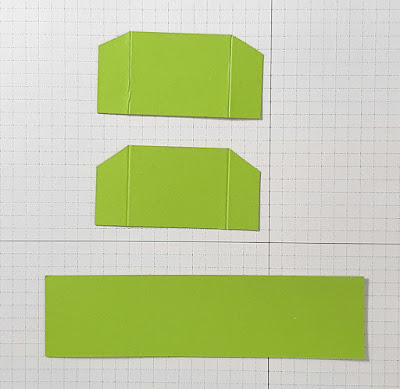
3.  I cut (2) pieces of green at 2-1/2" x 1-1/4" - then scored 1/2" from each end and mitered the top of flaps.  These are my side pieces.

4.  I cut a piece of green for the front of box at 1-1/4" x 5"


5.  I cut a couple different colors of green (can be all one shade) into strips at 5-3/4" x 1-1/2" and scored 3/8" in from each end.  These are the inside "shelves" that we will attach our cows to later. 


6.  I then used various dies from the Hills Slimline set to cut the very tops off of each shelf piece.  


7.  I then cut the side flaps down along the score line as shown below:


8.  Next, with my 2 side pieces, I glued the left flap to the bottom left edge of my cloud piece, and the right flap to the bottom right edge of same piece as shown below.


* For the next few steps, we're not going to do anything with that right flap.  Just going to work on the left side.

9.  I added glue to the left flap of my side piece and attached the left side of my front piece.


10.  Decide which hill you want to be furthest back and add glue just to the left flap and bump it up to the score line of your side piece as shown below, making sure the flap is below the top edge of your side piece.


11.  Fold that hill over to the right and add glue to just the left flap of your middle hill.  Then attach it up to the scored line of the back hill as shown below.


12.  Fold that hill over to the right and repeat for the front hill.


13.  Add glue to ALL 3 tabs on the hills fold your right side piece over onto them.

14.  Add glue to the flap of your right side piece and attach your front panel onto it.


15. Die cut a fence using the Farm Fence Slimline die.  Add glue to the back leaving the top horizontal beam w/out glue as it will be sticking above your green front piece a li'l bit.  Attach to the front panel. 


16.  Die cut, color and piece together Savanna trees, Country Farm Cows, and Happy Birthday w/ Shadow.


17.  I added glue just to the lower portion of my sentiment and attached it to the top of my card base as shown below.

18.  I attached my die cuts to the various hills as shown.


19.  For the back of card, I cut a white piece as in step 1, cutting off 5/8" from bottom.  Then I cut a piece of green cardstock cutting the top with a Hills die and the bottom portion with the same Nested Wacky Stitched Rectangle die.  I also cut a cute balloon and done!

Here are the Products I Used:


THANK YOU for taking time to visit today!  I hope I inspired you to make a box card with your favorite CotageCutz dies!  

I'll be back tomorrow with a card from the NEW CHRISTMAS RELEASE!

~Kristine

Sunday, February 07, 2021

Go Wild

Hi!

It's Anja here. I have a very simple card for you today. My Circus dies are still on its way so I made another card using the Safari dies.


For this card I used:

- Cottage Cutz dies (Safari Cruiser w/Banner, Safari Phrases, Savanna),

- Distress Inks and Oxides,

- craft card base (12,5x18 cm),

- white card stock for die cuts,

- silver pigment ink,

- brushes,

- paper glue. 


First I cut and colored the car and the sentiment.

Next I did the trees.

And last I did the background. I colored directly on the craft card base with Distress Oxides. I used different types of brushes for coloring.

And when the color was dry I added the colored pieces to the card base and my card was done.


This is all from me for today. See you again tomorrow for my Monday post.

Have a nice Sunday!

Anja Z.


Cottage Cutz dies I used for this card: