Showing posts with label Safari Lion. Show all posts

Wednesday, June 02, 2021

Have a Roaring Birthday

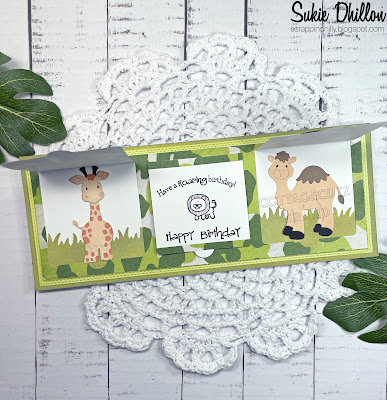
Hello!  This is Sukie and today I'm sharing an interactive card for my design team day!  The new Slimline dies certainly made it easy to create this fun card.

I used the Lift Flaps Stitched Rectangle Slimline die set to cut out the double stitched rectangle and the lift flaps.  I cut out an extra lift flap in white card stock and cut it off on the attached end.  I also cut out the Safari Lion, Safari Rhino, Safari Giraffe, Safari Zebra and Safari Camel.  The grass border is from the Grass Slimline die set.

The safari animals were cut out in both white and colored card stock and shaded with some inks.  The first step in my design process was to layer the lift flap die cut on top of the the grassy background.  This piece was then adhered onto my card base.
Next, the sweet animals were nestled inside of the lift flap frames.  I trimmed the giraffe slightly so that he would fit.
The lion and rhino were adhered on top of the right and left side flaps. 
I stamped a couple of sentiments along with a lion image on the white card stock flap and adhered it to the other flap adding a fun element to my card.
Here are the die sets used on my card, available in the store:

Friday, April 30, 2021

Interactive Slimline Birthday Card

Happy Friday!  It's Jeanne today and I have a fun, interactive card featuring the new Slimline dies and dies from the Safari release. Both releases are on sale right now for a limited time at the online store.  The interactive part of this card are the peeking windows from the Lift Flap Slimline die that allow for a surprise.  In fact, this card does not even open up - the "inside" of the card is under the windows!

To start, I cut a lion, zebra and baby gorilla along with leaves and sentiment from the Safari release dies.  I cut oval Windows Slimline die set and stamped my sentiment on that.

I set this all aside to construct the card itself. 

After picking some safari themed paper I adhered it to a light weight cardstock using a self adhesive sheet.  I wanted to use this for my flaps but the paper was too thin and had a pattern on the back.  By adhering these together it gives the flaps a bit of weight and a solid back side.

Using the largest Nested Rectangle I cut a card base from brown cardstock.  Since this card doesn't open like a traditional card, this IS my card - it will not be glued to side or top opening base.  I used the third largest rectangle to cut a white panel for underneath my window flaps.  This rectangle is just slightly smaller than the Lift Flap panel.

Using coordinating paper, I cut two 2 1/2 inch squares for behind my top and bottom windows and glued those to the white panel.  To get them in place I drew very light pencil lines where the window opening would be.  I also used this to place my "Happy Birthday" sentiment.  I used a slightly off-kilter sentiment so if it weren't lined up perfectly, it wouldn't matter.

I stacked the panels and glued them to the card base.

When gluing the elements to the flaps take care not to overlap the hinge side.  You can have elements hang off the outer edges and the windows will still open.  

The lion is popped up using foam dots.

The other two animals are glued to the the top and bottom inside windows. 

Finally, I added some bronze "photo corners" to my flaps panel.

I hope you've enjoyed my card today.  Interactive cards are always delightful to give (and receive.)  These Lift Flaps can be adapted to any theme to make your card extra fun!

Dies Used:


 Thanks for stopping by!  I hope you have a fun and creative weekend!


Sunday, January 17, 2021

Missing You

Hi!

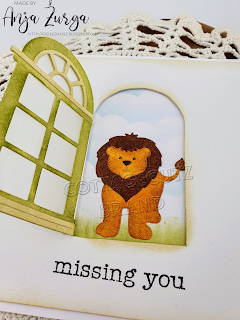
It's Anja here. I have another card for you today. This time I made it with a window and a cute lion on the other side.

 
For this card I used:
- Cottage Cutz dies (Safari Lion, Classic Arched Window),
- Distress Inks,
- white card base (15x15 cm),
- white card stock for die cuts,
- watercolor paper for background (14x14 cm),
- pencil,
- paper cutting knife,
- black pen,
- white pen,
- scissors,
- plastic foil,
- folding bone,
- plastic stencil (clouds),
- sentiment stamp,
- acrylic block,
- black pigment ink,
- adhesive foam pads,
- paper glue. 

First I cut the window with the die. I used scissors next and straighten the edges. I used this as a stencil to draw the shape of the window on the watercolor paper I trimmed in advanced.

Next I cut another two windows and the lion. I color all the pieces and glued it together.

Then I cut out the window using a cutting knife.

Then I put a piece of foil between two windows and glued it together. Before that I folded the smaller parts of the window so that I can glued the window to the background.

Next I colored the background directly to the card base. I used a plastic stencil to color the sky.

Then I used a bit of color to emphasize the edges of the background. I also shaded around the edges of the open window.

After that I added the sentiment.

 
And then I just put all the pieces together on the card base. I used adhesive foam pads to glue the background on the card base. Last I added the lion. And my card was done. 


That's all from me for today. Have a nice Sunday and see you again next week.

Anja Z.


Cottage Cutz dies I used:


Thursday, December 31, 2020

Jungle Birthday

 Hello Scrapping Cottage Friends

It is Pam on the blog this fine Thursday!

I hope you all had a wonderful Christmas.  And I also want to wish you a very Happy New Year! I am getting started on my Birthday cards for 2021!  Luckily I don't have any birthdays in January so that gives me a months head start.  I am using some of the adorable critters from the Safari Release.  Today I used the cute lion and giraffe on this fun birthday card.


Design Steps

1.  Use a piece of kraft card stock as the A2 base, green card stock cut 4 1/8 x 5 3/8, DP cut 3 7/8 x 5 1/8, use the second from the largest Wide Pierced Rectangle Frame Die to cut a green frame and finally a piece of white card stock 2 1/2 x 3 1/2
2.  On the small piece of white card stock sponge in clouds using blue ink and a stencil
3. Glue the green card stock to the kraft card base and then glue down the DP to the green card stock.  Glue the white cloud rectangle to the center of the card.  Place dimension tape to the back of the frame
4.  Center the frame right over the top of the clouds and then pop it down
5.  Cut all of the leaves out of 3 shades of green using the Safari Adventure Gang die and the Safari Monkey, cut the pieces for the lion using the Safari Lion die and last cut all the pieces for the giraffe using the Safari Giraffe die.  Assemble the animals using a fine tip glue

6.  Arrange your animals and leaves to create your jungle scene

7.  Stamp the sentiment and then use the Pierced Circle die to cut it out.  Add to your scene and your card is complete

CottageCutz Products


Happy 2021 to everyone and I hope you have a very blessed year!

Pam