Showing posts with label Rectangle Set. Show all posts

Tuesday, May 07, 2019

Somewhere over the rainbow

Hi, Janja is here with you.
I found an inspiration for today's card in a lullaby for babies. I made a baby boy card with sweet unicorns.


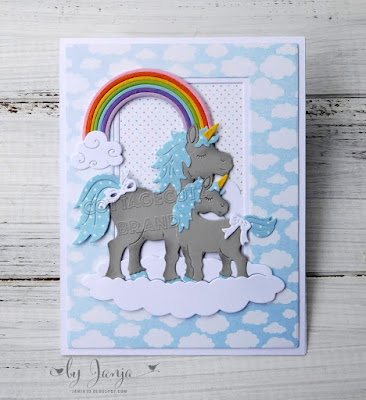
- CottageCutz dies: Rainbow With Clouds, Sweet Unicorns, Fairytale Castle (cloud), Clouds & Sun, Rectangle Set, Stitched Rectangle Set
- white card base: 4.25 x 5.5" (10,8 x 14 cm), folded
- patterned paper: 4 x 5.2" (10,2 x 13,2 cm)
- white and colored cardstock
- gray ink pad
- glue, double-sided adhesive tape, self-adhesive foam pads

From colored cardstock die-cut both unicorn. Add the shading on the edges with ink pad and brush. Put all the pieces together with a glue.


Die-cut the rainbow and clouds.


Trim selected patterned papers and a white cardstock.
With two differently large dies, first die-cut the rectangle into the patterned paper. Place it on a white cardstock and die-cut a smaller rectangle.
Paste the clouds into the background and attach the frame.


Now we have everything ready to finish the card.


Have a nice day. 
Janja


Saturday, April 13, 2019

Magical Unicorn Birthday (new die)

Hello Scrapping Cottage friends! Thanks for taking the time to stop and visit with us today. It's Mary Marsh here bringing you the Saturday edition of the Blog.

We have a new release of dies in our online store. If you haven't seen the Magical Fantasy release yet, you have to drop by the store and check it out. These new dies are all so cute and whimsical. There are 27 new designs and I am in love with everyone of them.

My good friend asked if I could make a birthday card for a little girl who loves unicorns. I was happy to oblige her request. I decided to use the Princess Pony die and turn it into a unicorn. There is a horn included with the die.  So let's get started with some details on how I created my card.

Step 1: As I have said so many times before, having a layout in mind at the start of my card is always a big boost for me. It jump starts my creative thought process. I love working with the sketches that are out there in the online world. That way I just choose the colors and designer paper and I am good to go.
I liked this week's sketch #744 from Splitcoaststampers.
The center panel was perfect for the unicorn pony and also would allow my designer paper to be seen. I found this paper the other day at Hobby Lobby and thought it would be perfect for any of these new dies. The swirl pattern seemed a bit magical to me. I also used white mesh ribbon for element 3 of the sketch.

Pink Card Base: 4 1/4" x 5 1/2"
Pink Designer Paper Layer: 4 1/8" x 5 3/8"
Pink Stitched Scallop Rectangle Panel: 2 7/8" x 4 7/8" (2nd largest die)
White Image Panel: 2 5/8" x 3 5/8" (Rectangle Set 2nd largest die)
White Mesh Ribbon:  1 1/2" x 4 1/2"(Element 3 on sketch)

Next I moved onto cutting the unicorn. I liked the colors on the packaging so I stayed with those. The detail is amazing, and I think she has the cutest face and eye.
I stamped my sentiment in the upper corner of the image panel. I was just looking to use only the "magical" word so I taped off everything else. Stamped in grape ink and cut my unicorn word from matching grape cardstock.
To cover element 6 of this sketch, I decided to use a cloud. I cut in the same pink cardstock as the unicorn and I used the Clouds & Sun die. I stamped my birthday word in grape ink.

Step 2: Now that all my elements are cut, I am ready to start card assembly. I started by securing the mesh ribbon to the designer paper panel and then attached that to the card base.

Next up is the image panel. I attached the unicorn phrase with Ranger multi matte medium. This phrase is part of the new Magical Unicorn Dreams die.On the cloud, I used double sided tape. Then for the unicorn, I used dimensional adhesive to lift it somewhat off the background.
I finished my card by adding some light and dark purple stars. They are part of the Magical Unicorn Dreams die. I hope I have given you an idea for a way to use this new die. Starting next Wednesday we will have 4 days of group posts using these new dies as well as the Spring dies. So make sure you stop by to see all the beautiful cards. 


Dies I used to create card:


Saturday, March 09, 2019

Rainy Day Duck (new die)

Hello Scrapping Cottage friends! Thanks for taking the time to stop and visit with us today. It's Mary Marsh here bringing you the Saturday edition of the Blog.

We have a new release of 36 Spring dies in the online store. There are a variety of designs so perfect for Easter or Spring cardmaking. Take a look in the store you definitely won't be disappointed.

For my card today I am using the new Rainy Day Duck die. This little ducky has such detail right down to the water puddle and splashes of water coming off the puddle. It would be so perfect for a get well card, a thinking of you, a thank you and even a birthday card. So let's get started with some details on how I created my card. 

Step 1: Having a layout in mind at the card start is always a big boost for me. That way I can just choose the card colors and designer paper and I am good to go. I liked this week's sketch #739 on Splitcoaststampers because there are lots of layers and the image panel is big enough to show off the sweet little ducky. 
I looked through my designer papers to get one that would coordinate with the whimsical die cut image I was using. Well that took much longer than I anticipated (lol)!! I selected 4 papers before I settled on the one I am using on this card. Dotted paper always works for me. 
Teal card base: 4 1/4" x 5 1/2"
Teal dotted designer paper: 4 1/8" x 5 3/8"
Teal diamond paper (Layer 3 on the sketch): I used the largest die of the Rectangle set
White image Layer: Again I used the largest die of the Rectangle set
Next I cut the duck image. I used a daffodil cardstock for the body and a tangerine cardstock for the beak and legs. I selected another patterned paper for her umbrella and a coordinating cardstock for the handle. I cut the umbrella twice to give a little contrasting edge.


I love how the water puddle has splashes of water coming out to give the appearance of movement. CottageCutz dies are so detailed. I used the puddle of water as element 6 of the sketch. 

For the rain cloud and raindrops I used the Stitched Sun, Clouds and Umbrella die. I used dimensional adhesive on the rain cloud. The umbrella I used on my card is part of the Rainy Day Duck die. 

After I attached the cloud, I thought of adding a sentiment on the cloud. So I carefully removed it and stamped my sentiment. I decided to make this a thinking of you card. My cards are always a work in progress so sometimes I have to backtrack in the creating process (lol)!!! 
Step 2: Now that all the card elements are cut, I am ready to start assembly. Attached the background designer paper and the designer paper that is element 3 of the sketch with double sided tape. This is my favorite adhesive. 
For Element 4 of this sketch I decided to use purple cardstock. I cut it 1/2" x 4 1/8". 
 To complete my card I added the image panel and it was done. I hope I have given you some inspiration on a way to use this die. I made another card with these same dies and sketch but the card colors and paper are different. You can see that one here
That's it for me for this week see you next Saturday. 
dies I used to create card:


Tuesday, February 26, 2019

Coffee time

Hi, Janja is here with you.
Today I have prepared a card for coffee lovers.


- CottageCutz dies: Love Latte & Donut, Rectangle Set, Nested Stitched Scallop Rectangle Set
- card base: 4.3" x 5.3 "(11 x 13.5 cm), folded
- patterned paper
- colored card stock
- colored ink pads
- embossing powder - white
- double-sided adhesive tape, foam tape, glue

Cut out cups and donuts from colored card stock. Emphasize the edges with ink pads. Paste all the pieces together.

Stamp a sentiment with a VersaMark ink on a brown card stock. Apply white powder and heat emboss. At the end cut the sentiment.


Prepare a card base. Cut three rectangles. Paste them on the front of the card with a double-sided adhesive tape.


Attach cups and donuts with foam tape to the background.


Finished card.


I would like to invite you to the online store. The new Spring dies are on sale for 25% off. 

Have a nice day.
Janja